Hello dear readers! I recently wrote about how to root Android in . but there I did not fully outline the whole essence of rooting the Android system. In today's article I would like to describe this process in more detail. I recommend that you first subscribe to the blog update, so as not to miss informative articles.
1. Introduction
At the time of writing this guide, approximately 80% of the world's population owns a mobile phone. About 1.08 billion of these devices are smartphones.
If you're reading this, it means you've clicked on the wrong link on Google, or you're part of a proud legion of users who have made phones part of almost every aspect of their business. Everyday life. Most likely, you have been looking for a profitable offer for a long time, perhaps you have read numerous reviews, were interested in the opinions of your friends, and, during all this turmoil, you came across the term “rooting”, which you decided not to mess with, considering it another technical nonsense. Why bother with a good smartphone if he already copes with all the tasks?
Time passes. Newer, more demanding apps and Android OS updates actually force you to buy new phone. However, before you buy a new model, consider another fairly simple way out. You can get the most out of your favorite phone by rooting it.
Root rights will allow you to unleash the full potential of your phone, giving full unlimited access to all its settings. Manufacturers usually disable such things so that users do not accidentally damage their own devices. But if you found this guide yourself, then you are ready to take on this additional responsibility.
Rooting opens up practically unlimited possibilities. You can block annoying ads in apps, increase speaker volume, use your phone as a hotspot WiFi access, despite the restrictions, as well as install updates operating system, even if they don't officially support your model. In addition, you can install custom builds designed to improve performance. Tempting, right?
In this guide, we will mainly use the term phone, but as you probably know, there are many devices that run on Android (tablets, eBooks, netbooks, watches, consoles and so on). Given the active community of fans of this operating system, all existing devices can be rooted. And if you have not found a suitable guide, wait a week and it will surely appear.
If you are still not well versed in Android, we recommend that you read the latest
Before you begin, familiarize yourself with the basic terms, the knowledge of which will make your life easier. Thanks to this, you will be able to deal with any guides and troubleshooting instructions. After all, as any Google user knows, finding the right information is much faster if you know the right keywords.
Firstly, what is root rights or rooting? We have already mentioned this word several times. Rooting is a process that allows the user to modify the operating system (in our case, Android), in order to obtaining administrative or privileged rights (root access) to subsystems. Through this, the user can overcome the restrictions imposed on the phone by the manufacturer or operator. First of all you need make a backup of your system although this step is not required. Then unlock the bootloader (details below). After that you will be able to get root access or superuser rights.
In this section of the guide, we will cover all the terms that you may come across during your first dive into the bowels of Android. Naturally, it is impossible to reveal everything in one article, so you will have to familiarize yourself with the terms that are missing here over time. In addition, we will take a detailed look at each of the major versions of Android available on this moment. So if you have to choose a custom ROM, you will be able to determine its functionality by the version of Android it is based on.
So let's go through some terms in alphabetical order. Please contact us if you have any questions while reading the following sections of the manual, or while searching for information on the Internet.
Apps2SD: An application that allows you to move other programs from your phone's internal memory to a microSD card. Works only after rooting and is one of the most popular apps for devices with limited internal memory.
ADB (Android Debug Bridge): console utility that allows you to interact with a connected device on Android based or emulator.
Android: hardly needs an introduction. Based on the operating system installed on the device you want to have full access to.
Android 1.0-1.1: the first two versions of Android. Most likely, you will not find ROMs based on them. Version 1.0 was released on September 23, 2008. It was installed on the HTC Dream phone.
APK (Android Application Package): The file format in which Android applications are packaged. You will most likely need to download some of these files after rooting if you want to install a custom ROM.
Alpha: the first phase of software testing. At this stage, programs are most often unstable, which can lead to crashes or, in worst cases, loss of information. A large number of popular ROMs and kernels are in alpha testing.
baseband: A term describing signals and systems whose frequency ranges from 0 hertz to cut-off frequency, maximum bandwidth, or the highest signal frequency.
boot animation: Animation that plays when the phone is turned on. Many ROMs have their own animations built in.
Bootloader: a program that controls the boot process of the device.
Bootloop: A relatively harmless side effect of a rooting procedure that fails. The phone plays the loading animation endlessly.
beta: the stage of software development following alpha. Although beta versions of applications are usually more stable, they are still not ready for release. Programs written by non-professional developers often remain in beta for a very long time.
Cache: A special area in the device's memory where data is stored for faster access later.
CPU (central processing unit): You've probably heard this term before. Without going into technical details, the processor is the hardware that processes all the information you need to kill time while playing Angry Birds.
Cupcake (Android 1.5): Released April 30, 2009. This update was based on Linux kernel version 2.6.27 and includes the following functionality:
- Support for third-party virtual keyboards with autocomplete and custom dictionary.
- Support for widgets - miniature applications that can be embedded in other applications (for example, the main screen) and keep track of periodic updates.
- Video recording and playback in MPEG-4 and 3GP formats.
- Option to automatically connect to a Bluetooth headset, as well as support for stereo sound (A2DP and AVRCP profiles).
- The web browser now has copy and paste functionality.
- Photos are now displayed for favorite contacts.
- Added date and time to events in the call log. By clicking on a contact in the log, you can get instant access to his card.
- Animated switching between windows.
- Ability to upload videos to YouTube.
- Ability to upload photos to Picasa.
Dalvik: An Android virtual machine designed to run Dalvik executables (.dex).
Dalvik Cache: a separate cache that stores information about your applications so that they load faster. You will often be asked to clear this cache, as well as the regular cache, when installing custom ROMs and kernels.
Donut (Android 1.6): This update was released on September 15, 2009. It is based on Linux kernel version 2.6.29 and includes the following new features:
- Voice and text search now works in bookmark history, contacts and the Internet.
- Developers can include their content in search results.
- A multilingual speech synthesizer that allows anyone to Android application"speak" a line of text.
- Updated search in the Android Market and the ability to view screenshots of the application.
- An integrated interface for working with the gallery, photo and video camera, allowing you to easily switch between photo and video modes.
- Ability to mark images to be deleted.
- Updated support for CDMA / EVDO, 802.1x, VPN and speech synthesizer technologies.
- Added support for WVGA resolutions.
- The speed of search and operation of applications using the camera has been increased.
- Extended gesture framework and added GestureBuilder, a new tool for developers.
Eclair (Android 2.0): Released October 29, 2009. This update is based on Linux kernel version 2.6.29 and includes the following new features:
- Advanced account sync, allowing users to add multiple accounts to sync contacts and email.
- A new email interface that allows you to view emails from multiple accounts on the same page.
- Bluetooth 2.1 support.
- The ability to click on a contact's photo and select one of the available actions: call, send SMS or email.
- Ability to search through all saved SMS and MMS messages. Old messages in dialogs are automatically deleted when a certain limit is reached.
- Lots of new camera features including flash support, digital zoom, scene mode, white balance, color effects and macro.
- Increased typing speed on the virtual keyboard. A smart dictionary that remembers used words and substitutes names from the contact list when autocomplete.
- Updated browser interface with bookmark icons, double tap zoom and HTML5 support.
- The improved calendar now shows the status of each invitee and allows you to invite new guests to the event.
- Optimized hardware performance and redesigned user interface.
- Support more resolutions and screen sizes with improved contrast.
- Improved Google Maps 3.1.2.
- An improved MotionEvent class that allows you to track multiple simultaneous touches.
- Animated wallpaper on the main screen.

: This term refers not only to the Android operating system, but also to computers in general. Means exploiting program vulnerabilities to achieve unpredictable results.
EXT (Extended File System): the first file system designed specifically for Linux.
force close: Slang term for a glitch in Android apps.
fastboot: diagnostic setting for modifying the settings of the flash memory file system via a USB connection.
flashing: Memory used in all Android devices.
Froyo (Android 2.2): Released May 20, 2010. This update is based on Linux kernel version 2.6.32 and includes the following new features:
- Memory and performance optimization.
- Additional increase in application speed with the help of JIT compilation.
- Integration of the V8 JavaScript engine used by Chrome into browser applications.
- Support for C2DM service, allowing you to send notifications.
- Improved support for Microsoft Exchange, including security policies, calendar synchronization, and remote data wipe.
- Improved app launcher with separate shortcuts for phone and browser apps.
- USB tethering and Wi-Fi hotspot functionality.
- An option has been added to disable access to data over the mobile network.
- Updated application for accessing the Android Market. Added functions of its group and automatic update.
- Quickly switch between different languages and their dictionaries on the virtual keyboard.
- Voice dialing and contact sharing via Bluetooth.
- Support for desktop and in-vehicle Bluetooth docking stations.
- Support for passwords that include letters and numbers or only numbers.
- Support for file upload fields in browser applications.
- Ability to install applications in extended memory.
- Support for Adobe Flash.
- Support for high resolution screens (320ppi), such as 4-inch 720p screens.
- The Gallery allows users to view sets of images using a zoom gesture.
Gingerbread (Android 2.3): Released December 6, 2010. This update is based on Linux kernel version 2.6.35 and includes the following new features:
- Simplified and faster user interface.
- Support for ultra-high screen sizes and resolutions (WXGA and above).
- Built-in support for SIP VoIP telephony protocol.
- Faster and more intuitive virtual keyboard typing with improved autocomplete and voice input mode.
- Enhanced copy and paste functionality that allows users to highlight words with a tap.
- Support for the Near Field Communication (NFC) standard, which allows you to read the NFC tag embedded in a poster, sticker or advertisement.
- New sound effects such as reverb, equalizer, headphone virtualization and bass boost.
- A new download manager that gives users easy access to any downloaded file from a browser, email, or other application.
- Support for multiple cameras on one device, including the front camera if present.
- Video playback in WebM/VP8 formats and support for AAC audio encoding.
- Improved power management, giving you more control over the apps that keep your device active for too long.
- Improved support for embedded development tools.
- Migration from YAFFS to ext4 in new devices.
- Improvements in sound, graphics, and input for game developers.
- Parallel garbage collection that improves performance.
- Built-in support for more sensors (such as gyroscopes and barometers).

: You will come across this term when you start installing custom ROMs and kernels. The governor controls the speed of the processor. Once you have Superuser privileges, you can customize this setting as you wish.
Honeycomb (Android 3.0): Released February 22, 2011. This is the first release of Android exclusively for tablets. It is based on the Linux kernel version 2.6.36 and first appeared on the Motorola Xoom tablet, offering the following changes:
- Optimized tablet support with a new virtual and "holographic" user interface.
- Added a system bar with quick access to notifications, status, and navigation buttons. Available at the bottom of the screen.
- An action bar has been added that gives access to contextual options, navigation, widgets and other types of content at the top of the screen.
- Simplified multitasking. By opening recent apps in the system tray, users can access a list of active apps and can quickly switch between them.
- An updated keyboard that lets you type faster and is optimized for larger screens.
- Simplified, more intuitive copy and paste interface.
- Numerous browser windows have been replaced by tabs. Added autocomplete forms and a new "incognito" mode that allows you to browse sites anonymously.
- Quick access to camera exposure, focus, flash, zoom, front camera and other functions.
- Ability to view albums and other gallery collections in full screen mode with access to thumbnails of other photos.
- A new two-pane contact list interface and fast scrolling make it easier for users to organize their contacts and find the entries they need.
- A new two-pane email interface that allows users to select one or more messages and makes them easier to view.
- Support for Google Talk video chat.
- hardware acceleration.
- Support for multi-core processors.
- Ability to encrypt all user data.
hot spot: Slang term for a hotspot that provides access to the Internet via Wi-Fi.
hboot: equivalent to desktop BIOS.
Ice Cream Sandwich (Android 4.0): Released October 19, 2011 with Galaxy Nexus. This update was based on Linux kernel version 3.0.1 and includes the following new features:
- Increased speed and performance.
- Virtual buttons in the user interface instead of capacitive or physical buttons.
- Widgets are placed on a separate tab in the manner of applications.
- Simplified folder creation.
- Customizable launcher.
- Improved voicemail with the ability to slow down and speed up messages.
- Offline search, two-column preview, and a new action bar at the bottom of the Gmail app.
- Ability to switch between Gmail dialogs by swiping left or right on the screen.
- Integrated screenshot taking (simultaneously hold the power and volume down buttons).
- Improved keyboard bug fixes.
- Ability to access the application directly from the lock screen (same as in HTC Sense 3.x).
- Improved copy and paste functionality.
- Improved voice integration and improved voice dictation mode.
- Unlock your device with facial recognition software.
- A new browser that allows you to open up to 16 tabs.
- Automatic browser synchronization with bookmarks in Chrome.
- New user interface font - Roboto.
- The "Data usage" section in the settings, which allows you to enable warnings when a certain limit is reached and disable data usage if this limit is exceeded.
- Ability to disable applications that use data in the background.
- Improved camera app with zero latency, panorama mode and the ability to zoom in while recording.
- Built-in image editor.
- New gallery template organized by location and people.
- Updated People app including integration with social networks, status information, and high-resolution images.
- Android Beam is a short-range data transfer feature that allows you to quickly share bookmarks, contacts, YouTube videos, and more.
- Hardware accelerated user interface.
- Scalable Widgets - This feature was already available in Android 3.1 for tablets, and now it's made its way to phones.
- Support for Wi-Fi Direct.
- Video recording in 1080p resolution.
Jelly Bean (Android 4.1-4.2): released November 13, 2012 along with LG's Nexus 4 and Samsung's Nexus 10. This update includes the following new features:
- Ability to take panoramic photos.
- Gesture keyboard (this feature is also available on Android 4.0 and later via google app Keyboard).
- Improvements to the lock screen, including support for widgets, and the ability to immediately switch to the camera.
- Manage notifications (via "Quick Settings").
- Screensavers that display various information in standby mode or when the device is docked.
- Using multiple accounts (only on tablets).
- Support for wireless displays (using Miracast technology).
- Accessibility enhancements: Triple-tap to zoom in on the entire screen, pinch to zoom and pan with two fingers. Gesture navigation and audio alerts for blind users.
- New clock app with built-in stopwatch and timer.
- All devices, regardless of screen size, now use the same interface template (program buttons in the center, the system bar at the top of the screen, and the home page with the application menu).
- Increased the number of extended notifications and active notifications for apps. Users can react to certain notifications directly from the notification panel without opening the app itself.
- Always available VPN.
- Premium SMS confirmation.
- Sending group messages.
Android 4.3 Jelly Bean On July 25, 2013, it was officially announced with few changes on board.
Android 4.4 "KitKat" On October 31, 2013, Google introduced the world to a new version of Android 4.4 The changes affected the main interface. Also, Android 4.4 has been optimized to work on budget smartphones with 512 MB RAM. There are a lot of changes in this version, mainly it concerns the interface and new nice features.

JIT (compile on the fly): also known as dynamic compilation. It was first introduced in Android 2.2 (Froyo). It is a technique designed to improve application performance.
Kang: is the name given to a release that introduces minor changes to the version of software it is based on, or released by another developer.
Kernel: Allows the phone software to communicate with the hardware. Therefore, all custom cores are designed to increase the efficiency of this interaction in order to use the hardware to its full potential. ROMs often contain their own kernels, although many standalone kernels can be found.
Mod: this is what we call any modified software, which performs functions for which it was not originally intended.
NAND: flash memory type
Nandroid: Using Nandroid, you can make a full backup of the system and then restore it with it.
nightly: builds compiled every day during development. Users of these releases often get the latest functionality, but have to sacrifice stability and have to make constant updates.
Open & Closed Beta: The names speak for themselves. The closed beta has a limited group of testers, while the open beta is open to everyone. These are two different methods for collecting most software performance information to improve it before the official release.
Overclock: a method by which you can force the processor to run at a higher frequency than the manufacturer intended. Considered slightly risky, but based on the experience of other users, you can find out to what threshold it is safe to overclock your processor.
Partition: like HDD desktop computer, the phone's built-in memory can be divided into several sections.
Recovery: phone boot option, which allows you to install custom firmware, as well as hard reset and backup.
Rom/Firmware A: ROM is a modified operating system for your phone that can be installed after rooting the device. They are usually packaged in jam files and contain functionality not available in official releases or simply allow you to install a new version of the OS on a device that for some reason does not support it.
RAM (Random Access Memory): A group of memory chips, usually a dynamic (DRAM) type, that functions as the main working area of a computer.
root: The first level of the system folder.
SBC: The little-known cousin of overclocking. The idea is to increase the battery life by breaking the limits. This will allow the device to work longer without recharging, but the battery life will decrease.
: installing applications bypassing the Android market.
Superuser/SU: Can be compared to administrative privileges in Windows. The Superuser account gives you full access to the device's system, allowing you to increase its potential (or cause serious harm if you are not careful).
SDK: also known as devkit. This is a set of tools that allows you to develop applications for a specific operating system. In our case, Android.
Stock: The basic official version of the Android system. the term can also be used to refer to any other unmodified software.
Underclock: process opposite to overclocking. You may ask, why would anyone deliberately slow down their phone? The answer is quite simple - to increase battery life when you are not using the full potential of the device.
undervolt: You reduce the processor power, thereby increasing the battery life and reducing the overall temperature of the device.
USB (Universal Serial Bus): You should be familiar with this term if you've spent any time near your computer. During rooting, you most likely had to connect your phone to your computer several times to transfer files and backups. Most phones use a microUSB variation of this port for charging and syncing.
XDA Developer Forums: as you read through this guide, you will see that we will be making quite a few references to these forums. XDA is the largest source of information for Android developers. Most of the major projects originated there and still publish updates in their forum sections. If you want to stay up to date with the Android scene, check back often!
3. Do you need Root rights?
Now, before you get down to business, you need to sit down, make a deep login and ask yourself a very important question: do I need full rights to the device?

Think well! For the first time, this procedure can take a long time, because you are still unfamiliar with the internals of the phone. In addition, studies show that a large percentage of users were never able to return to normal life after the first rooting. Now they dedicate their free time searching for new ROMs and kernels, as well as other not quite normal activities.
As for the real reasons why you need to get full rights, they range from increasing performance by installing custom ROMs and kernels to using a particular application that only works after rooting. If you came from dark side(using an iPhone), this is equivalent to a jailbreak.
Of course, modding Android smartphones is not so easy, which brings us to the next topic of the guide.
The risks of rooting are numerous, but fairly straightforward. You don't have to be afraid of anything if you are well prepared before causing permanent damage (the chances of this are extremely small, we just like to dramatize).

First of all, let's talk about the worst possible outcome - device failure. Breakdown in this case is not taken literally. In fact, this means that the phone has stopped working. This includes endless loading, inability to turn on, and so on.
Second, with great power comes great responsibility. In this case, rooting gives you superuser rights, but also weakens the protection set by the manufacturer or operator, allowing you, for example, to install infected applications that were not rejected by Android Market filters. Android malware is a harsh reality that a high percentage of users have had to deal with. The effects of infected programs can range from relatively harmless crashes to identity theft. So it's best to stock up on a good antivirus for your phone.
The last risk of rooting, which cannot be avoided under any circumstances, is the loss of warranty. The manufacturer does not bear any responsibility for damage caused to the device by third-party software. Such a prospect may seem intimidating, but if you are still reading this guide, then you are ready to do the necessary research before modifying your device to Android, which is the most reliable guarantee available.
If the previous section has taken away from you the desire to root your device, fear not. There are many ways to secure your phone. This was made possible thanks to the active community of Android users.
Probably the most important step if you're planning to root your device is to back up your files in case they get wiped. In today's era of computers and universal access to the Internet, you have probably come across this term more than once. Backing up files actually means that you copy them to another hard drive, flash drive, or, most conveniently, to a cloud service that allows you to access files from anywhere with an Internet connection.

As for the basic features, the Android operating system has built-in mechanisms for backing up data associated with Google accounts, such as contacts, wireless settings, and so on (Available through "Settings > Personal data > Backups and reset". More options can be found by opening "Settings > Personal > Accounts & sync").
In addition, you can manually copy photos, music, and videos from your phone to another computer by simply connecting it with a USB cable. The phone will appear as an external hard drive. Most of the files are stored in the DCIM folder. If you're on a Mac, you'll need to manually download the Android File Transfer tool from the Android site before you can connect your device as an external drive.
If these options are not enough for you, use one of the third-party backup applications available for the Android operating system. Among them are both paid and free. Also keep in mind that some of these programs only work after rooting.
To cover all the backup applications available on Android, you will need to write a separate guide. Therefore, we will consider the most popular programs that do not require rooting to use:
- : a well-known service, the mobile version of which allows you to effortlessly synchronize files on your phone and any other device with Internet access. There's even an option to automatically upload photos and videos you take with your phone, so you don't even have to lift a finger to back them up.

- : this application provides functionality comparable to Titanium Backup (we will talk about this program below in the section " Applications for users with full rights"). After downloading the application to your phone, you will need to download its desktop version, as well as drivers for your device. Helium works with all versions of Android from 4.0 (Jelly Bean) onwards. It allows you to not only backup individual applications, but also save their data, in case you do not want to create a large backup file and do not mind re-downloading some .apk files (for example, you want to keep the game save, which occupies 5 GB., But don't want to include it all in the backup file). There is also a paid version of the application that allows you to synchronize your phone with cloud services (only Dropbox, Box and Google Drive are currently supported).

- : If you only want to save things like text messages, bookmarks and call history, this app is the easiest solution. You can schedule it to run at a specific time and specify where to store backups, or automatically send them to your email. Super Backup also allows you to backup applications, but we recommend using other programs for this. The application has paid and free versions.

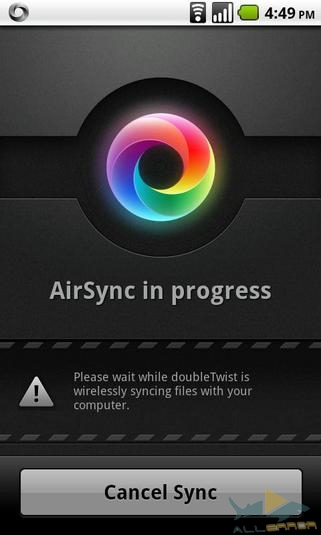
- : If you're using a Mac and don't like the idea of downloading and installing the Android File transfer tool, DoubleSync has developed an application especially for you that syncs media files with your iTunes library over any available Wi-Fi connection.
Before proceeding with rooting your phone, we strongly recommend that you back up all your data, as the device will most likely need to be formatted. Even if the information is saved, develop the habit of backing up important files so as not to end up in an unpleasant situation.
6. Let's get down to business. Getting superuser rights
That's all, friends. The moment of truth is near. In the first part of the guide, we presented the process of rooting as something very difficult, partly so that you do not rush and end up harming your device. In addition, we wanted to provide you with the basic knowledge that you will need to experiment with different phones, firmwares and kernels in the future.
In truth, there are tools that allow you to root with the click of a few buttons. And they are compatible with most phones.
The market for Android-based devices is constantly updated with new phones from many manufacturers. Therefore, it is practically impossible to include individual guides for each of them in this article. Of course, if you do not want our guide to the volume of War and Peace. For this reason, we decided to describe applications that will do all the work for you, whether you are using an old Motorola phone or the latest Nexus model.
6.1 Quick and painless rooting with "SuperOneClick"
Are you one of those people who constantly change their phone? This will save you a zillion amount of time if you are going to be rooting a lot of different devices. You are very lucky. Not so long ago, we had to look for individual rooting guides for each phone model. This handy program will allow you to get full rights on any device in just a few clicks once you learn how to use it (which is pretty easy).
First, in order to work with the SOC, you will need to have Microsoft .NET Framework 2.0+ installed on your computer, since the phone will need to be connected to the PC in order to be rooted. The application supports the following operating systems:
- Windows XP
- Windows Vista
- Windows 7
- Ubuntu Hardy (8.04 LTS) or newer
- Debian Lenny (5.0) or newer
If you're reading this on a Mac, don't despair! The SOC is compatible with Mono 1.2 and above (a program that allows you to develop and run cross-platform software).
Attention: You can download all programs for obtaining Root rights at the end of the article.
So, you have already downloaded SuperOneClick and checked your OS for compatibility. The only thing left to do is find out if your phone is included in the list of devices officially supported by the SOC, which is deceptively small:
- Acer Liquid Metal
- Dell Streak
- HTC Magic (Sapphire) 32B
- HTC Bee
- LG Ally
- Motorola Atrix4G
- Motorola Charm
- Motorola Cliq
- Motorola Droid
- Motorola Flipside
- Motorola Flipout
- Motorola Milestone
- Nexus One
- Samsung Captivate
- Samsung Galaxy 551 (GT-I5510)
- Samsung Galaxy Portal/Spica I5700
- Samsung Galaxy S 4G
- Samsung Galaxy S I9000
- Samsung Galaxy S SCH-I500
- Samsung Galaxy Tab
- Samsung Transform M920
- Samsung Vibrant
- Sony Ericsson Xperia E51i X8
- Sony Ericsson Xperia X10
- Sprint Hero
- Telus Fascinate
- Toshiba Folio 100
Keep in mind that this only includes officially supported phones at the time of writing this guide, and although the program works successfully with most devices, the developers have not updated this list for a long time. It seems that SuperOneClick allows you to get full rights to any phone without NAND blocking (a limitation that does not allow writing files to the /system directory), through the use of its own ADB exploit.
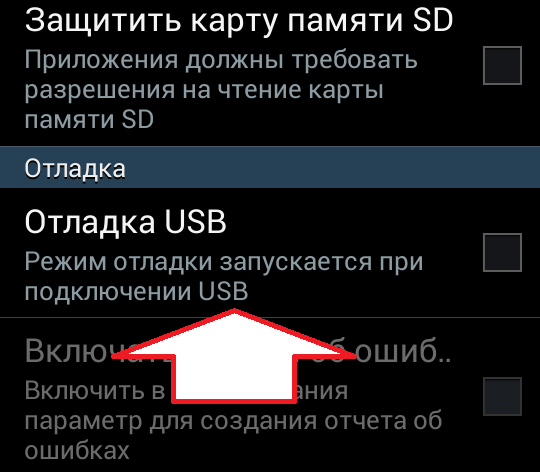
Now that we've covered everything, it remains to give you a few final instructions: put your phone into USB debugging mode ( Settings > Applications > Development > USB Debugging), install the appropriate device drivers on your computer (they should be installed automatically when you first connect your phone to the PC via USB cable; if this does not happen, open the manufacturer's website and download them yourself). And finally, make sure you remove the SD memory card from your phone before rooting.
As for the instructions for using the program itself, as you can see in the following screenshot, it lives up to its name. The whole procedure of rooting consists in pressing one button. You only need to connect the device, and the application itself will take care of the rest.


We live in the future! If SuperOneClick didn't help you, don't panic. There are many more simple programs that will allow you to quickly root your device.
The main SOC competitor among them is , which also allows you to get full rights at the touch of a button and is compatible with new devices (including several popular tablets), such as:
- Samsung Galaxy Note 2
- Samsung Galaxy SIII
- Samsung GT-I9100
- Samsung Galaxy Note
- Samsung Galaxy S
- Samsung Nexus S
- HTC One S
- HTC Droid DNA
- HTC EVO 4G LTE
- HTC Desire HD
- HTC Desire S
- Google Nexus 4
- Google Nexus 7
- Google Nexus 10
- Amazon Kindle Fire
- Kindle Fire HD 7”
- Lenovo P700
- LG Optimus 2X
- Sony Xperia Arc
Unlike the SOC developers, the UnlockRoot creators are constantly updating the list of supported devices, which you can review on the official UnlockRoot website.
To work with this program, you need to download the drivers of your phone, connect it to the computer, start the USB debugging mode (Settings> Applications> Development> USB debugging), open the application and click on the "Root" button.
6.3 What if I can't use SuperOneClick and UnlockRoot?
Before you fall into your own tears, my dear reader, let me assure you that all is not lost. Looking at the lists of devices supported by the SOC and UR, you will notice that several specific phones are missing from them and this is not a coincidence.
Most devices that do not work with both programs are not supported due to NAND locking, access to which is necessary for the operation of individual exploits for each application (NAND locking is most common on HTC devices).
If you're the owner of one of these devices, you'll have to unlock it in order to root it, otherwise you'll only be able to do a shallow root (which won't open the /system directory). Software that allows you to remove the NAND lock can be found on the Unrevoked website. Unrevoked will allow you to not only get rid of NAND restrictions, but also root your phone as easily and quickly as SOC or UR.
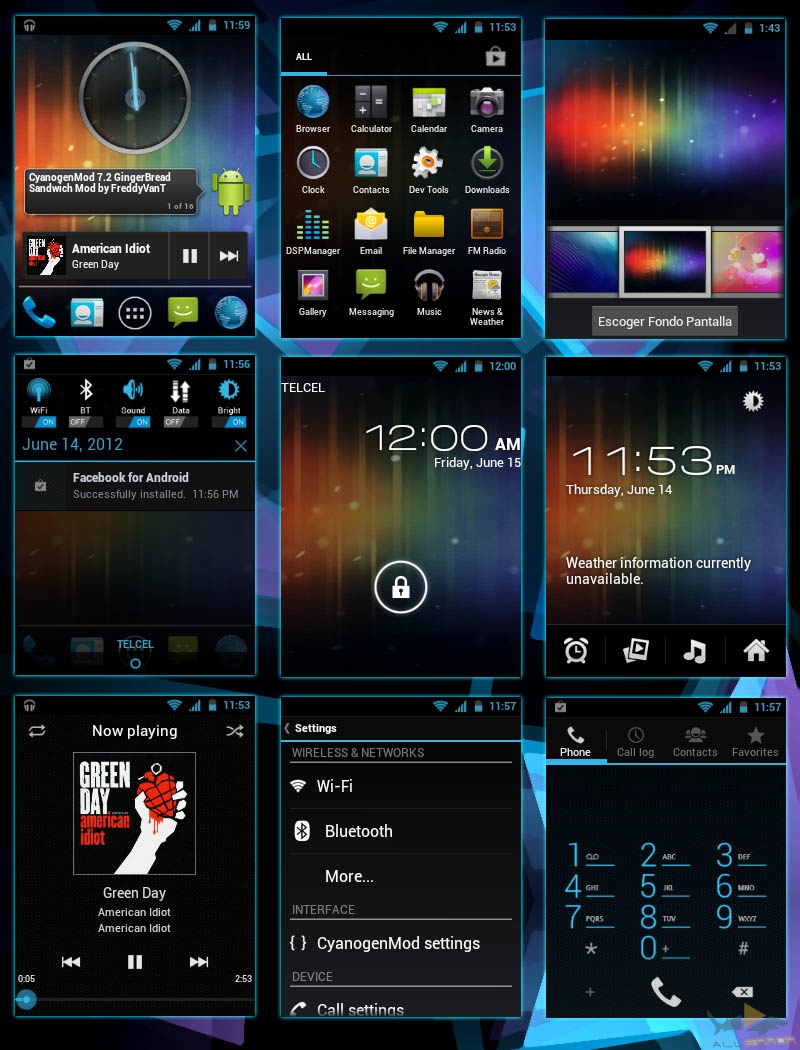
7.1 Overview of Popular ROMs
Installing custom ROMs is perhaps the most obvious reason for rooting phones. You can do this because the manufacturer has stopped releasing updates for your device, it's slow, or you just want to change something. Whatever your reason, here is a list of the most commonly recommended ROMs:
- : minimalistic and lightweight option with wide functionality. Significantly improves performance on most devices (it's worth mentioning that given the sheer number of different Android phones, it's impossible to predict exact performance gains for each model. You should always assume that reviews are based on testing of current generation devices). Slim Bean also increases battery life thanks to its own core. Includes an automatic update feature so you don't have to download and install patches manually.

- : This ROM lives up to its name by focusing on performance. Simplifies processor tuning, allowing you to get the most out of your processor. Battery life is largely unchanged, but you can power down the processor or change its settings if you want the device to last longer. Testing has shown that this ROM is prone to frequent crashes, but this problem is solved by a simple reboot. Keep in mind that most of these projects are done by small teams of developers who don't have a lot of resources. Therefore, you will not always get the most stable product. However, this disadvantage is offset by advantages in other areas.
- AOKP (Android Open Kang Project): think of AOKP as a senior cousin Android. It is ideal for all beginners installing their first ROM, as it is very similar to the standard Android and differs only in wider functionality. AOKP is compatible with most devices, and its long history of development means it's pretty stable.

- : Our latest pick and another old heavyweight. Cyanogen is extremely popular among Android fans as it contains almost every feature imaginable and is stable. On top of that, it extends battery life.
As you may have noticed, we did not describe in detail the functions of the ROMs that we mentioned. The reason is that they are not so different from each other. Ultimately, it's not about stability or a wide range of features that allow you to go beyond what standard Android allows you to do. If you stick to one brand and don't want to experiment with new ROMs, choose the ROM you like best or have. good story compatibility with your device.
8. Applications for users with full rights
So, you have successfully rooted and installed a beautiful custom ROM. Now you are probably thinking: “Please tell me that I can finally stop reading this guide and return to my normal life?”. Not yet. We have not covered another interesting topic. We will cover a few apps that are only available after rooting so you can use the full potential of your unlocked device. Let's start:
- greenify: Have you ever noticed that some apps keep running in the background even after you close them? Greenify allows you to make sure that they no longer consume valuable phone resources, but continue to work, in case they are important services.
- network log: this app allows you to store a detailed usage history network connection. And it works in real time! You can monitor how much traffic individual programs consume and receive notifications when one of them tries to access the Internet.
- drivedroid: One of the most useful apps on Android and a must have in any reader's arsenal when it comes to fixing computers for their family and friends. DriveDroid lets you turn your phone into a boot disk Linux using ISO image. So you can always turn on and fix a computer that has some problems.
- : one of the backup apps that we didn't mention in the related section because it only works after rooting. You can make full backups of your device data with the click of a few buttons and restore them with the same ease, as well as enjoy the benefits of cloud storage.
![]()
- Wireless Tether: With this useful application, you can easily turn your phone into a mobile hotspot.
- Undelete: As you can guess from the name, Undelete allows you to recover accidentally deleted files (that have not yet been overwritten). In addition, the application makes it possible to delete files without the possibility of further recovery.
- Avast Mobile Security & Antivirus A: yes, this app is available to all users, but on devices with full rights, it gives access to the mobile firewall, which is required on most smartphones, given that they often store personal data and other sensitive information.
- Super Download Lite: SDL allows you to use Wi-Fi and mobile data at the same time to increase your download speed. It is worth noting that the free version has a limit on the size of downloaded files.
- : a very handy app for people who constantly install new firmware. It not only allows you to find new ROMs, but also monitors their updates, and also backs up data.

- ADB Wireless: another useful application for experimenters. Allows you to use the Android Debug Bridge over a Wi-Fi connection, instead of USB connections. Pretty handy for developers.
Friends, dear readers, I think you were interested in learning more about the Android system and getting Root rights. You can download all rooting programs below.
The main advantage of the Android platform is its open source code. Because of this, the final android user devices can find custom firmware, programs and tweaks on the network for almost any gadget model.
In order for these features to become available for the device, you need to get ROOT rights.
Gadget manufacturers have removed "admin rights" from their Android skins for "reliability and security" reasons. This limitation negates possible damage to the device when deleting or modifying system files. If you are a confident Android user, then it's time to get acquainted with the information: how to get root rights on Android.
What is ROOT rights?
ROOT rights(super user or administrator rights) - give the owner of the Android gadget full control over the system. Thanks to this, you can change, delete, edit system files and folders.
ROOT access is easy to get today. Some programs allow you to do this right on Android device without the participation of a computer. At the same time, the risk of damaging the software is almost minimal.
Yes it is. When installing root rights on Android, there is a risk of harming the system or turning the device into a "brick" (it will not be able to start).
If this is your first time trying to root your Android, don't worry, there are many popular programs for rutting cope with the task perfectly. Therefore, we can say with confidence: "ROOT is right, it's safe."
Advantages and disadvantages
By rooting an Android device, it gains many privileges while sacrificing some features. To understand in detail, consider the advantages of rooting point by point:
- Change and remove standard and system applications.
- Installation of custom firmware and mods.
- Install personal images when the device boots.
- Work with applications that require ROOT rights.
- Set up and use advanced Android features.
- Using programs and tweaks to improve the performance and autonomy of the gadget.
- Removing viruses and advertising banners in applications.
- Perform firmware and data backup.
- Adding Linux executables and more.
In exchange for such a rich functionality, you will lose some features, namely:
- Loss of warranty from the manufacturer (although root rights can be canceled at any time).
- Loss of the ability to update the Android OS over the air from the manufacturer.
- Unstable operation of the device in case of damage to system files (but most often the gadget can be revived).
Advice! If you want to root an Android device, read the instructions completely so as not to miss any nuances.
How to get superuser rights?
Before installing ROOT rights, be sure to back up your data. When rooting a tablet or smartphone, information from the phone's memory may be deleted. Therefore, protect yourself in advance.
And transfer photos, music, videos, documents and other files to an SD card or save it on a computer.
Attention! Perform all further actions at your own peril and risk! You are the only one responsible for your gadget. If you are not sure about anything, contact a specialist!
Programs for root rights
The fastest, most reliable and optimal way to obtain superuser rights is to use specialized applications.
|
Applications for Android |
PC software |
|
Kingoapp |
Kingo Root |
|
Framaroot |
vroot |
|
Universal Android |
Root Genius |
|
Weak Sauce |
king root |
|
Application example King Root v4.9.6:  Obtaining SuperSU RightsUnfortunately, when this program receives ROOT rights, it puts the superuser KingRoot, instead of SuperSU. If you have KingRoot in the system, not all applications and tweaks will work properly, some programs may not even recognize the presence of ROOT rights. Therefore, you need to replace kingroot to stable and familiar SuperSU:
Installation with Windows 10The installation process is this:
There are several ways to disable mandatory driver signature verification in Windows 10:  An example of working with Kingo Root software:  How to delete?If you want to remove ROOT rights, use the same program that received them. For example, when connecting an Android gadget to a PC and turning on the Kingo Root program, you can remove ( Remove Root) and reinstall ( Root again) superuser rights. |
If you are an enthusiast of the Google Android operating system, constantly testing some interesting features of your device; or an advanced user who wants to install and test more new programs on their smartphone or tablet; or even an ordinary user who needed to gain access to some hidden function of the operating system of your mobile device on the Android OS, you will definitely come across the concept of "root rights".
This concept is very important in the Android operating system, and with the help of obtaining root rights you can open access to many very interesting and useful settings your phone or tablet. What are "root rights", how to check their presence and get them in the absence, and in general - what this root is for, you can find out by reading the following article.
What is root rights in the Android operating system
Root user rights, otherwise called Superuser rights (Superuser in English) came to the Android operating system from the Unix OS. In this OS, the Superuser has the right to perform any operations on the device. Accordingly, in the Android operating system, when gaining access to root, all possible operating system settings become available to the user, including those that were hidden before. Let's briefly list what root is for?
OS mobile device superuserAndroid has the right:
Change any hidden and system OS files;
Change, add or remove the splash screen that appears when the operating system boots;
Remove OS applications included in the firmware by the manufacturer;
Remove in-app ads;
Embed your own applications in the firmware;
Change the appearance of the OS interface, including themes, the appearance of system interface elements, etc.;
Control the frequency of the processor of your mobile device;
Create backup copies of the device firmware;
Has the ability to install custom (unofficial) firmware;
Optimize system performance and device battery life by fine-tuning hidden OS features.
As you can see, the list of possibilities for a user who managed to open root access on his Android smartphone or tablet is impressive, and it definitely makes sense to try to get root rights on your device.
What do you lose by gaining access to Root?
Before you make permanent changes to your phone or tablet, be aware. When trying to getroot rights You lose the warranty on your device! This operation is considered by the manufacturer as one that interferes with the intended functionality, and any attempts to hand over your "killed" while trying to put the root smartphone in the official service center most likely to come across a completely motivated and legitimate denial of service. In addition, even if you contact the warranty service with a different problem, and the engineers find that your smartphone or tablet was previously "rooted", you may also face a denial of warranty service on completely legal grounds. So, if everything suits you so far in the operation of your Android device, think about whether you really need to install Superuser rights on it.
If something went wrong
If, after you set root rights, your device began to behave incorrectly, often freeze or give program errors, you can try to return everything back by performing a factory reset. You can do this by going to the "Settings" menu and then selecting "Backup and Reset".
If the program has led to a serious OS failure and your device refuses to boot at all, there is a way to reset the settings using the Recovery menu. First you need to find out how you can enter this menu specifically for your device. This is usually some combination of the hardware volume keys and the power button on your device. Then, once in the Recovery menu, go to "wipe data/factory reset" and confirm your choice to wipe all data from the device. After that, select the restart option. Navigation through the menu items is carried out using the volume keys, and the selection of the item is carried out with the power key.
Sometimes, after gaining Superuser rights, the antivirus application installed on the phone or tablet starts swearing for viruses in the system. Do not be afraid that the program for obtaining root has brought something bad to your device. The alarm raised by the antivirus is due to the fact that it is used to obtain root applications work through various vulnerabilities in the OS, thereby arousing the suspicion of system protection software. If something like this occurs on your device, the best thing to do is simply install another antivirus that will be calm about having root rights.
How to check if you have root rights?
A beginner who has read about the tremendous benefits of "rooting" his Android smartphone may have an irresistible desire to find out if his device is rooted in order to obtain these access rights if necessary. You can check whether the Superuser is activated on this device using several very simple ways and without a computer.
To get started, we recommend opening the menu Android programs and see if there is an application shortcut with a distinctive name, such as "Superuser" or "SuperSU". Many Chinese smartphone manufacturers, meeting the needs of users, can root their firmware from the factory, making our lives much easier. And the presence of this application in the system signals to us that "rooting" has already been done and the manufacturer installed the corresponding application in the firmware to manage root rights.
If nothing like this is found, it’s not a fact that you don’t have root rights, it’s just that the system may not have an application to control them. Try to check for root using programmatic methods. For example, you can download the free Terminal Emulator for Android application and enter the command in the command line su. If after entering the command you receive a message "Permission denied" , then there are no root rights on your device. When, after entering the command su icon $ at the beginning of the command line turned into an icon # , congratulations, you are the Superuser of your Android device.
You can also install a simple Root Checker program from Google Play Market, the only task of which is to find out if root rights are activated on this device.
After such a slightly protracted introduction, it's finally time to find out how you can open access to root rights for android on a smartphone or tablet with the Android operating system.
Let's say right away that due to the huge variety of mobile devices on the Android OS, as well as firmware for them, there is no universal recipe for obtaining Superuser rights. Each Android device has its own characteristics, which must be taken into account if you are going to "root" it. You may have to try several programs before you can root your device. Below we will talk about the most popular ways to root Android.
We strongly recommend that you make backup copies of your contacts, applications, user data or even the entire system before carrying out any manipulations with obtaining root, so that you do not bite your elbows later if something goes wrong. How to make a backup various types data on Android you can read in on our website.
We warn you, dear readers: all actions related to obtaining Root rightson your Android device, you do at your own peril and risk! The administration of our site is not responsible for any possible damage or loss of functionality of your hardware due to your actions!
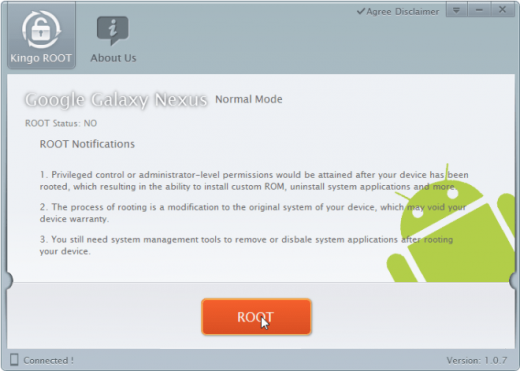
One of the popular applications that allows you to quickly and conveniently get root access to your mobile device is the Kingo Android ROOT program. The program is free and allows you to get root rights in a few clicks.
1. Install the application and connect your mobile device to a computer (which must have Internet access), in USB debugging mode (installation of applications from unknown sources must be allowed);
2. The program will download and install drivers for your device automatically;
3. After that, you will see the "Root" button that appears, which you need to click;
4. The system will set the Superuser rights and reboot;
5. If everything went well, you have received root rights on your device.
AT mobile phones companies HTC and Sony, before obtaining root rights, you need to do one more additional operation - unlock the bootloader. This is done easily and simply, in addition, the operation is reversible and at any time you can lock the bootloader back if you need to, for example, return the phone under warranty in its original form.
Applications for unlocking the bootloader are also released by the already familiar Kingo company, and you can download them from their official website:

All you need to do after that is connect your smartphone or tablet to a computer (which should have Internet access), select your Android OS version, and activate USB debugging. After that, the program will automatically install the driver for your device and establish a connection with it. Press the "Unlock" button and wait for the operation to complete. In the end, the only thing left for you to do is to click the "Finish" button. Root access on your device is open.
The above method will work for most devices, but its only drawback is that you need to connect your mobile to a PC. What to do for those who want to "rut" their mobile assistant without a computer? Below we will give examples of several of the most popular programs for getting root on different versions of the Android operating system, allowing you to get root rights without a computer. Read the instructions carefully before using them.
forAndroid 1.5-2.2:
Universal AndRoot (does not work on all models): The application must be copied to the flash card of your device, installed and after installation press the "Root" button. We reboot the operating system and enjoy the received root rights.
forAndroid 2.3:
Gingerbreak: USB debugging must be enabled on the smartphone (Menu "Settings" -> "Applications" -> "Development" -> "USB Debugging"). Copy Gingerbreak to a flash drive and install the application on your device (main memory only). Run it and press the "root" button, wait until the program completes the necessary operations. If everything went well, the device will reboot, and the SuperUser application shortcut will appear in the Android programs menu.
for new versionsAndroid (from 4.x):
KingRoot: The application is in Chinese, but its interface is simple to disgrace, so figuring out how to install and activate root rights is very simple. Kingroot includes a KingUser program that manages root access to run. applications.
Framaroot : the list of supported devices is limited, but may be suitable for those users who, for some reason, are not satisfied with the work of KingRoot. The algorithm of actions for activating the root is also very simple:
Install the program;
Run it and select the desired application, SuperSU or Superuser;
Choose a character;
A window with a smiley will appear, indicating a successful installation;
Reboot your phone;
Enjoy the resulting Root.
After getting root on your device, the applications "SuperUser" or "SuperSU" may appear. These programs do not by themselves provide root access, they are designed to control the granting of Superuser rights to every application that may request them. When launching an application that needs root access, "SuperUser" or "SuperSU" will ask you if you agree to grant root access to this application, and you must confirm your choice.
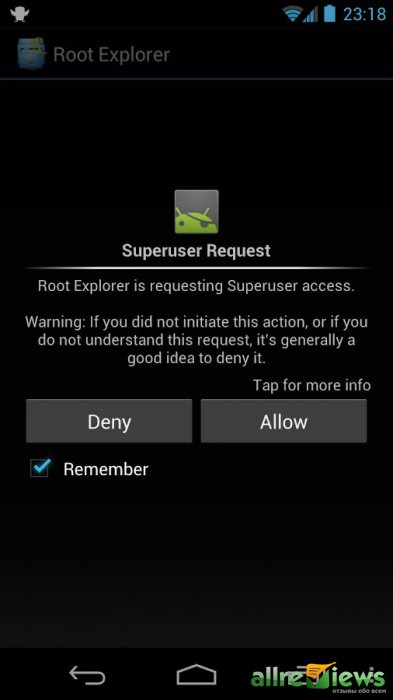
Keep in mind that simply installing these applications without first "rooting" your smartphone or tablet does not grant root rights.
How to remove root rights on android if necessary
We already wrote above that getting Root on your Android smartphone or tablet when contacting an official service center can be regarded as an interference with the design provided by the manufacturer, and this will serve as a refusal of warranty service. Or perhaps you want to give your device to someone to use for a while, and do not want this person to have too many opportunities to change OS system files and do too much with a smartphone or tablet. In any case, it will be useful to know how to remove root rights from Android.
If you installed root rights using the Kingo Android Root application, you will also find the "Remove root" button in it to restore the system to factory settings. Or you can remove root from the OS from the SuperSU app settings.
A universal application that allows you to return your Android device to its original state without a computer is the Universal Unroot program. Its interface is extremely simple. You just need to run the installed on your mobile application Universal Unroot and click the "Unroot" button.
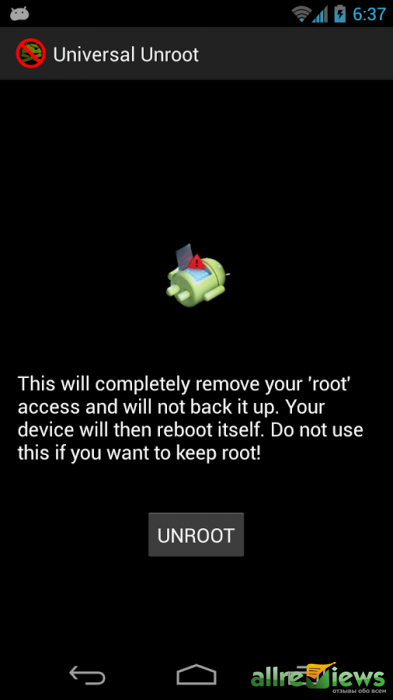
Agree with the questions that the program will ask you, and wait for the OS to reboot. You have removed root permissions from your system. If you need to lock the bootloader that you previously unlocked to get root (which we wrote about above), keep in mind: Universal Unroot will not be able to do this. In this case, use another method to remove Root.
You can also try removing the Superuser from your device manually. To do this, use a file manager that has access to the system area (Root Explorer, ES File Explorer, etc.) to go to the folder:
System/xbin/ and delete Busybox and Su files there;
System / app / and delete the SuperSu.apk or SuperUser.apk files there;
Restart Android.
So, we figured out why you need root on mobile device, learned how to check for its presence and how to install Superuser rights on your smartphone or tablet both using a PC and without a computer. Root rights to Android open up new and very interesting features of the device, and using it wisely, you can make your Android device much more convenient and functional. Be careful and careful, and everything will work out for you in the best way. Good luck!
Almost all users of Android devices sooner or later wonder how to get Root rights on Android. But, most users find that rooting is too difficult or that rooting can corrupt their data. Therefore, most quickly abandon this idea. In fact, now you can get root rights simply by making a few mouse clicks. The times when to get root rights it was necessary to study long instructions for a long time and tediously are long gone. Now most of the work is done special programs. In this article, we will talk about what root rights are, what they are for, and also how to get root rights on Android.
Root rights is a term from UNIX-like operating systems. It means a user with an identifier (UID, User IDentifier) of zero. This user is also called the superuser and has full access to the operating system. In other words, if you root your Android smartphone, then you will have full control over the Android operating system that is installed on your device.
This control provides many benefits. Firstly, once you get ROOT, you will be able to uninstall standard apps preinstalled by your smartphone manufacturer. You can also change program shortcuts, install themes, launch specialized applications, change operating system files, install applications on a memory card, etc.
On the other hand, getting ROOT rights carries some risks. Firstly, devices with ROOT access lose their manufacturer's warranty. So in the event of a breakdown, you will have to repair the device at your own expense. Also, on devices with ROOT rights, the ability to update "over the air" disappears (you will no longer be able to install OTA updates).
It should be noted that there are several types: Full Root (full access without any restrictions), Shell Root (without access to the system folder), Temporary Root (temporary Root, works only until the first reboot of the device). But, enough theory, it's time to move on to practice.
How to Root Android with Kingo Android ROOT
The Kingo Android ROOT program is a free utility that allows you to get ROOT rights quickly and without any hassle. This program supports most popular Android devices, so it can be considered a universal solution.
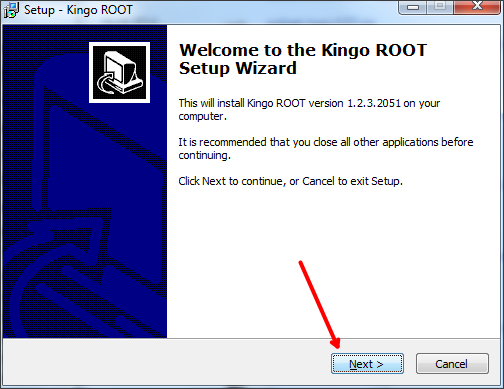
Step #1Download Kingo Android ROOT. Go to and download the program on your Windows computer.
Step number 2. Install the downloaded program on your computer. We will not consider the entire installation process, there is nothing complicated. Everything is exactly the same as when installing any other program.
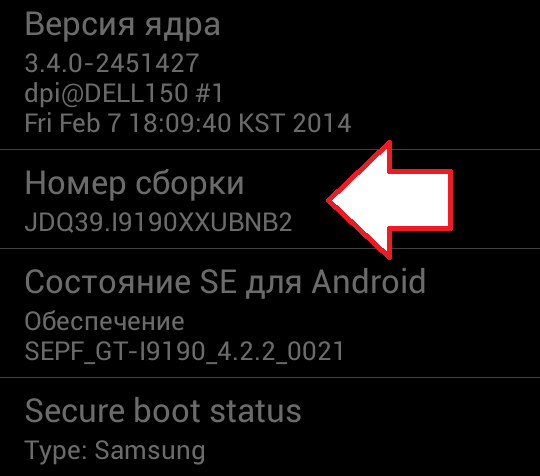
Step #3: Enable "USB Debugging" mode on your smartphone. To do this, we first need to enable "Developer Mode". To do this, open the settings and go to the "Device Information" section. Here you need to click on the "Build number" item several times in a row. After that, a message will appear stating that the developer mode is enabled.
After we have enabled "Developer Mode". We return to the Settings, and go to the "Developer options" section (this section may be called differently, for example, "For developers").

Under Developer Options, we need to find the USB Debugging feature and enable it.
Step #4: Enable installation of apps from unknown sources. To do this, open the Android settings and go to the "Security" section. Here you need to find the "Unknown sources" function and enable it.

Step number 5. We launch the Kingo Android ROOT program on the computer and after that we connect our Android device to it with via USB cable. After connecting the Android device, the program will find and install the necessary drivers.

Step number 4. We get Root rights on Android. The tricky step of getting root rights. After the Kingo Android ROOT program installs the drivers, you will see a big red "ROOT" button. Click it and wait for the Kingo Android ROOT program to finish.
Step #5: Reboot your Android device. After successfully obtaining Root rights, the program will display a corresponding message and ask you to restart your Android device

That's it, now you have got Root on your Android gadget. If necessary, you can remove the root rights. To do this, it will be enough to reconnect the device, launch the Kingo Android ROOT program, and click on the "Remove Root" button.
How to Check if You've Rooted Android
If you wish, you can check that getting root rights went well. This can be done in several ways:
- If you have Root, then in the terminal emulator after entering the su command, you should see a prompt in the form of a hash sign (#).
- If you have Root, then in the terminal emulator for the command "/system/bin/id" you should get the answer "uid=0(root) gid=0(root)". But, this method of verification does not always work.
You can also check for root rights simply by running an application that requires them. If the program works fine and all its functions are available, then you have Root rights. If you see warnings and errors, then there are no rights. Also, in some cases, after obtaining root rights, the Superuser or SuperSU application will appear in the application list.
Some smartphone owners want to get the most out of their device. In this case, it is impossible to do without obtaining root rights. After all, only they will allow you to use all sorts of tweaks, activate additional functions and even block the display in free apps advertising.
The Android operating system is famous for its openness. But in fact, some of its components are still blocked for the average user. You can download an ad blocker to your smartphone, but it will not work. The fact is that the advertising part of the OS is closed to other applications - it is impossible to change the corresponding files. However, if you get root rights on Android, then everything changes. After that, all hidden sections become available. But you need to be careful - these sections contain, among other things, those files, the removal or modification of which will destroy the operating system, and therefore the device itself.
In general, root access provides the user with the following benefits:
- Ability to install unofficial firmware and mods;
- Ability to change system files;
- Easy removal of system (pre-installed) applications;
- Gaining access to additional functions of the operating system;
- Installation of tweaks and other programs that increase productivity;
- Installation of special applications for which root rights are required.
But, as mentioned above, root-rights also bring a few unpleasant moments:
- They often void your warranty;
- The procedure for obtaining root rights can result in the failure of the gadget;
- In the future, you will no longer receive OS updates over the air.
Getting superuser rights without a computer
If you don't have the most new smartphone or a tablet, that is, there is a high probability that you can open root access on it using the Framaroot application. To do this, you do not even need to connect the device to a computer, and therefore the process proceeds quickly and without any difficulties. You will need the following steps:
Step 1. Download latest version Framaroot programs.
Step 2 Install this APK file on your gadget. If necessary, check the box next to " Allow installation of apps from unknown sources«.
Step 3 Run the program. If your smartphone or tablet is supported by it, then you will see a menu that contains options for further actions.

Step 4 Choose one of the methods for obtaining root rights. A prompt will appear shortly, telling you about the results of the program. If the method did not work, then try the second and third.
Step 5 If the application crashed, then restart it.
Step 6 If you are informed that you managed to get root on Android, then restart the device and start using its advanced features.

Unfortunately, the list of supported devices for this application is strictly limited. If the program did not cope with its task, but you still want to use user rights, then you can try installing the following applications:
- 360Root;
- PingPong Root;
- kingroot;
- rootmaster.
The latter program will grant root rights even to the owner of a very old device running under Android control 1.5. The rest of the applications, on the contrary, try to hack the latest devices, including those made in South Korea (they have support for KNOX technology, which greatly complicates the task).
Getting root rights through a computer
It is possible that you are still thinking about how to root Android using a computer. You may think that this is very easy to do. But practice shows that a PC is almost no help in this matter. The fact is that almost every smartphone requires special algorithms, according to which superuser rights are granted. In this regard, there is no universal way obtaining such rights. But you can try to use the following programs:
- ROOT Wizard;
- VRoot;
- Root Zhushou;
- unlockroot.
However, remember that no one guarantees the successful completion of the process - it all depends on the specific device and the version of the operating system installed on it.
Types of root rights
In the menu of some programs, you may find that they are able to provide different root rights.
- Shell Root- full root, but the user is not given access to the hidden section System.
- full root- full root, the owner of the device is provided with all the hidden functionality of the operating system.
- Temporary Root- this root will disappear after the first reboot of the gadget.