Here is an attempt to present information in such a way that even a user who is not particularly sophisticated in the intricacies of android wilds can simply, understandably and quickly set up their smartphone or tablet for convenient daily use. And if something is not clear - here you can always ask your question and get an answer to it.
You have a smartphone or tablet with an operating system in your hands. Android system. First of all, you personally need to understand the minimum or maximum that you want to receive from your new friend and assistant. It so happened that this article describes the use of almost all free and available programs from open sources. I set up a dozen or two smartphones and tablets at the request of relatives and friends, so I will try to change the setup order a bit, since I understood many mistakes later, so my setup order and explanations may seem a little strange, but they have a practical component behind them.
1. Terminology, how Android devices work, setting the system language.
You need to buy a memory card of high quality and with good speed
Hidden text
RAM
Inner memory
sd card
root permissions
utility
device
Desktop
widget
Appendix
official clients
messengers
terms in this paragraph and in the text of the article are highlighted italic font.
2.
Obtaining root rights (optional item).
It is desirable to remove some restrictions for the device, namely receive root permissions
. Especially you can not rush and safely postpone this item for the future. Although to be honest with you, before it was generally the last item for me. Why is the question raised about him now? Sooner or later, despite the fact that you may have a powerful multi-core device with a lot of memory, you will still run into a shortage of resources. It is for optimization, cleaning and the possibility of transferring applications from random access memory First of all, these same root rights are needed, which are the removal of restrictions from the manufacturer, giving access to all hidden sections and functions of your device. If you are a little unclear about what the conversation is here, then do not despair, just install the program Kingo
23.68MB
84 Number of downloads: on your computer, connect your Android device and press the buttons according to the instructions on the screen. It was tested on rather rare devices and still the program manages to correctly get root rights.
If we successfully got what we wanted, I propose to immediately install then desired programs for which everything was started. You don’t need to download anything from anywhere, we download everything directly to the device from Play market(more details in paragraph 4.).
3.
Internet connection and status bar (notification area).
We can't do anything until we connect the device to the internet. To do this, we have several options:
3.1. The easiest option is with WiFi. To do this, go to the "Programs" known to you and look for a shortcut with a "gear" called " Settings", sometimes it is placed directly on the desktop (or as it is sometimes called the "first screen").
Once in the settings, select the Wi-Fi item and see all available networks. We select your network, click, enter the password and wait for the connection. The connection indicator will be a small symbol with arrows in both directions at the very top of the screen, which is called status bar or notification area.
3.2. By connecting your device to a computer that already has an Internet connection, you will automatically receive the Internet on your device. You just won’t need to do anything, just connect the device to the computer with a cable and select the mode.
The notification area was mentioned above. You need to understand how to use it and why it exists. This is a strip at the top of the screen, where you can see the notification of the phone signal strength, there are visible envelopes indicating the arrival of new SMS or mail, the ability to connect to WiFi networks and much more. In other words, your device communicates with you using this small bar at the top of the screen, informing you about everything important. Looks like this. In order to see all the notifications in more detail, you need to press your finger on this strip and, holding your finger, confidently "pull" it down, as if closing a horizontal curtain.
3.3. If your device has the ability to use mobile communications, then you can insert a SIM card and get Mobile Internet on the device itself. You won’t get around much, but to activate an account, install small applications and use already installed programs, it’s quite enough.
4.
google account. We have an Internet connection on the device, but now we also need google account. What is it and why is it needed? Simply put, you need a mailbox from google. For you, it will now not only be a simple e-mail, your backup copies of installed program settings, contacts and other useful information will be stored there. If you already have it, then you need to go to the "Settings" section, as in the previous paragraph 2. and select " Accounts", enter your email address from google and your password there. If you do not have it, then you can register by clicking on the link https://mail.google.com/mail/
After you link google mail to your device, which you can immediately receive on your device, other useful services from google will also "pull up". Once again, I want to highlight separately that duplicates of your contacts will now be stored on remote google servers and you can now access your contacts anywhere in the world or restore them if your device is lost. You can also merge contacts and calendar entries between different Android devices.
5.
Work with the Play market(GooglePlay), tab programs and their removal.
Play Market, the shortcut of which is on your device in the "Programs" section, which can be accessed by pressing the button. You get to the programs tab, where all your programs are saved and it is from this tab that you can delete them later.
In programs, select a shortcut Play market and see this picture
Click the magnifying glass icon and enter the name of the program you are looking for. When it is found, click the install button. After installation, a shortcut appears on the desktop installed program, and she herself appears in the list of programs in which you can get as described above. You can remove the program shortcut from the desktop without harming the program itself, to do this, press and hold it with your finger until a cross or a basket with the inscription "delete" appears at the top of the screen, then drag the shortcut to be deleted with your finger across the screen to the cross that appears. After dragging, release your finger and the shortcut will be removed. In this very way, you can delete entire programs, but you need to do this already in the "Programs" tab.
Let's single out the algorithm for searching for programs in the Play Market once again, since we will repeat this procedure many times.
So:
Desktop --> Programs button --> Play Market shortcut --> Search button --> program name
(!)
Below are the names of the programs as they appear in the Play Market if you use a laptop or computer to study this article and enter the names manually on the device. If you are browsing using your device, then by clicking on the name of the program you will automatically be taken to the Play Market, since links are attached to the names.
6. Programs for setting up, protecting and optimizing the system.
6.1. Antivirus for Android, unfortunately, is already a priority, since there are a great many viruses, malware, adware (muck is still the same, it’s hard to even remove later) and protection is critically needed. I use AntiVirus Security - Free by AVG Mobile. In addition to protection against the above threats, there is also anti-theft protection (the so-called anti-theft protection), you can remotely block the device using SMS. Look in the program menu, everything is very simple there, just do not forget the password for the device, which you yourself set, otherwise you will lose all data and settings.
6.2. Next, install the Advanced Task Manager program
6.3. Now it's the turn for Clean Master .
Also a very useful utility (a program for working with settings and the entire system, i.e. "technical worker" of your device). It cleans very well from garbage and unnecessary files in the system, and also reminds you of the possibility of moving programs from the device's memory to the sd card. To do this, in the program settings, find and select the item "reminder about the possibility of transferring to sdcard" (very useful setting, so that you do not manually transfer later). There is also a shortcut on the desktop that allows you to clean the device in one click (one click) It is called "Touch performance". Use this opportunity and do not wait for the system to become clogged at least once a month.
Because of the following two points, we did step 1. with getting root rights. These two utilities help to transfer programs from device memory to sdcard
6.4. AppAdmin - will help you work with all applications, you can use groups or with a specific application. It helps to correctly delete applications, make separate backups, and simply informs about the state of applications.
6.5. Link2SD - it was with this utility that I transferred applications from internal memory to sdcard. After launch, you will see a list of all applications, if the application is already installed on the memory card, then its field is written in yellow on, if the application is in the internal memory, then there is no such inscription. We click on the application in the list, after that detailed information about it opens and the button move on
If during the installation of any application the utility from p.6.3. did not offer to transfer the application to sdcard, then it makes sense to use Link2SD. It must be remembered that it is not advisable to transfer all applications to sdcard, especially if the application is displayed as a widget, which means that it constantly exchanges information with the desktop and any failure or "hitch" in such an exchange due to the fact that the application and the widget physically located in different memory segments, can lead to system crashes or instability. There are applications that the system still won't let you transfer to sdcard, even if you got root rights, then it's better not to try to do this, since there are very few such applications.
6.6. A guide is a must. Install -ES Explorer. The convenience of explorers for Android, for me personally, has always been doubtful, but this one is one of the best, it opens archives and sees the sections that opened after getting root rights.
6.7. An additional archiver still does not hurt - the Unrar archiver.
6.8. Install Office Suite - Kingsoft Office and OpenDocument Reader
6.9.
After installation, all programs automatically "throw" their shortcuts on the desktop until we touch them, and we will consider what to do with them in the next paragraph.
7.
Widgets and desktop customization. Weather, brightness, clock, calendar and more.
Once again I remind you - widgets should not be transferred to sdcard.
7.1. Hours with seconds are quite rare applications. It seemed that everyone around them lived without seconds. Through a long search, testing and sifting out all sorts of rubbish, I settled on the widget - Seconds Clock
Not quite what we would like, but an acceptable option.
7.2. There are a myriad of weather applications, it's all about how you want to see this weather on your desktop. Usually it will be useful to display the weather in the place where you are now.
7.3. The calendar
7.4. Mobile operator account balance on the desktop. You can try to use the piBalance application, which is compact, simple and not overwhelming with an abundance of unnecessary functions. If the application does not support your operator, then try to manually enter the balance check code in the application - Balance Check (usually *100#), but there is no widget for it. There are analogues with a widget, but they are too complicated to configure and require a lot of access rights (the security of the device as a whole may suffer).
8.
Skype video communication, secure voice communication.
8.1. Without Skype, nowhere - Skype. True, there is a small drawback - the program does not start automatically. You can solve it by installing a small add-on - Autorun for Skype (do not move to sdcard).
8.2. For business communication Viber will be very helpful. You can communicate both by voice (both via Skype, but without video), and by exchanging messages. They say that while it is absolutely confidential, they will not listen to it and none of the "enemies" of your messages will be able to read it. And the history of correspondence, if necessary, is erased very quickly. The account is linked to your existing phone number, so you will be very surprised how many of your friends are there. You will also have an exciting experience, constantly watching someone from your phone book being added to the number of Viber users.
9
. Internet browsers are programs for using the Internet.
To view sites on the Internet, a special type of program called browsers is used. A standard browser is present in any device. It is absolutely viable, but I still recommend installing Chrome, Opera Mini and UC Browser. Reasonable question why? I propose to consider Chrome as the main browser, since the native one is usually strictly tied to the manufacturer's brand advertising and is a modified Chrome. It seems to me that it is better to install pure Chrome, which has good performance and integration with all google products. Opera Mini will manage well in cases where the Internet connection speed is poor, and UC Browser has a built-in flash function and you are unlikely to encounter the problem of not being able to play Internet videos, almost like in a regular browser.
10.Social media.
All major social networks have already released and are constantly improving their official clients. These are programs that make it much easier to work with social networks. You can easily send messages, view the news feed, download information and do everything that you are used to and what you need from social networks. All messages will come automatically, like SMS, in real time.
In contact with
Classmates
Facebook
These are official clients. There are also alternative, informal messengers, which may offer you "all in one" and other conveniences, but users still prefer the official versions. It is believed that they are safer and work more correctly.
11.
Audio, video, Internet TV, your device as a multimedia player for home tv, torrents. bhhh
VLC
GPlayer
iMediaShare is a very, very useful utility if you have a TV with Wi-Fi. After installing it, the need to insert flash drives into a TV, cable connection or any kind of media player simply disappears. Now everything is in your device and the connection to the TV is via Wi-Fi, it's outrageously simple. Download content to the device, launch the application, select a file for broadcasting, select a TV in the coverage area (it is searched automatically), press start and enjoy watching. Moreover, you usually carry out control from the remote control of your TV or device, if you like it better.
Crystal TV
SPB TV
Shazam
12
. Navigation on Android.
Cards.
A separate science on any device and running any OS.
12.1. Maps from google are preinstalled on your device - Google Maps. They are absolutely usable and useful, it is convenient to plan routes with them, to view the surroundings. They constantly require an internet connection. Therefore, be especially careful when roaming. (!)
I personally know a person who traveled around Europe with such cards for $ 10,000 on a corporate phone, where there were no restrictions on the use of funds. To protect yourself from such surprises - use the advice from paragraph 15.3.
For permanent use and without the risk of losing money in roaming, if you have a GPS chip (check in the instructions if there is one in your device), full-fledged navigation programs are usually used: - a good PDF and DJVU reader. - notes with the ability to synchronize with your google account.
15.5. AnTreNotes - tree notes
15.6. Devicemanager- a very useful thing if you lost your phone.
There is also such a direction as games, but this is already according to your personal taste. You already know how to use the Play Market, and you can find anything there. Just do not forget to delete what did not fit right away - keep the system clean and tidy!
Good luck and enjoy using your devices!
). But I myself used android sporadically. And only recently becoming the owner of a phone on android base, I can now begin to talk about this operating system.
I must say right away that I liked the system. Unlike i-devices, where the user can do almost nothing without a jailbreak, there are no such strict restrictions here. Which, however, leads to some responsibility of the user for their actions. So, about everything in order.
Gestures on android
Android is usually installed on phones with touch screen. Therefore, you will most likely launch programs and make calls by clicking directly on the screen. There is nothing special to talk about here, the only thing worth noting (not everyone finds it right away) is that if you swipe down from the top edge of the screen, a window will open in which you can view notifications and enable or disable wifi, bluetooth, gps and auto-rotate the screen. I recommend turning off Bluetooth immediately, it eats up a lot of energy, but more on that later.
What is more convenient, you will most likely have a two-finger gesture on your android, approaching or moving away from each other. For example, this can be used to change the scale of maps.
Installing applications on android
If the iPad has an Apple Store, then Android has Google Play. By launching it from the settings, you can search for applications to install - there are a lot of them. What I would recommend to install first:
- Yandex Maps: very handy application with world maps; by the way, I do not recommend installing Yandex Navigator (this is a separate application) - it devours the battery in a matter of minutes;
- qr droid: qr code reader (by the way, if you need to generate a qr code online, try the one you find at the link);
- Skype: . What is convenient, after installing Skype, interesting functionality will appear. The phone will offer to make any call both in the usual way and via Skype. The latter can be nice if, for example, you have access to Wi-Fi, and ordinary calls are expensive for you, for example, when roaming;
- Bubble: bubble, level, you can not buy a similar tool;
- screen filter: Reduces screen power consumption very effectively;
- Dr Web. light: antivirus;
- Torch: Allows you to use your phone's camera flash as a flashlight.
If you log in to android with your Google profile (applications - settings - accounts and synchronization - add), you can install applications in another interesting way. Open the site https://play.google.com/store , log in with the same Google profile. After that, you can find the application you need and click the install button. The computer will report that the program will be installed on the phone in the near future, and it will happen!
Generally speaking, the phone is very highly integrated with Google services, but this is a topic for a separate article.
Another point, you can install applications not only from Google Play. This, of course, increases the risks, so think about what you install. To allow third-party sources, go to applications - settings - security and check the box "unknown sources".
Android power saving
It is well known that Android phones have problems with power saving, the battery runs out very quickly. Our instructions should help you at least slightly ease these problems on android. Firstly, in order to extend the battery life, it is necessary, of course, to complete the first charge-discharge cycles completely. In addition, the android has a convenient functionality for analyzing what the battery is used for. If you go to the application menu - settings - battery, you will see how the percentage of battery consumption is scheduled since the last charge. I won’t be surprised if the screen comes first - the backlight of the screen. To spend less on the backlight, you can, of course, turn it off completely, but it is also possible, for example, to use the screen filter mentioned above.
Of course, turn off WiFi and bluetooth when you don't need them.
And further. There are many programs that help reduce battery consumption. Actually, they just kill some processes. It is not a fact that there is much benefit from this - if the share of the expenditure on these processes is small, then you will not gain anything.
In addition, there are so-called power saving modes - the benefits of them are also doubtful. Their essence lies in the fact that when the battery level drops below a predetermined level, they turn off the backlight and some other functions. But I personally prefer to control what and when to disable.
Viruses on android
It is worth saying a few words about viruses on android. They are, and are usually offered under the guise of useful programs or updates that need to be installed. Moreover, the liberality of Google Play leads to the fact that harmful programs are also there. Therefore, I recommend doing the following:
- Install an antivirus. I tried several and settled on the free Dr Web;
- When installing a program, look at the list of its resolution. Unlimited calls or sms should warn you;
- Some programs are harmless on their own, but mimic system messages about the need to run or update something. Be extremely careful with such messages; if you encounter such a program, uninstall it.
I hope that this guide will help you with the development of android. If you have any questions, write. And I will collect material for the next article.
In contact with
Classmates
Now let's move on to the main settings of the device. Open the Settings and we will customize the Android background “for ourselves”.
Let's start with the sound settings. We go to the Sound item and already here it will be possible to adjust the sound effects emitted by the device to suit any taste.
Let's start with Volume.
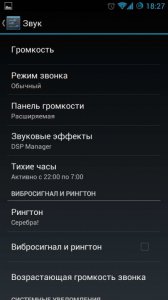
In this paragraph, you will find 4 standard volume settings for 4 types (processes): multimedia, call, ringtone and alarm clock. You adjust the ringer volume directly at the time of the call. It is better to set the volume for the alarm clock to the maximum immediately, but coupled with the volume increase mode. In the ringtone volume settings, you can set the volume and sounds for system events: SMS, notification, and others. The volume of multimedia is set in each case: when watching a movie or music, during the game. In many Android backgrounds, the standard power key or the button in the Panel has additional functions, pressing which brings up a menu for quickly switching to “silent” mode or vibration mode.
Also in the Sound menu you can call, melodies or sounds for system events. Set the Quiet Hours mode when only calls and can disturb you, and all notifications go silent.
Now let's move on to customizing the Android background screen.
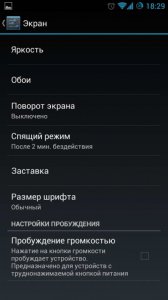
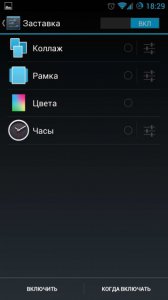
We go to the Screen item and proceed to setting up the screen by setting the brightness level or automatically detecting it (provided that your device has a light sensor); enable automatic screen rotation; install wallpaper; set up sleep mode; set the size and type of fonts used to display information on the screen; configure the screensaver on the screen (available for devices with 4.2+).
Let's move on to Memory.
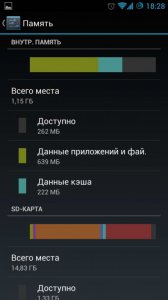
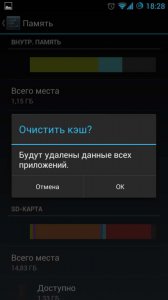
At this point, you will have access to information about how much and what exactly the device’s memory is occupied with: internal memory, and an external USB drive. All information is presented in the form of a graph-diagram, divided by colors according to the type of memory content. You can determine how much memory is occupied by movies, applications, images, etc. Here you can also delete everything, in your opinion, unnecessary from the device’s memory, including application cache files.
At this point, you can format the memory as much as possible.
Item Battery.

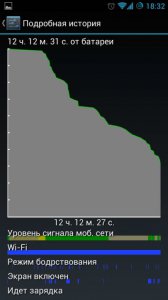
By entering this item, you will see a graph of the device's battery consumption and the amount of remaining charge in percent, as well as the time until the device is completely discharged in the current power consumption mode.
Naturally, your attention will be presented to the most energy-intensive elements, parts of the device, services and applications. The percentage of energy consumed by an application or service is calculated as follows: if, for example, the remaining battery energy is 35%, and the screen consumed 45%, then this means that out of all the energy consumed, 65% (100% ( full charge) - 35% (residue)) the screen took 45%. Similarly, for all other energy consumption values of applications and services.
Now, looking at the schedule and the list, you can determine when and who exactly “takes” energy and, if not needed, disable this service or application.
Let's move on to the Applications.
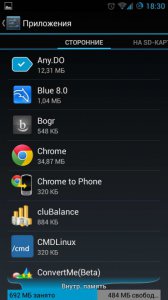

At this point, you can do whatever you want with the applications installed on the device. It is at this point that the application is stopped, the application or its cache files are deleted, the applications of the System are “frozen”. In most cases, all applications are divided into four tabs:
Third party, On SD card, All, Working.
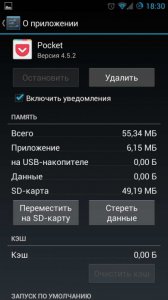
By selecting any application from the list, you can do the following actions on it:
Delete the application;
- Stop the application (all processes associated with this application will be completed);
- Erase data (all application data will be deleted up to the state of the first launch);
- Clear cache (application cache files will be deleted while saving all settings and data).
On some Android backgrounds and with some applications, you will have access to additional actions on applications:
Move to SD card;
- Transfer to phone;
- Remove default settings.
As for the last point, this action should be performed to change the application that you have defined as the default application to the standard (preinstalled application).
You can disable all unnecessary pre-installed applications by going to the All tab. By going to this tab, select the application you no longer need and click on the Disable button. You should be careful using this function - you can accidentally disable the system process.
Of course, you can "enable" the application back by going to this tab and clicking on Enable.
Item Accounts.

At this point, you can synchronize your device with all your accounts in any social networks, cloud storages and other network services.
At the very beginning, you will only have access to Google Accounts, with which you can synchronize contacts, calendar, mail, applications, tasks and create all device settings. By clicking on the corresponding entry, you can configure synchronization and backup: exactly what settings and data you intend to save, as well as the frequency of these backups.
New accounts available for synchronization will become available to you as you install client applications for services or social networks. For example, after installing Skype, you can synchronize your Skype account with your existing ones by adding or changing an account in other accounts, creating a connection between them in this way.