We continue to deal with the work of different routers in repeater and bridge modes. In this manual, we will take a closer look at setting up a Tp-Link router in bridge mode (WDS). I think that you immediately need to understand the question of what is WDS on Tp-Link routers and how it differs from the "Repeater" (repeater) mode of operation.
I will say right away that on Tp-Link routers, there is no such mode as a repeater, such as Asus and Zyxel (there, routers really work like ). Only access points from Tp-Link can work as network repeaters. Concerning conventional routers, such as: TL-WR941ND, TL-WR740N, TL-WR841N, TL-MR3220, TL-WR842ND and other models, then they have the ability to configure the bridge mode, aka WDS.
What is the difference between bridge mode and repeater mode? I explain in simple language: in bridge mode, we simply connect two routers via Wi-Fi. This mode can also be used to expand WiFi networks. For example, we have some kind of main router that distributes the Internet via Wi-Fi. And we need to expand this network, increase its range. We take a Tp-Link router, set up the bridge mode on it according to this instruction, it receives the Internet via Wi-Fi from the main router, and distributes it further. But, unlike a repeater, you will have another wireless network, with its own name and password.
Of course, the repeater (or router in repeater mode) much better for this job. It simply clones and amplifies an existing network, and in bridge mode, another wireless network appears. And you will have to choose which network to connect to.
In the comments, I was recently asked this question:
Good afternoon. The question arose, how to configure the tl-wr941nd router to receive Wifi, and then transfer the Internet via cable. That is, just use it as a receiver. Is it possible to do this somehow?
By setting up your Tp-Link in WDS mode, it can be used as a receiver. To connect to the Internet, for example, a TV or a computer that does not have a Wi-Fi receiver.
A few more points:
- You can have any main router. Of course, it’s good if both devices are Tp-Link, and even better if they are the same models. I have a main router, and I will configure the bridge on the TL-MR3220. By the way, I didn’t succeed in making Tp-Link friends with an old Asus RT-N13U.
- We will also change the settings of the main router. We need to set a static channel.
- This method is ideal for wirelessly connecting two routers in bridge mode. For example, on the first floor you have a router, and on the second floor we put another one and connect it to the first one via Wi-Fi. There is no need to lay the cable.
Setting up a bridge (WDS) on a Tp-Link router
1 First of all, we need to change the wireless network channel on the main router. Please note that the router to which we will connect in bridge mode must be configured. That is, the Internet must work, it must distribute a Wi-Fi network.
My main router is D-link DIR-615 .. So, we need to set a static channel for the wireless network in the settings on the main router. I don’t know what kind of router you have, therefore, see the instructions. In it, I wrote about changing the channel on devices from different manufacturers.
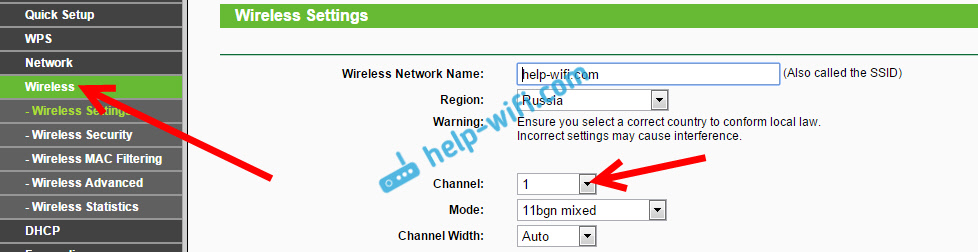
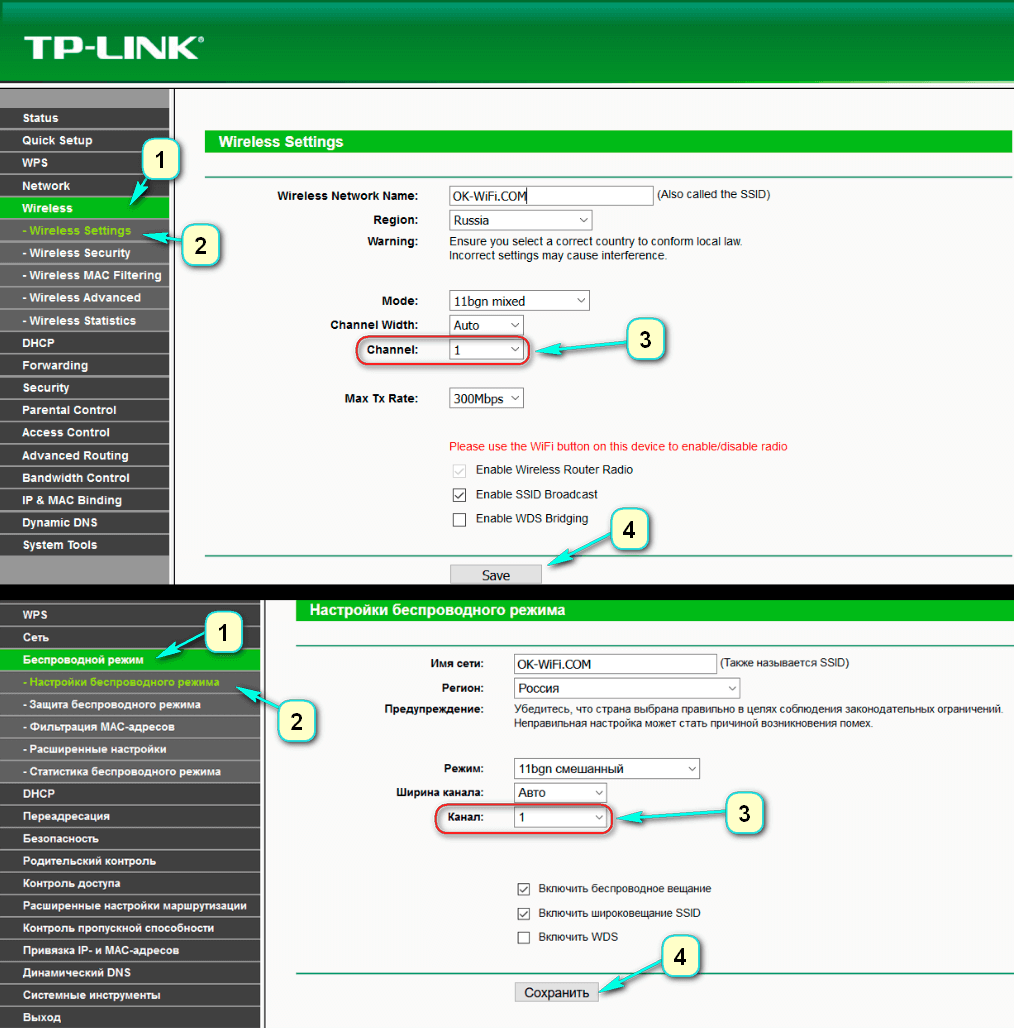
If, for example, you also have Tp-Link as the main router, then the channel can be changed in the settings (which open at 192.168.1.1 (192.168.0.1), or see the instructions), on the tab Wireless. In field Channel specify a static channel. For example 1, or 6. Press the button Save to save the settings.
A static channel has been established. You can exit the settings of the main router.
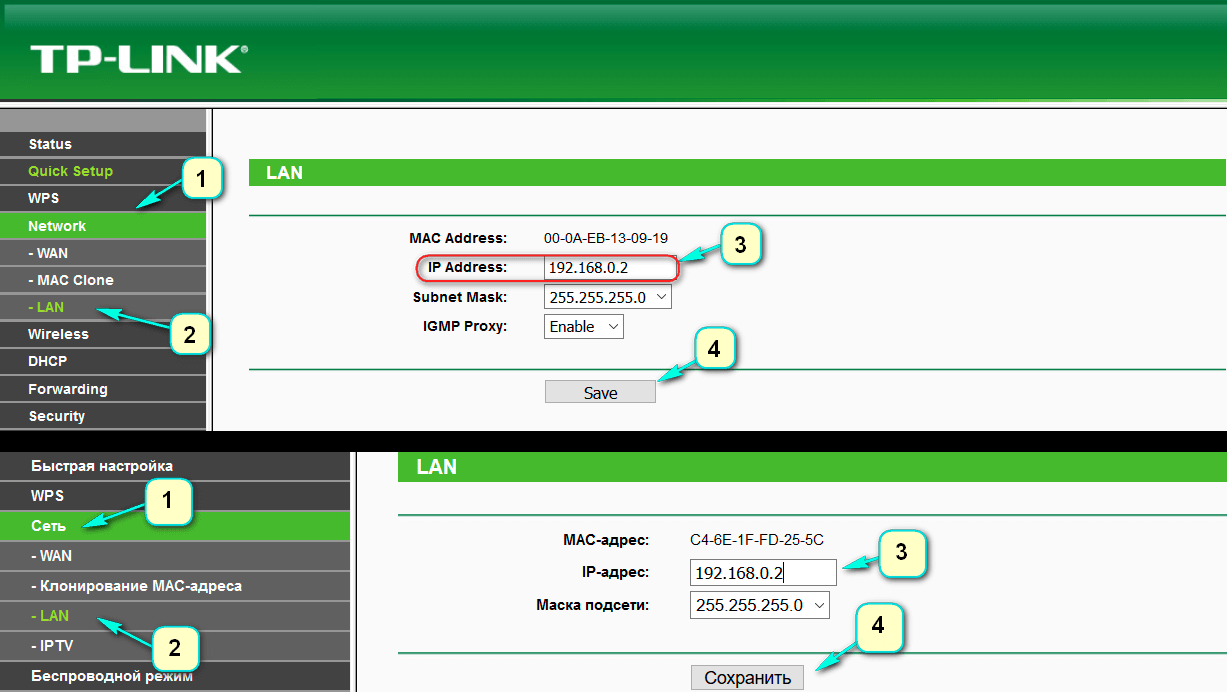
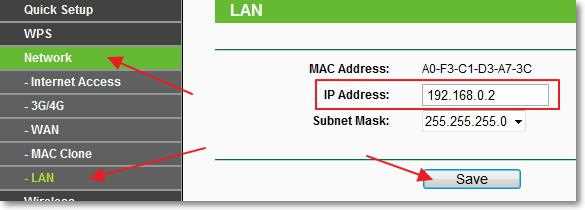
First, we need to change the IP address of our Tp-Link. This is necessary so that there are no two devices with the same IP on the network. For example, if the main IP address is 192.168.1.1, and the second IP address is 192.168.1.1, then an address conflict will result. Go to the tab network - LAN. In field IP address change the last digit from 1 to 2. You will get the address 192.168.1.1, or 192.168.0.1. Click the button Save. The router will reboot.
We need to know what is the IP address of the main router to which we are going to connect. If it has 192.168.1.1, then on the router that we want to connect via WDS, change the address to 192.168.1.2. And if the main address is 192.168.0.1, then the second one is set to 192.168.0.2. It is important that they are on the same subnet.
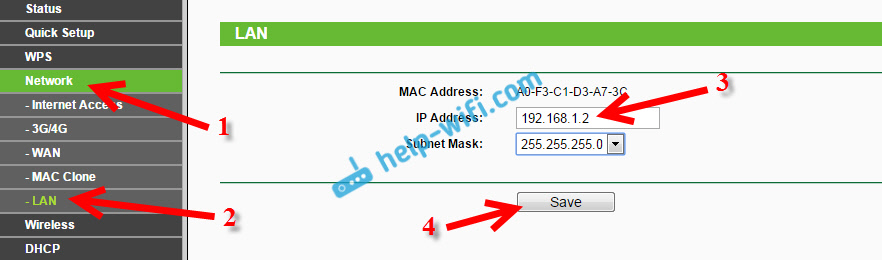
Go to the settings again, only the IP address will be different - 192.168.1.2. which we have indicated above.
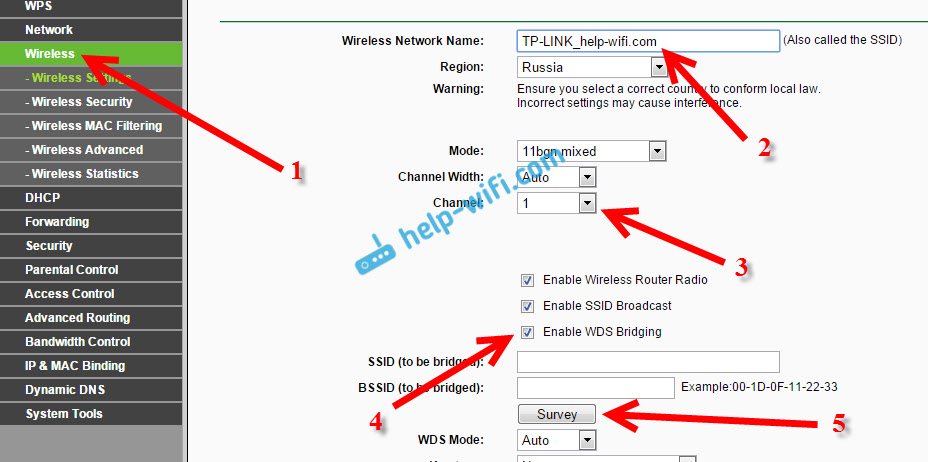
3 Click the Wireless. In field Wireless Network Name you can specify the name of the second wireless network. And in the field Channel be sure to specify the same channel that was set in the settings of the main router. I have channel 1.
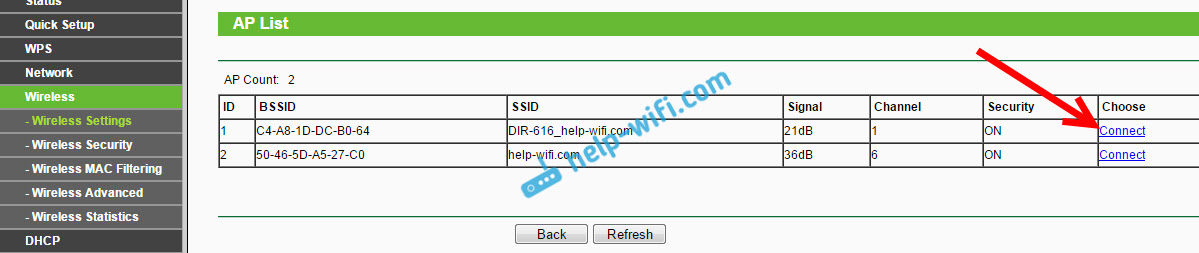
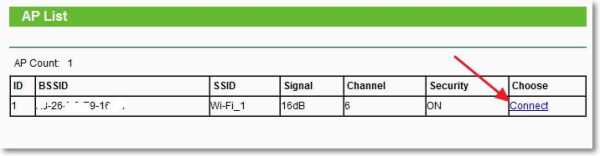
Select from the list the desired network from which the router will receive Internet. Opposite the desired network, click on the link Connect.
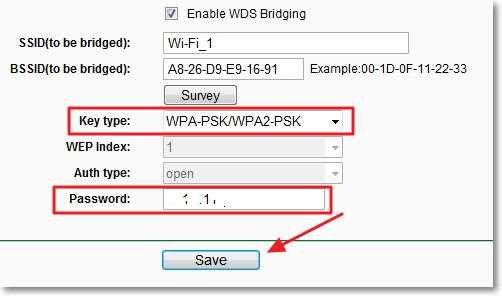
4 We are left only opposite the drop-down menu key type choose the type of security for your network (to which we are connected). And in the field Password enter a password for this network. To save, click on the button Save.
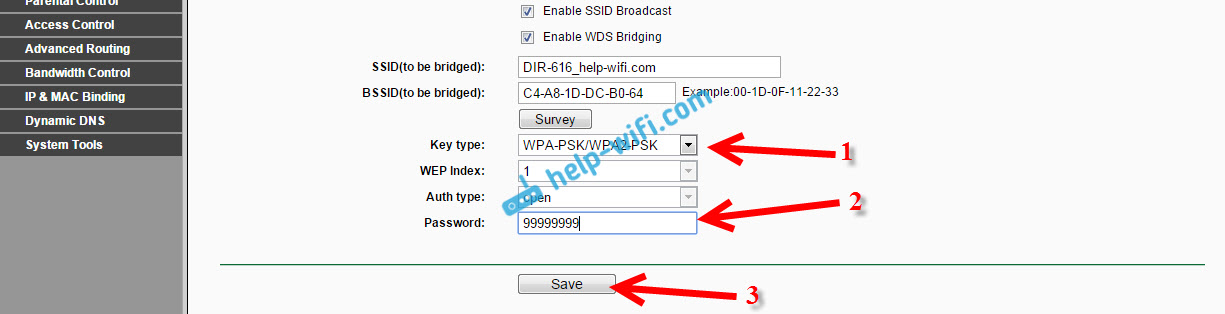
Reboot your router. By turning off the power and turning it back on, or in the control panel by clicking on the link "click here".
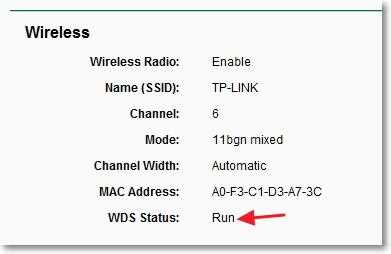
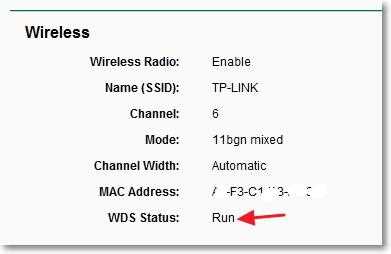
5 After the reboot, go back to the settings. And right on the main screen (Status tab), look at the section Wireless. Against WDS Status should be written Run.
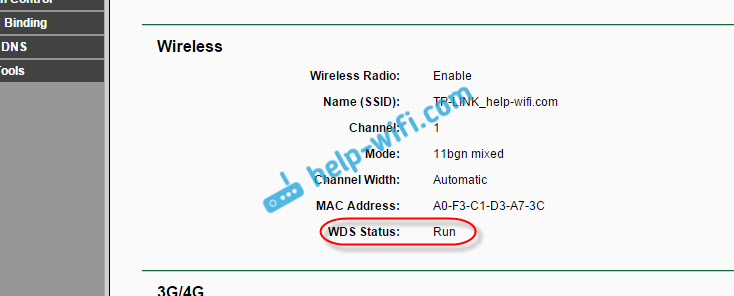
This means that our Tp-Link will already connect to the main router. And it should distribute the Internet via Wi-Fi and cable. Setup completed.
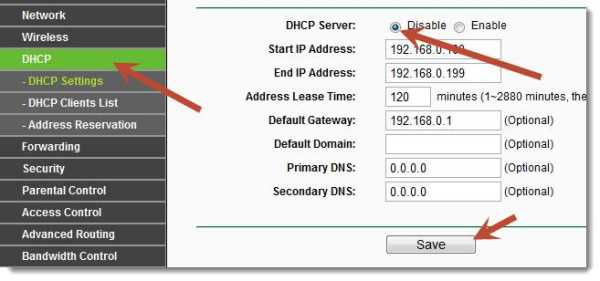
If you need the main router to issue IP addresses (not the one configured in bridge mode), then on the router that we just configured, you need to disable the DHCP server. You can do this in the settings, on the tab DHCP. By setting the switch near Disable and saving the settings.
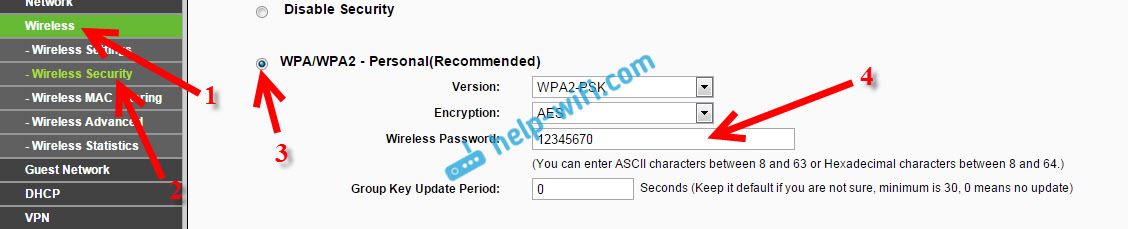
6 Do not forget to put a password on the Wi-Fi network that the router we configured will distribute. You can see detailed. Everything is simple there. In settings, tab Wireless - Wireless Security, highlight an item WPA/WPA2 - Personal(Recommended), in field Wireless Password set a password (minimum 8 characters), and click the button below Save.
Now our Tp-Link router receives the Internet from the main router, and distributes it further. Choose the right place to install the second router so that it is within the range of the main router.
Setting up a wireless bridge (2.4 GHz and 5 GHz) on the new firmware version
I decided to update this article and add up-to-date information on configuring WDS on TP-Link routers with new firmware. The one in blue. Everything is set up a little differently there. I will show you now.
If you have a router with a new control panel, then you need to go to the "Advanced Settings" - "System Tools" - "System Settings" section. If you have a dual-band router, then there you will see the opportunity to configure the bridge mode in two bands. At a frequency of 2.4 GHz and 5 GHz.
1 Check the "Enable WDS bridge" box next to the required frequency. For example, I checked the box next to 2.4 GHz. Click on the "Search" button
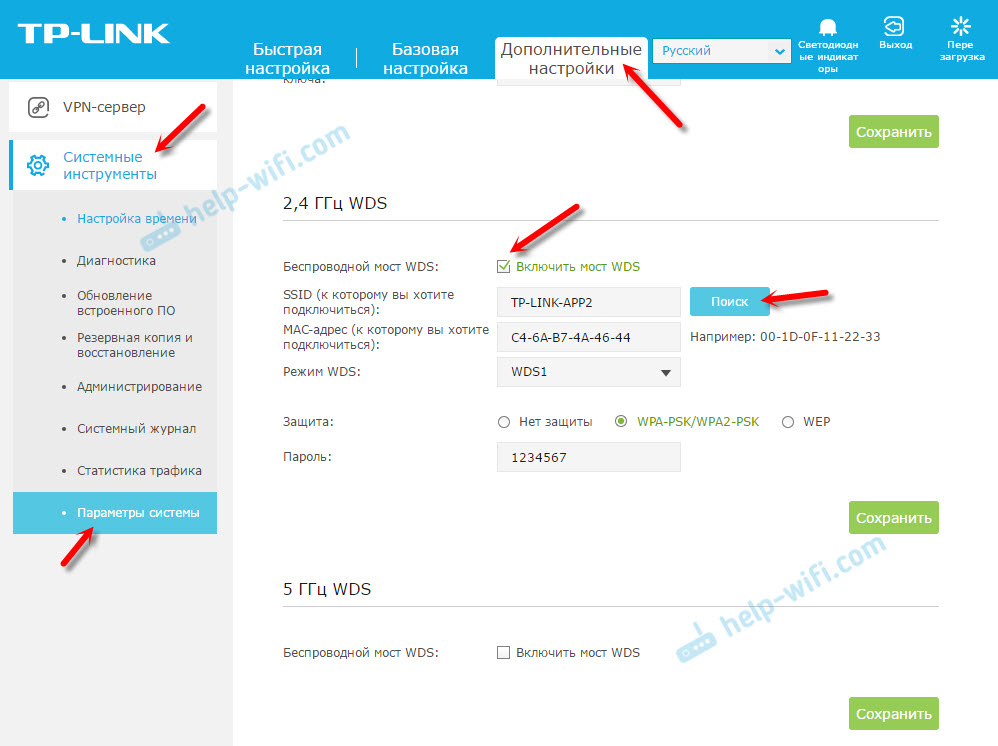
2 Select the network you want to connect to from the list. Just click "Select" next to your network. I think you can easily find your network in the list of available ones.
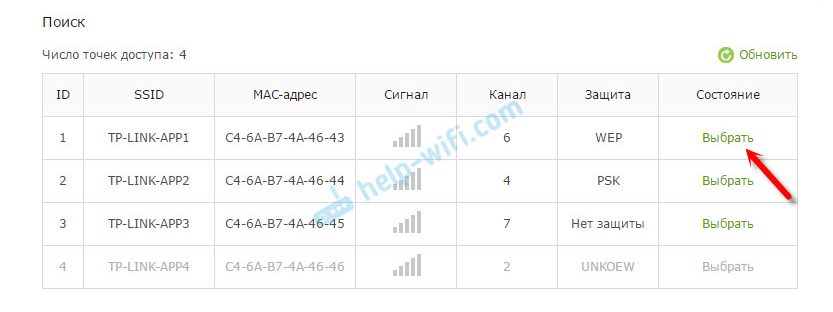
3 If necessary, you can change the protection settings (Protection, Password) and click on the "Save" button. If you set a password, then select "WPA-PSK / WPA2-PSK". You can also leave the network without a password. If needed.
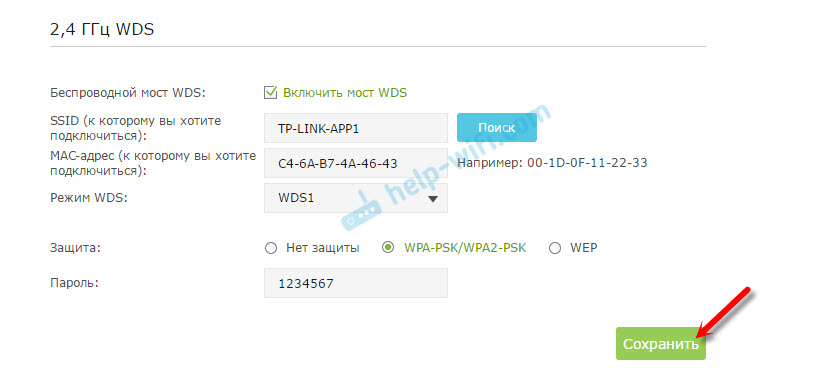
Roture via Wi-Fi will connect to another router, and will receive Internet wirelessly.
If you need to disable the DHCP server, you can do this on the tab "Advanced settings" - "Network" - "DHCP server".
If the Internet does not work via cable in WDS mode
If you make the settings that I showed above, then the Internet will only work via Wi-Fi, and when connected to a router (which is in WDS mode) cable, internet not working. Without internet access. This, of course, is not the case, and using a router as a Wi-Fi network receiver, for example, will not work. Therefore, I wrote a question to TP-LINK support, and they answered me.
When setting up the WDS function, you receive IP addressing from the original router (the device to which the WDS client connects) both over a wired and non-wired network. To properly configure this function, you must always disable the DHCP server on the equipment on which the WDS bridge is configured. You also need its local IP address to be on the same subnet as the original router.
I checked everything on the TP-LINK TL-WR740N, and indeed, after disabling the DHCP server, the Internet immediately started working on network cable. Disabling DHCP is not difficult at all. In the router settings, open the tab DHCP, set the switch near Disable(disable) and save the settings.
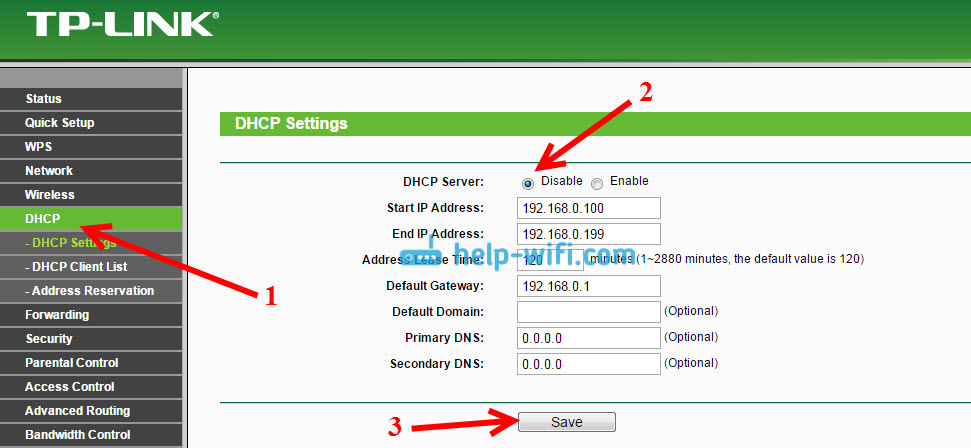
We reboot the router and everything works fine. I immediately got internet via cable. You can go to the settings of this router at the address that we set in the second step. Mine is 192.168.1.2.
Good day.
There is no Internet connection in my house yet. If you hang a Wi-Fi adapter outside the window, you can catch several cafe networks with free Internet. However, I want the Internet to be throughout the apartment. You can make a repeater out of a Wi-Fi router, but then the home network is open to others. As a result of digging the Internet and discussions on the forum, a solution was found how to take the Internet from an open wireless network and distribute it in a closed network with encryption.
It all started with the purchase of the legendary ASUS WL500g Premium second edition (V2).
First, I installed Oleg's firmware from enthusiasts. I decided to try connecting my wi-fi adapter to the router (fortunately 2 usb on it). A discussion on the forum of the Oleg firmware prompted the idea that it is possible to use the OpenWRT firmware in which it is possible to add virtual adapters. That is, we connect a physical wireless adapter to an open network with the Internet (let's call it CafeAP) and distribute this Internet in a closed home network(HomeAP). I started digging, and came across a post that in DD-WRT you can easily do this. Excellent. With the choice of firmware, I decided now we put it.
This is a fairly trivial task and its solution is quite accessible, so I will not waste symbols.
Just do not install the SP1 firmware in any case - it does not support what we need.
I installed DD-WRT v24-sp2 (08/07/10) mega (fortunately, 8 MB of flash memory allows; those who have less flash memory on the router will have to set standart). Further digging began on the DD-WRT WIKI. She is very rich, but... only if you can read English. The Russian wiki is almost useless so far.
Repeater or take the Internet from the cafe's Wi-Fi network
The algorithm of actions after installing the firmware is as follows (my router speaks English, therefore the instructions on it).1. Do 30/30/30
2. Connect a cable to the router (it is possible without a wire, for which there is an open wireless network called dd-wrt). Go to it by typing 192.168.1.1 in your browser. You will be asked to change your username and password - do it.
In the tab Wireless -> Basic Settings:
- Wireless mode: set to "Repeater" mode
- Wireless Network mode: set to the same as CafeAP. Although it is possible and not necessary, I left the mixed mode (mixed) and everything works fine
- Wireless Network Name (SSID): SSID of the network we are connecting to (in my case it is "CafeAP")
Save by clicking Save.
Add a virtual adapter by clicking the button Add
- Enter a name different from the network to which we are connecting (in my case, HomeAP)
Save
(It is advised to apply the changes by clicking Apply Settings after each page is completed, not after you have completed everything).
3. Wireless -> Wireless Security:
Physical Interface wl0:
Here you will need to enter the network security settings. If you are connecting to an open network of cafes, you do not need to change anything. If to an encrypted network, then you will need to select the encryption algorithm it uses and enter the password
Save
Virtual Interface wl0.1:
And this is your network (HomeAP). I selected WPA2 Personal, tkip + aes and entered the password
Note: The instructions say that if encryption is used on both networks, and it is different on both, it may not work. In this case, try to make the encryption settings the same.
Save
4. Tab Setup -> Basic Setup:
Network setup:
Here you need to specify the subnet settings of our router.
For example: if the subnet of the access point to which we are connecting (CafeAP) is 192.168.1.x, then the router address should be 192.168.2.1 (I set 192.168.77.1)
Save
5. Tab security:
Uncheck all the boxes in the "Block WAN Request" section (excluding Filter Multicast), and then turn off the SPI firewall (I'm paranoid - I didn't turn it off. Everything seems to work.)
Save
6. Tab Administration:
Change what you see fit. For example, I made sure that the statistics page is not shown to unauthorized users (Enable info site is changed to disable)
Click Apply Settings
Then Reboot Router
Now, if everything is correct, then the router will get WAN IP (see right in the corner; it should be different from 0.0.0.0), and you will get Internet access.
If you want to connect to another network, you can go to the Status -> Wireless tab. At the very bottom you need to find the Site Survey button. A window will open in which you can see a list of networks. Refresh button - refreshes the list. Choose the one you like and click Join. The router will say that it has successfully connected to the selected network and will take us to the Wireless tab. You will have to change the settings as you did in steps 2-3, click Apply Settings and you are connected to another network.
Repeater Bridge or connect to a friend's network
The c Repeater instruction is suitable if we connect to untrusted networks. And if we want to connect, for example, to a friend's network (FriendAP), then we need to use the Repeater Bridge modeIn doing so, we will have full access to the resources of a friend's network (including printers), and he to our resources.
To do this, we need to do the following
1. Restore Factory Defaults(Administration -> Factory Defaults) on your router
2. Make a router 30-30-30
3. Connect to router over a wired or wireless network and go to it.
Tab Wireless -> Basic Settings tab
Physical Interface Section
- Wireless Mode: Repeater Bridge
- Wireless Network Mode: leave mixed or set as FriendAP router
- Wireless Network Name(SSID): same as friend's network - FriendAP
- Wireless SSID Broadcast: Enable
Save
Virtual Interfaces Section
- Add
- Wireless Network Name(SSID): SSID other than FriendAP (HomeAP)
- Wireless SSID Broadcast: if set to Disable then the network will be hidden
- AP Isolation: Disable
- Network Configuration: Bridged
Save
4. Tab Wireless -> Wireless Security tab
Physical Interface Section
- Security Mode: Same as FriendAP (DD-WRT is said to work in similar mode only if FriendAP has wep or WPA2AES)
- WPA Algorithms: same as FriendAP
- WPA Shared Key: same as FriendAP
Virtual Interfaces Section
- Security Mode: WPA2 is best
- WPA Algorithms: I installed tkip + aes
- WPA Shared Key: choose a password
- Key Renewal Interval (in seconds): leave as is
Save
5. Tab Setup -> Basic Setup tab
- Connection Type: Disabled
- Change the STP checkbox to Disabled (Leaving Enabled may cause connection problems)
- IP Address: 192.168.1.2 (If FriendAP router has IP 192.168.1.1)
- Mask: 255.255.255.0 (If FriendAP has such a network mask)
- Gateway: 192.168.1.1 (If FriendAP router has IP 192.168.1.1)
- DHCP Server: Disable
- Local DNS: 192.168.1.1 (If FriendAP router has IP 192.168.1.1)
- Assign WAN Port to Switch: If you want to use the WAN port as a regular LAN, check the box
Save
- If you applied the changes, go back to the router at the new address 192.168.1.2
6. Setup -> Advanced Routing tab
- Change operating mode to "Router"
Save
7. Services
- Disable the Dnsmasq service
Save
8. Security -> Firewall tab
- Uncheck everywhere except Filter Multicast
- Disable SPI firewall
Apply the changes and reboot the router(Administration -> Reboot router)
After these steps, you should be able to access the FriendAP network as if you were directly connected to it.
Routers very often have to be configured to work as an amplifier or bridge. Therefore, this instruction is suitable for those who are trying to configure Tp-Link to work as a bridge, in WDS mode. Before moving on to the job description process, a clear definition of what a bridge is and how it differs from a repeater should be made.
The issue of repeater mode has already been raised before. It was noted that Tp-Link models do not have this mode. For example, Zyxel or Asus have them, there is a separate switch in the settings. In this case, the device works like a real amplifier. For TP Link given function available only at selected access points. In most standard router models, for example, TL-WR941ND, TL-WR740N, TL-WR841N, TL-MR3220, TL-WR842ND, there is only a WDS operation option - a bridge.
What are the features of the bridge?
The bridge is characterized by the connection of a pair of devices via wireless communication. This method can be used if you need to strengthen or expand the Wi-Fi network. The situation can be visualized using the example of a router that distributes a connection. Its network does not cover the entire space, therefore, it needs to be expanded. For this, a second Tp-Link router is used. It is connected and configured according to the instructions below. As a result, it takes over the settings from the main equipment and distributes the network further. The difference from the amplifier will be that with a bridge you will get two wireless networks with independent access parameters.
The method is quite convenient if there is no other possibility for customization. The amplifier is more advantageous as it simply duplicates all the parameters and does not create its own connection. In the case of a bridge, each time you have to choose which of the two networks to connect to.
Sometimes the question arises how to configure tl-wr941nd to receive a wireless connection and then transmit it further via cable. It turns out that the router will be used as a receiver, and is such use of equipment possible?
The answer is simple, when you configure a router over a bridge connection, it will work as a receiver. In this case, through it you can easily connect a TV, laptop or other equipment that does not have its own adapters for connecting via a Wi-Fi network.
What points should be considered?
- For the main router, you can choose a device from any manufacturer. It is desirable that he be alone, but not necessarily. The ideal option is when both routers are of the same model. In the example, the D-link DIR-615/A will be the main one, and the TL-MR3220 model is used for the bridge. It should be noted that not all models can interact correctly. Communication between Asus old version RT-N13U and Tp-Link has not been configured.
- The settings of the main router will also be changed. You will need to specify a static communication channel.
- This method is best suited for wireless communication. As an example of use, we can cite the situation when a main device is installed in one place, and another device is installed in another, which is connected to the main one via Wi-Fi via a bridge.
How to set up a bridge on Tp-Link?
Initially, you need to change the wireless channel of the main unit. It is important that the main router is configured and debugged before starting the procedure. It should broadcast the Wi-Fi connection uninterruptedly. In the example, the main router is D-link DIR-615. He should change the communication channel. Perhaps yours will be different. Then, in order to change the channel, you should read the instructions. She talks in detail about this procedure for routers of various brands.
For Tp-Link, this is easy. You should log in to the administration panel at 192.168.1.1 (192.168.0.1). If you can't do it, read the article. Then go to section wireless, You will be interested in the field Channel. It specifies a static channel. This can be a value of 1 or 6. After that, the changes are saved by the button save.
This completes the changes to the settings of the main router. You can close the administration panel.
In the settings, you should make changes to the ip-address so that there is no conflict between devices if they receive the same values. In such a situation, they will not work. To change the data, open the section network – lan. IP address. It will need to rewrite the value of the last digit of the address to 2. After that, apply the settings using the button Save and reboot your device.
In order to check the new parameters, log in again and make sure that the address is the same as you assigned it.
The third step specifies the network name. To do this, open the section wireless. Find the line in it Wireless Network Name. In it, write the name of the new connection. In line Channel be sure to specify the same channel that was set in the settings of the main router. In the example, the value is 1. Check the checkbox opposite the line Enable WDS Bridging, and click Survey.
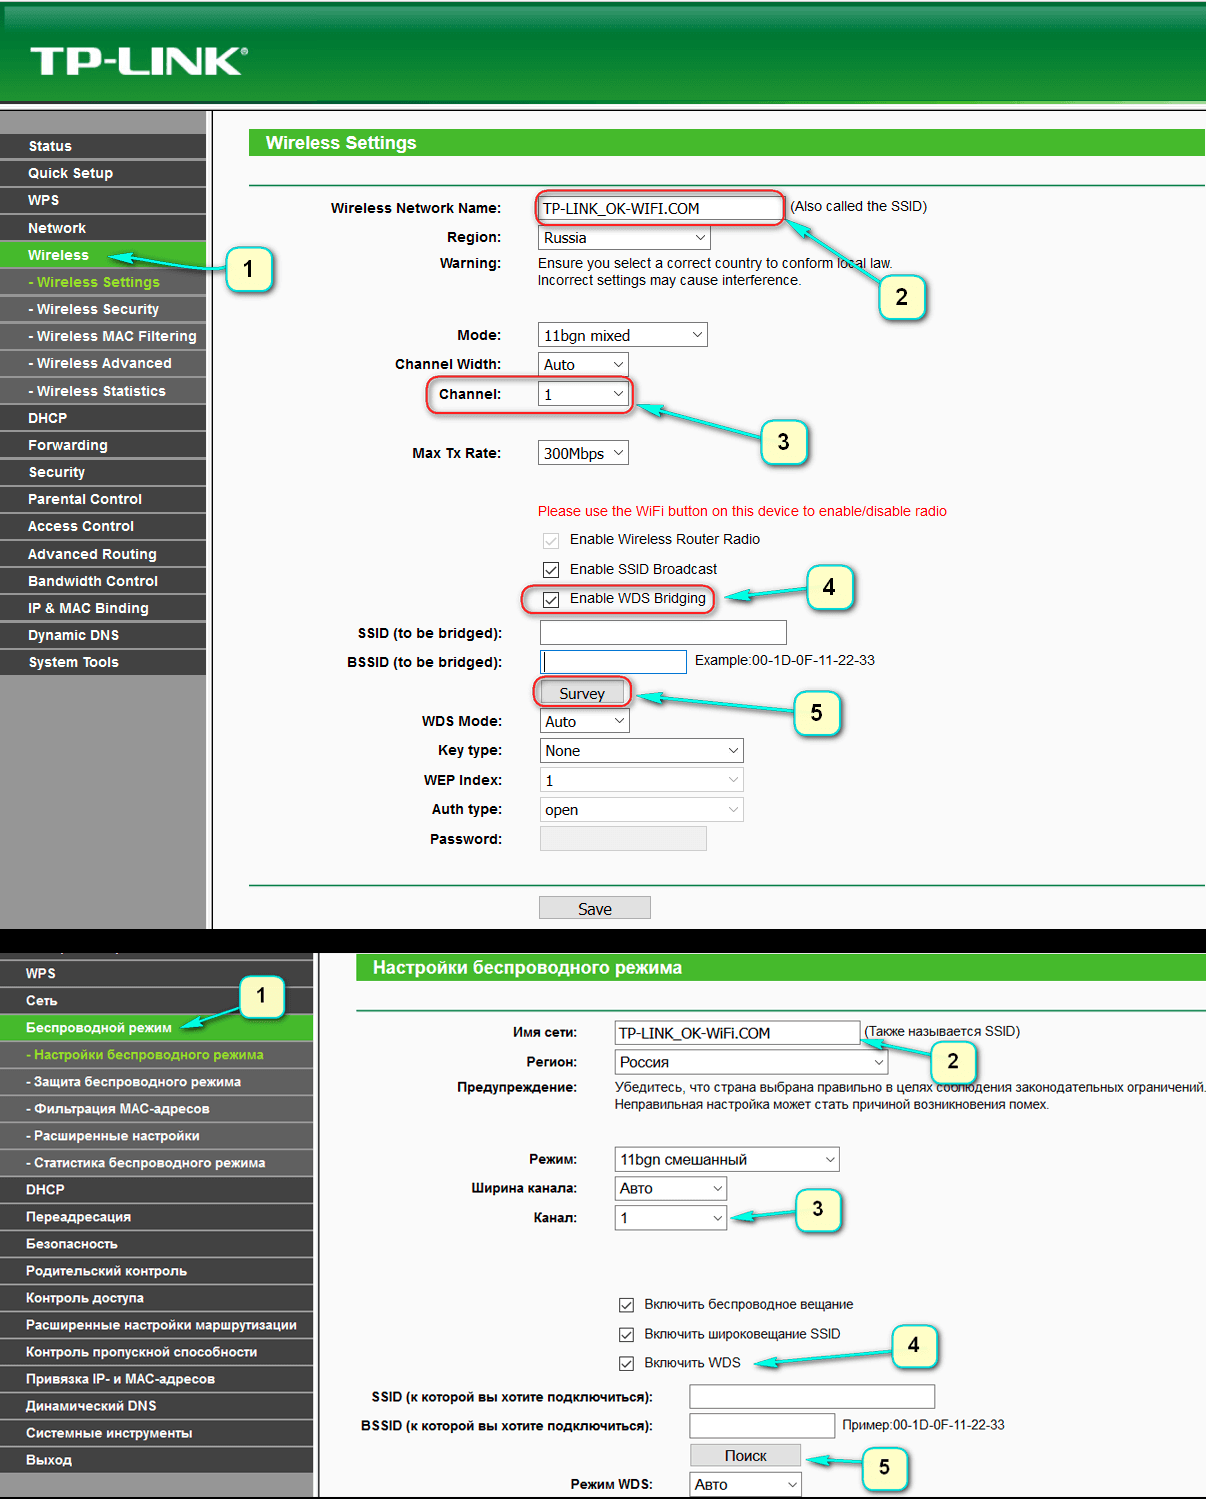
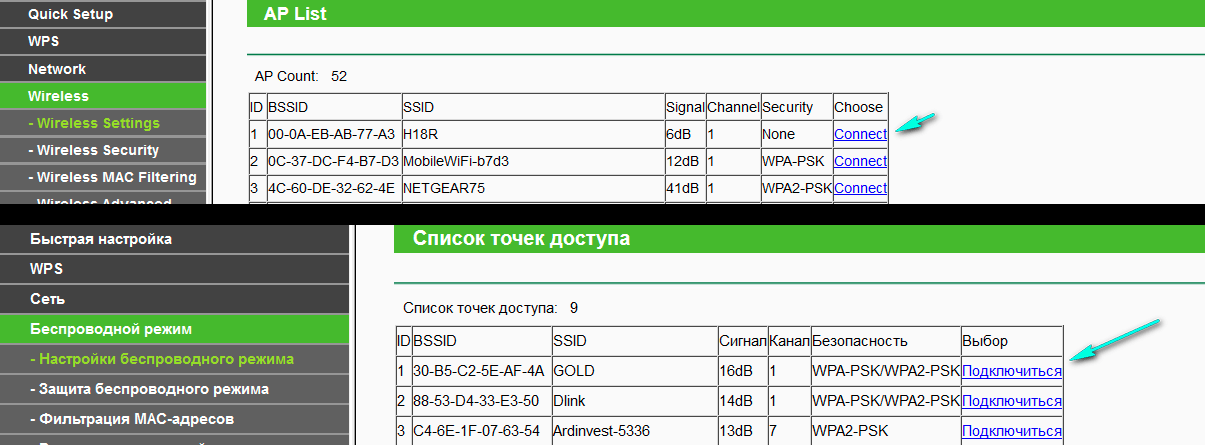
In the list that appears, mark the connection with which the connection will be established, and click on Connect.
The fourth step sets the security type. In drop down list key type a value similar to the settings of the first router is selected. Then the field is filled password. This is the access key to the new network. To apply the settings, press the button Save.
When the settings are saved, reboot. To do this, turn off the power of the box and restart it. Or use the button on the administration page.
The fifth step is to check the parameters. You should go to the router settings again. On the main page of the administration panel, find the section wireless. You will be interested in the line WDS status. Opposite it should be the value run.
If the value is there, then the setting is correct. The router was able to successfully connect to the host device. Now he is ready to distribute the network over a wireless connection or cable.
In some situations, ip-addresses must be distributed by the head unit. In order to do this, the DHCP server is disabled on the administration panel of the secondary router. Does it in a tab DHCP, where the value is set opposite the line disable. for the settings to take effect. The save button is pressed.
![]()
In conclusion, you should set a complex password for the new wireless network. You can find out how to do this by looking. In the settings, find the tab Wireless — Wireless Security, check the section WPA/WPA2-Personal(Recommended), in line Wireless Password specify keys and save by button Save.
Hey! TP-Link has such popular router models as: TL-WR841ND and TL-WR741ND. They are indeed very popular, and are installed in many homes and even offices. Well, many people have a question about how to set them up as a repeater. Can TP-Link routers work as repeaters at all? Now we will try to understand this, and I will tell you how (or other model) set up as a repeater.
I just took these two models as an example, since they are the most popular. In fact, almost all router models TP-Link do not know how to work as repeaters (I don’t know how it is now with new devices). They simply don't have that option. Only TP-Link access points support repeater mode. Now I have to enter the work in the present mode of the Wi-Fi network repeater. When another router simply expands the range of the Wi-Fi network, as Asus devices do, for example (wrote about this).
If you have a TP-Link TL-WR741N, or TL-WR841N, it doesn't matter, you won't be able to configure it as a wireless network repeater. Rather, it will turn out, you just need to change the firmware to an alternative DD-WRT. And that's a loss of warranty. And although TP-Link works great on DD-WRT, even better than on native firmware, not many people dare to install it.
If you do not want to install DD-WRT on your router, but you just need to configure your TP-Link to increase the range of your Wi-Fi network, then you can use WDS mode(bridge mode) . Unlike the repeater mode, after setting up WDS, you will already have two Wi-Fi networks. And the speed will have to be divided by two. But, I already checked everything, and everything works. You can easily use your TP-Link to amplify an existing Wi-Fi network.
The only difference is that the repeater mode was originally created to increase the range of the network (read more about repeaters), and the WDS mode (bridge mode) was created to connect two Wi-FI routers into one network wirelessly. That's all the differences.
In a separate instruction, I already wrote about setting up WDS on TP-Link:. Follow the link and set up. Everything is very detailed there. Everything is checked, it works.
But, if you need to effectively, and without any problems with setting up, amplify the signal of your Wi-Fi network, then I would advise you to buy a real repeater, and if you already have a TP-Link router (ex. TL-WR841ND), then flash it with DD-WRT firmware and use it in real repeater mode.
It is a pity that TP-Link has deprived its routers of this useful feature. On Asus routers and the Zyxel network repeater mode works very well and is very easy to set up.
Hello. I have been asked several times in the comments about how you can connect two routers via Wi-Fi in wireless bridge mode (WDS). More precisely, one router will work for itself as usual, and the second will connect to it via a wireless network, take the Internet and distribute it as another network. This method allows you to amplify the signal of the wireless network.
For example, you already have one router installed at home, but it is not enough and the network does not catch it throughout the house. To strengthen the Wi-Fi network, of course, there are special devices - WiFi repeaters . Which simply catch the signal from the router and distribute it further. But almost all modern routers can work in this mode, that is, they can act as a Wi-Fi repeater.
If you have not yet understood what and how I will configure, then I found an excellent picture on the official TP-Link website that clearly shows the scheme of such a connection.
To be honest, I don’t know how things are with this in the routers of such companies as: Asus, D-Link, Tenda, Linksys, etc. I will show you how to configure wireless bridge(WDS) on the router from TP Link. Now I'm working through a TP-Link TL-MR3220 router, so I experimented on it. But for example, setting up the same TP-Link TL-WR841N in repeater mode will be no different. Checked. In any case, my instructions should come in handy.
Here is another comment that was left a few days ago, we will respond to it today.

If you have a main router for example from TP-Link and you want to install another router as a repeater, then I advise you to buy a device from the same company, in our case TP-Link. Devices of the same company work better and more stable.
So on our main router, you only need to change the channel.
Setting up the main router
Go to the router settings and go to the tab Wireless. Opposite the parameter Channel set the channel number, for example 6 (the same channel will need to be set on the router, which we will configure as a repeater). Save settings by pressing the button Save.
Setting up the repeater router
At the time of setup, the router (which will work as a repeater) must be connected to the computer via cable.
We go into the settings of the router. To do this, in the browser we type the address 192.168.0.1 , or 192.168.1.1 (the address can be viewed from the bottom of the router).
Then you will be prompted to enter a username and password to access the router settings. If you have not changed them, then usually the default is admin and admin (you can also look at the bottom of the device).
Disable WPS
I wrote more about WPS in the article What is QSS and WPS? What is the QSS button on a Wi-Fi router for and how to use it ?, you can read. We need to disable this feature.
To do this, go to the tab WPS and click on the button “Disable WPS”.

Reboot your router. To do this, you can click on the link click here which will appear on the page after changing the settings.
After the reboot, the page with the router settings should open again.
Change the IP address of the TP-Link router
Go to the tab network – LAN. In field IP address change the last number of the IP address to a number 2 . For example, I had the address 192.168.0.1, and I changed it to 192.168.0.2 . To save the settings, press the button Save.
The router itself will reboot, it will ask you to enter your login and password again to access the settings, and you will be taken to the settings page. Please note that the IP address in the browser will be different.

Setting up a wireless bridge (WDS) on a TP-Link router
Go to the tab Wireless.
Near Wireless Network Name specify the name of the new wireless network that our new so-called "Repeater" will distribute. And near region indicate your region.
Against Channel I advise you to change the channel to digital 6 (better set to 1 so that the channels do not match. Try this and that).
Attention! If the Internet does not work when installing the same channels on the main router and on the “repeater” router (for example, 6), then set channel 1 (or another) on the second router. Try this and that.
To enable bridge mode (WDS), check the box next to Enable WDS Bridging.
Well, it remains only to start the search for Wi-Fi routers. To do this, click on the button “Survey”.
![]()
A page will open with a list of wireless networks (there may be only one network). Select the network (main router) and press the button next to it Connect.
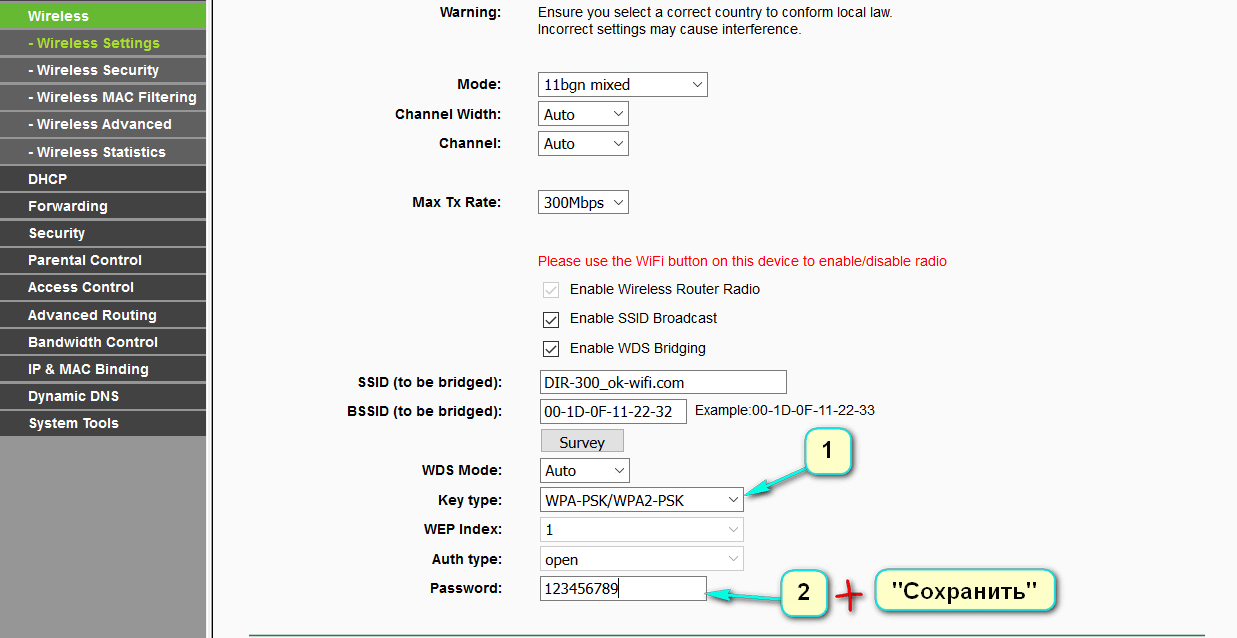
You will see that the fields SSID (to be bridged) and BSSID (to be bridged) will be filled. If the password for the Wi-Fi network is set on the main router, then in the field key type specify the type of encryption, and in the field Password enter the password to access the wireless network of the main router.
Click the button Save and reboot your router.
Everything must work. On the main page of the router settings, you can see the connection status. If opposite WDS Status written Run, then this means that the router has connected to the main router and should distribute the Internet.
Also, do not forget to set up wireless network protection on the new router (the one that is a repeater), read more in the article How to set (change) a password for a Wi-Fi network on a TP-Link TL-WR841N router.
Possible problems when setting up a wireless bridge (WDS)
If on the main page of the router settings in the status WDS Status written for a long time Scan..., then this means that our repeater router cannot connect to the main router.
1. Check if you have entered the correct encryption type and password to connect to the main router.
2. Try playing around with changing channels. Tab Wireless paragraph Channel(on both routers).
3. If you have an item in your router settings Wireless – Wireless Bridge(for example, TD-W8960N), then on both routers you need to set the following settings:
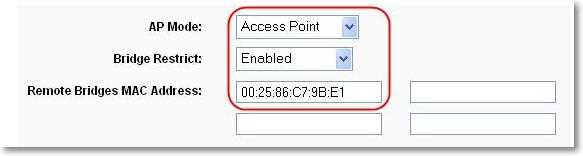
Only when configuring the main router, you need to specify the MAC address of the secondary router. And when configuring the secondary, specify the MAC address of the main one. The MAC address of the router can be viewed from the bottom of the device.
4. Just in case, check if MAC address filtering is enabled on the main router.
If, after setting up, the routers connect, but the Internet does not work, then try disabling DHCP. Go to the router settings on the DHCP tab and change the value to Disable. Save your settings and reboot your device.
Afterword
Perhaps a little confusing article turned out, but I tried to put everything on the shelves. In fact, setting up a wireless bridge on a router is not difficult.
To be honest, I had an HTC phone as the main router, it has the ability to work as a router. So here's mine TP Link TL-MR3220, which I set up as a “Repeater” connected to the phone via Wi-Fi and distributed the wireless network further. And everything worked great. But it's not very important point because the settings are the same.
I just wanted to make sure that everything works, and it's not very good to write unverified information.
There will be questions, ask! Best wishes!