Hello.
Today we will consider a representative of the ASUS router family, the ASUS RT-N12VP model
About the brand

Asus is a Taiwan-based company that manufactures personal computers as well as computer components such as motherboards, graphics cards, and laptops. Cell phones, internet tablets, optical drives and monitors.
As of 2014, the company is the third supplier personal computers and tablets in the world in terms of sales (after HP and Dell).
The brand name Asus comes from the word Pegasus (Pegasus). The full name of the company is ASUSTeK Computer Inc.
It has a number of subsidiaries: Pegatron, Unihan, ASRock.
Specifications
Type - router
Model - ASUS RT-N12 VP
Black color
Wi-Fi support - yes
Operating frequency WiFi module- 2.4~2.4835GHz
Data rate b/g/n - 802.11b: 1, 2, 5.5, 11Mbps ; 802.11g: 6,9,12,18,24,36,48,54Mbps; 802.11n: up to 300Mbps
Maximum Wi-Fi connection speed - 300 Mbps
Transmitter power - 18 dBM
Type and number of antennas - external non-removable x2
Antenna gain - 5 dBi
LAN ports - 4 x RJ45
WAN port - 1 x RJ45
Basic data transfer rate, LAN - 100 Mbps
Supported network standards - IEEE 802.11b, IEEE 802.11g, IEEE 802.11n, IEEE 802.3, IEEE 802.3u, IPv4, IPv6
Security - 64-bit WEP, 128-bit WEP, WPA2-PSK, WPA-PSK, WPA-Enterprise , WPA2-Enterprise , WPS support
Network Management - UPnP, IGMP v1/v2/v3, DNS Proxy, NTP Client, DDNS, Port Triger, Virtual Server, DMZ
Connection types - Automatic IP, Static IP, PPTP, PPPoE, L2TP, Dual Link
DHCP Support Yes
VPN support - IPSec Pass-Throuth, PPTP Pass-Through, L2TP Pass-Through, PPTP server
Panel Indication - PWR x 1, Wi-Fi x 1, WAN x 1, LAN x 4
Firewall - Yes
Filtering - by IP address, by MAC address
Services - EZQoS, WMM (WiFi multimedia)
Support for IPTV - connect up to 2 set-top boxes.
Management, configuration - Web-interface
Features - Multiple SSIDs, Parental Control
OS Support - Windows 7, Windows 8, Windows Vista, Windows 2000, Windows XP, Mac OS X, Linux
Power: 110V~240V(50~60Hz)
Power supply - 12V/0.5A
Dimensions L/W/H - 179 x 128 x 28 cm.
Weight - 275 gr.
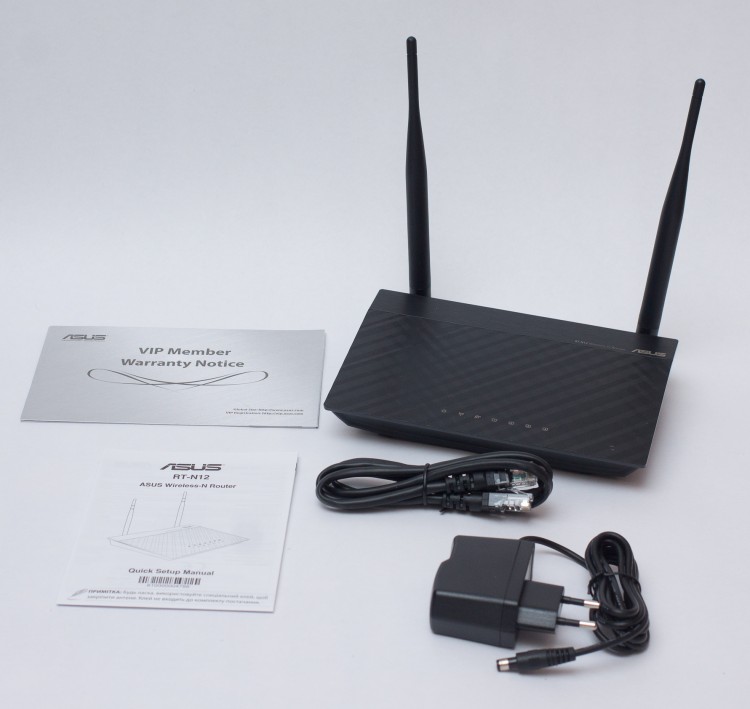
Equipment, appearance
The router comes in a cardboard box. The box is wrapped in polyethylene.
The most important characteristics are accentuated on the front side. 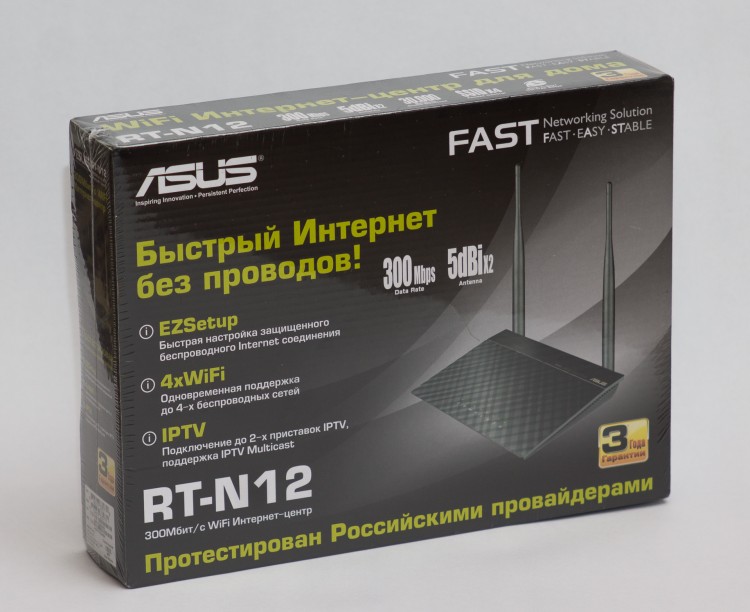
On back side, other detailed information. 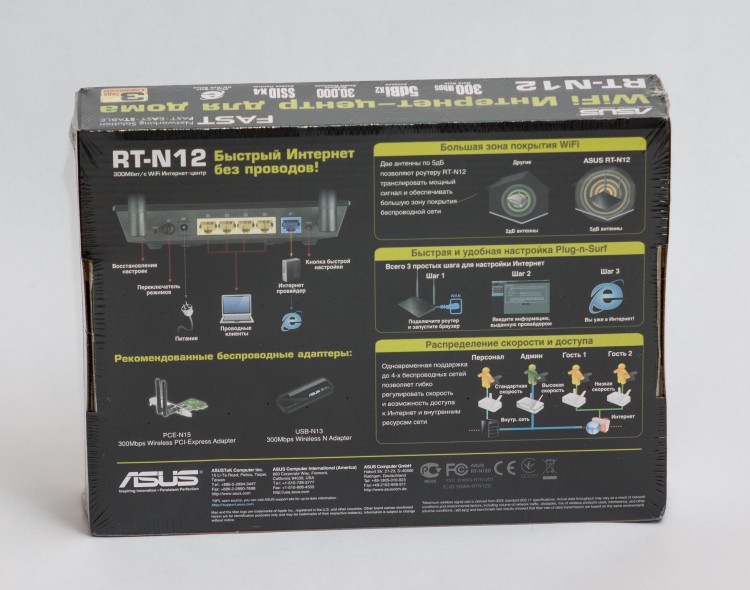
Side details.
Two large Mac and Win8 icons are visible. It's strange that there is no mention of Linux support... 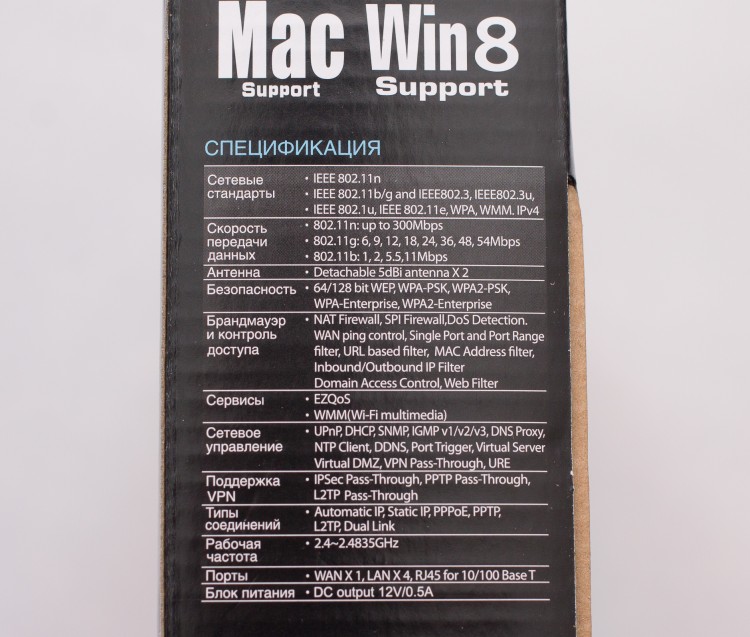
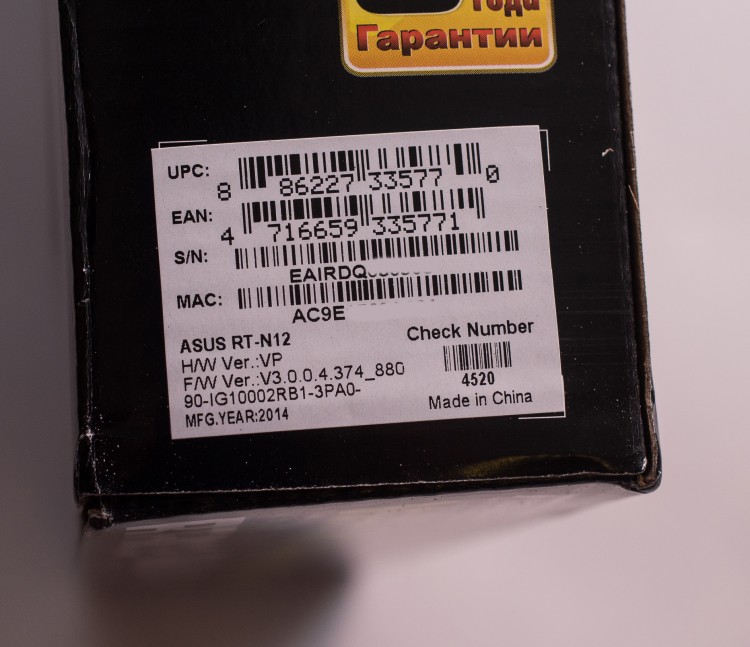
In order to find out which version of the router you got, you need to look at the sticker:
There is a release date. In our case, 2014.
It also contains the firmware version. We got the version: V3.0.0.4.374_880
This firmware was released on 2014/04/18. By the way, the manufacturer's website has an updated firmware dated 2015/02/11
Changes in firmware 3.0.0.4.376.3835 from 2015/02/11:
1) Asus has fixed a critical vulnerability in its routers. The "hole" was in a service called infosvr, which is used by Asus utilities to make it easier to configure the router by automatically detecting it on the local network. The vulnerability allowed to execute any commands with as root(after all, infosvr is also root), which gave the attacker full control over the system.
2) Added support for Yandex DNS
In this review, we will review the router, so to speak "out of the box", with standard firmware V3.0.0.4.374_880
The package bundle is standard for routers of this class:
Router ASUS RT-N12 VP
RJ45 patch cord (1 meter long)
power supply (1.5 meters long)
instruction
warranty card
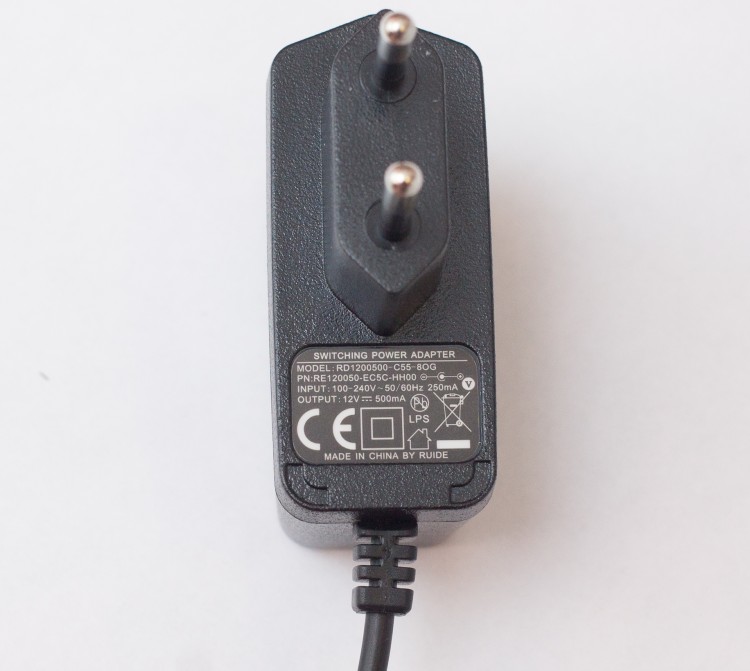
Third party power supply.
12V - 500mA
The appearance of the device is very pleasant. Stylish design with chopped lines in black.
This router will look great in any interior.
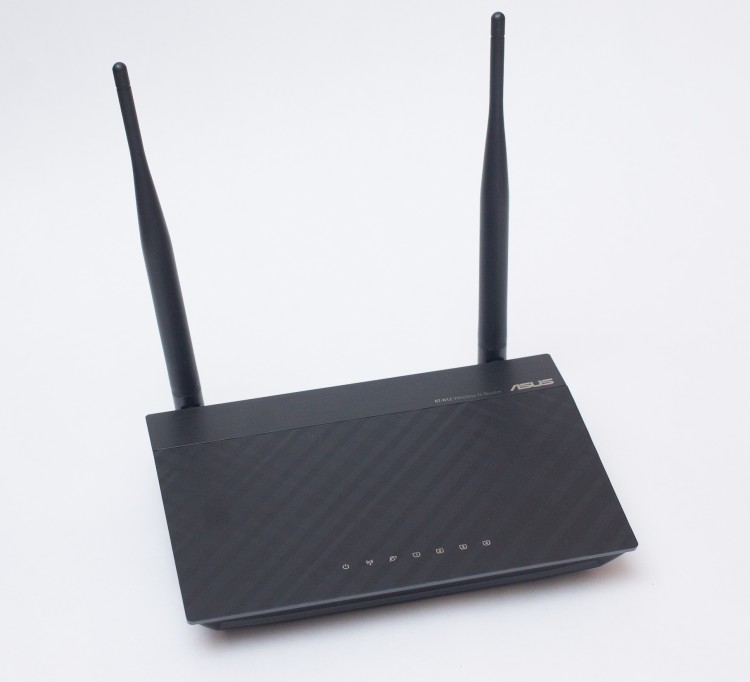

Ventilation holes are made on both edges for heat dissipation.

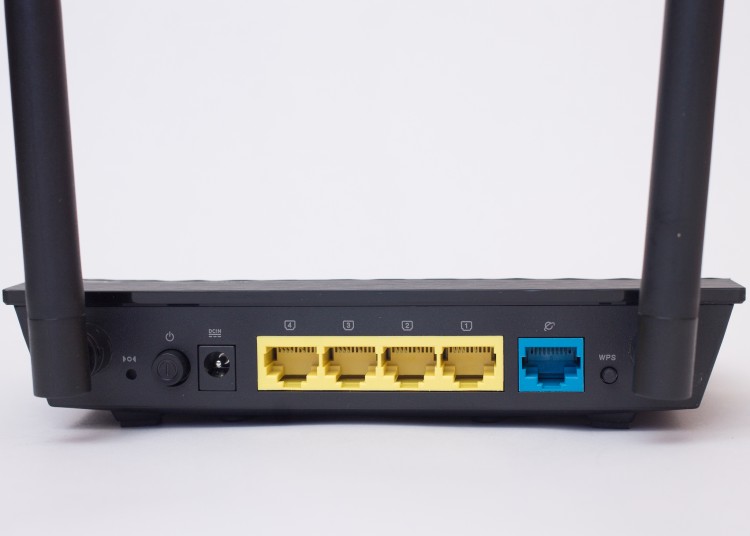
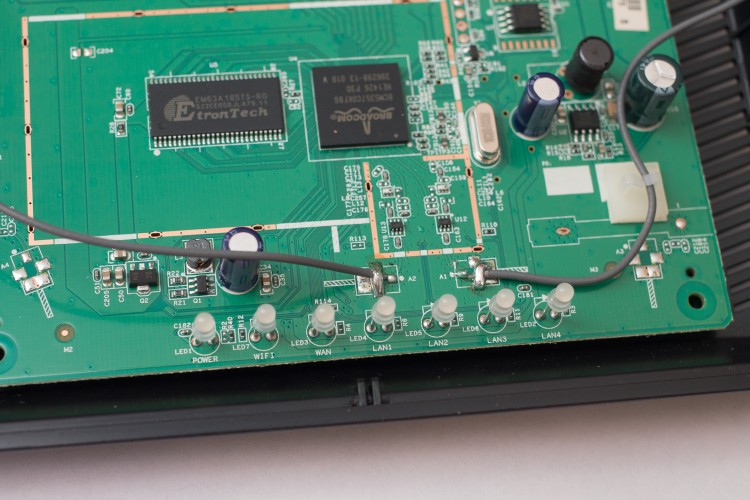
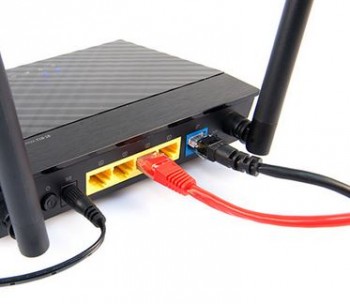
On the back side there are buttons and connectors, from left to right:
1. Reset button (factory reset)
2.PWR power button
3. Connector / socket for connecting the power supply
4. LAN ports - 4 yellow connectors
5. WAN port - 1 x blue
6. WPS button (for quick setup)
It is worth noting two antennas. They are not removable. In general, this is not a disadvantage. Just a feature.
There are indicators on the device, from left to right:
1. PWR (Power)
2. Wi-Fi operation
3. WAN port connection
4. Connectors 4 LAN ports
When working, they are highlighted in a bright, blue color. Slightly strong. A little annoying.

There are rubber feet on the back of the device.
Perforation for ventilation and a sticker with information.
The data for management via a Web browser is indicated: IP address, password, PIN code. And also, firmware version, product serial number and MAC address.

And now we will analyze our device!
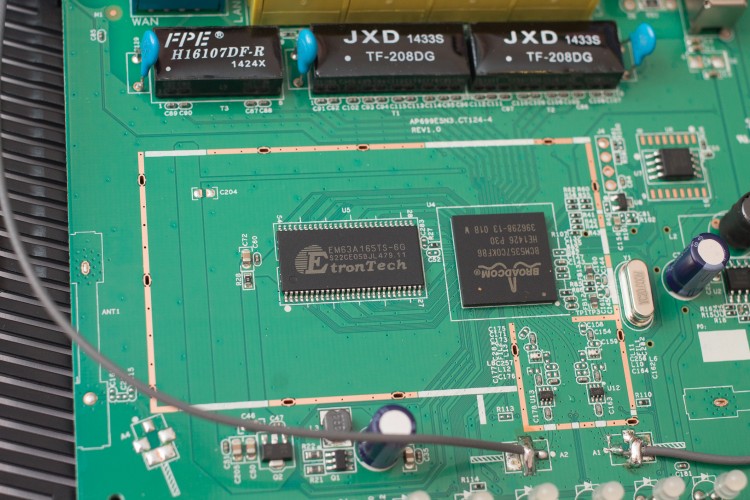
The RT-N12 VP router is based on the Broadcom BCM5357C0 MIPS 74K V4.9 processor with a frequency of 300 MHz. There is also 32MB of RAM based on the Etron Technology EN63A165TS-6G chip and 8MB of flash memory for firmware storage.

The radio module supports 802.11b / g / n protocols in the 2.4 GHz band, and the maximum connection speed is 300 Mbps. The processor also manages five 10/100 Mbps Ethernet ports.
The device is equipped with two fixed external antennas with a gain of 5 dBi.
They are soldered directly to the board.
Other features include support for up to three guest networks, parental control, traffic filtering, DDNS services, traffic manager and QoS, DMZ, access point or repeater modes, support for IPTV and PPTP/L2TP clients.
I also purchased a Power over Ethernet (PoE) splitter injector separately.
This addition is necessary when the router needs to be installed in a place where there is no 220V socket
For example, in the hallway. Let's check if our model supports this technology. 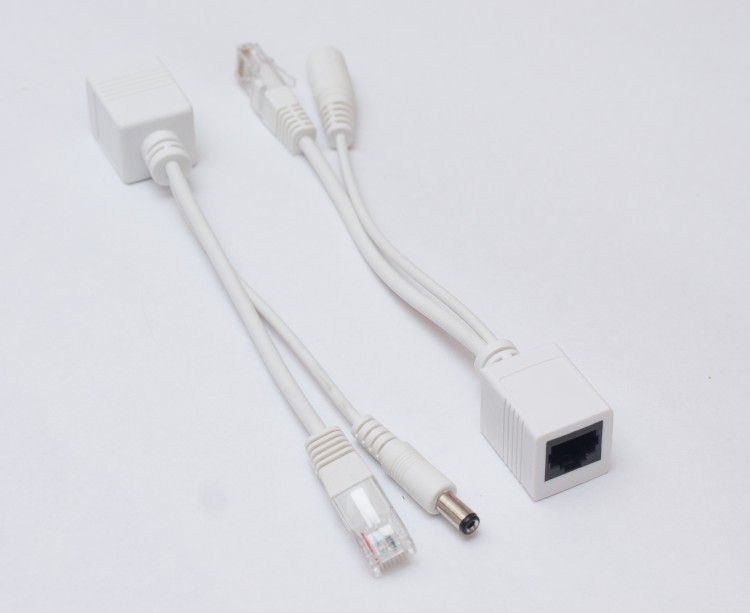
ASUS RT-N12VP did a great job.
This router supports Power over Ethernet (PoE)
The power supply was in another room. Power was transferred successfully. 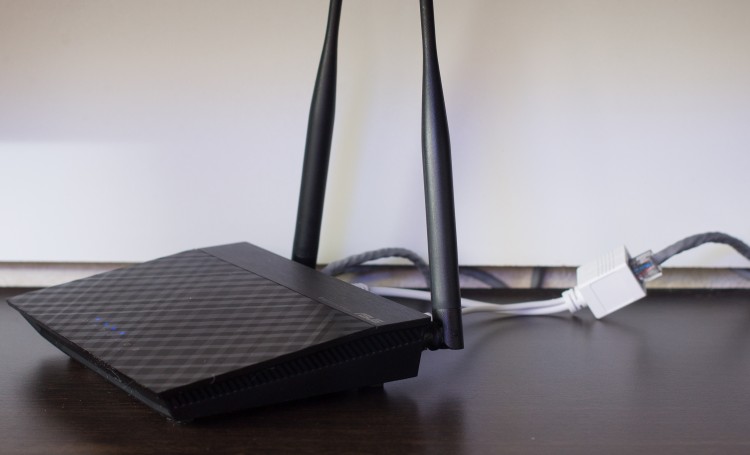
Connection and setup
To connect the router, you need to do the following manipulations:
1. Connect the power supply cable.
2. Insert a patch cord into the LAN connector - yellow, which we also connect to the LAN port of a laptop or PC.
3. In the WAN port - (blue), insert a network cable with the Internet. It can also come from an ADSL modem.
Next, press the power button. It will take 5-10 seconds and the device is ready for use.
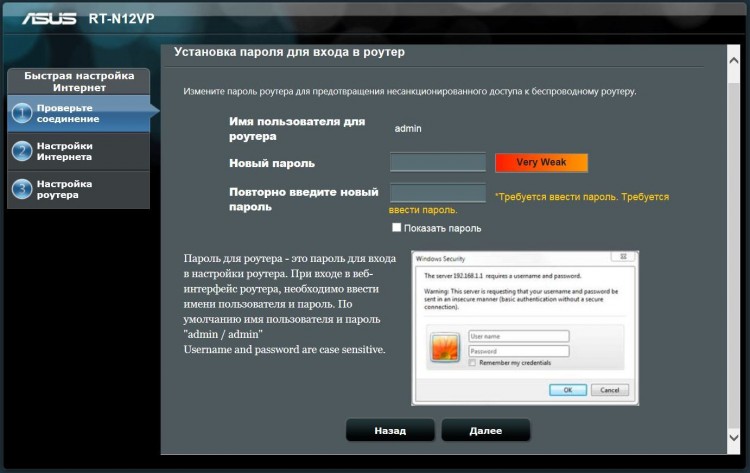
After turning on the router, you just need to launch the browser, and when you try to follow any link, the settings window will open. I launched Internet Explorer and saw the following window:
Click Go...

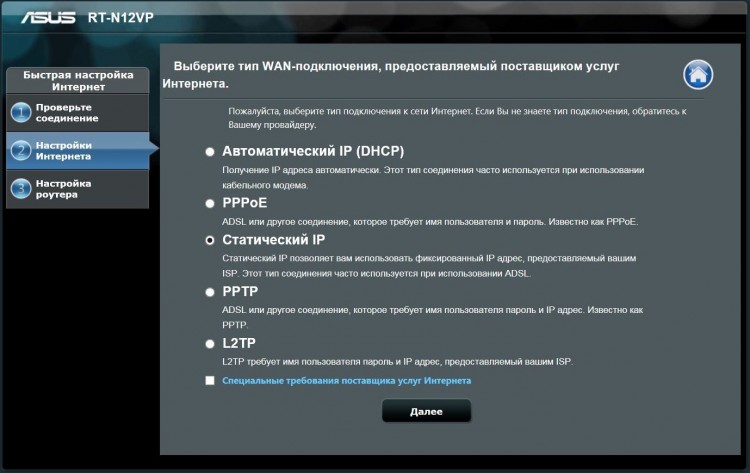
In the next window, you need to select the type of your Internet connection.
In my case, this is a static IP
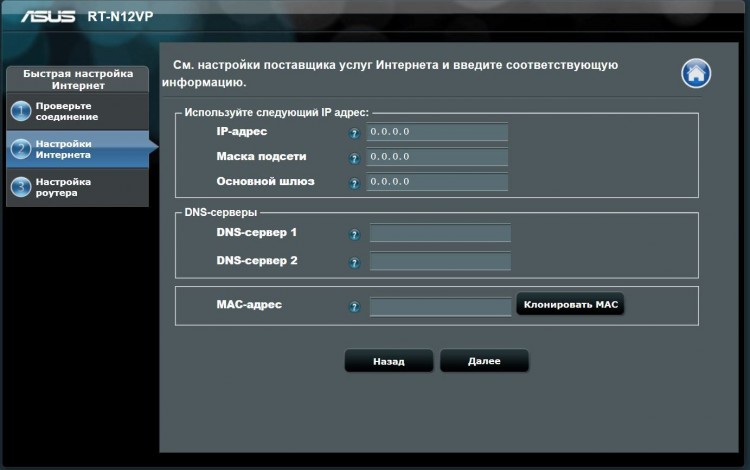
We drive in the IP that your provider gave you.
Just in case, click "Clone MAC address", suddenly your provider has a binding to the MAC address.
If you know these data, you can call the technical support of your provider.
Next, set up the Wi-Fi network.
You need to come up with a password. The password must be longer than 8 digits. For increased security, you can add a Latin letter or letters.
By default, the network name will be ASUS. The name can be changed.

Congratulations! The network is configured. After that, you should earn Internet and Wi-Fi network.

Now consider the capabilities of the router.
On the left are two large items "General" and "Advanced settings"
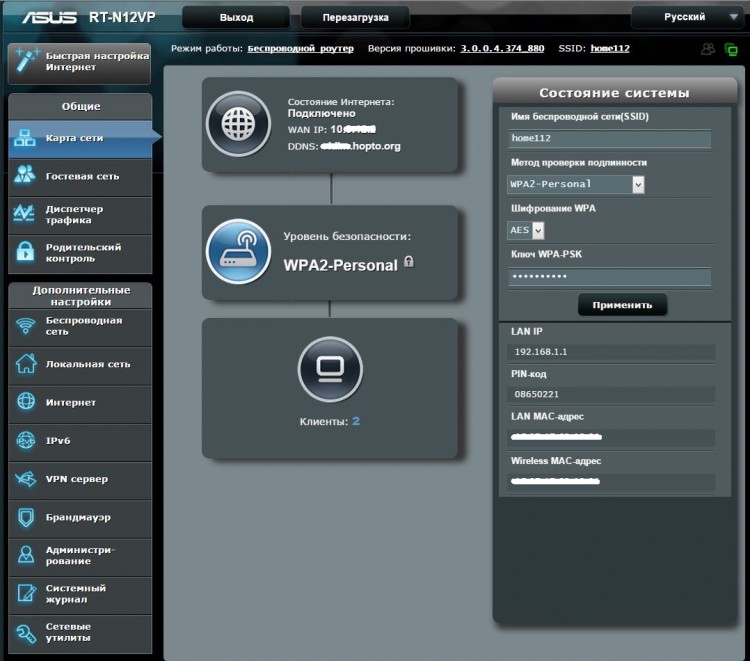
The main menu looks like this.
Center: Internet Status, Wi-Fi Status, and the number of connected clients.
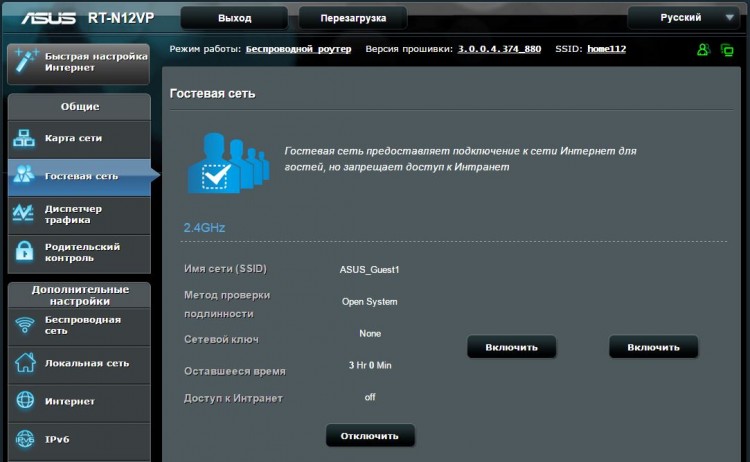
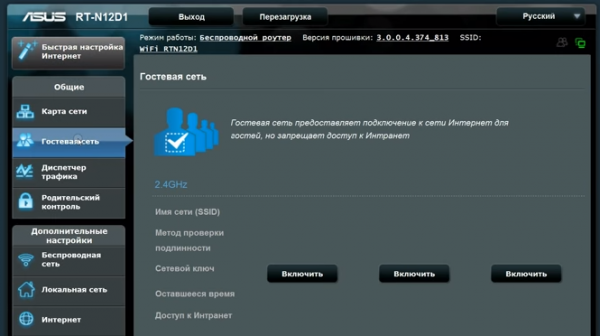
In the "Guest Network" section, you can configure guest access in three ways.
By default, access to the local network is closed. Only the Internet is available to guests.
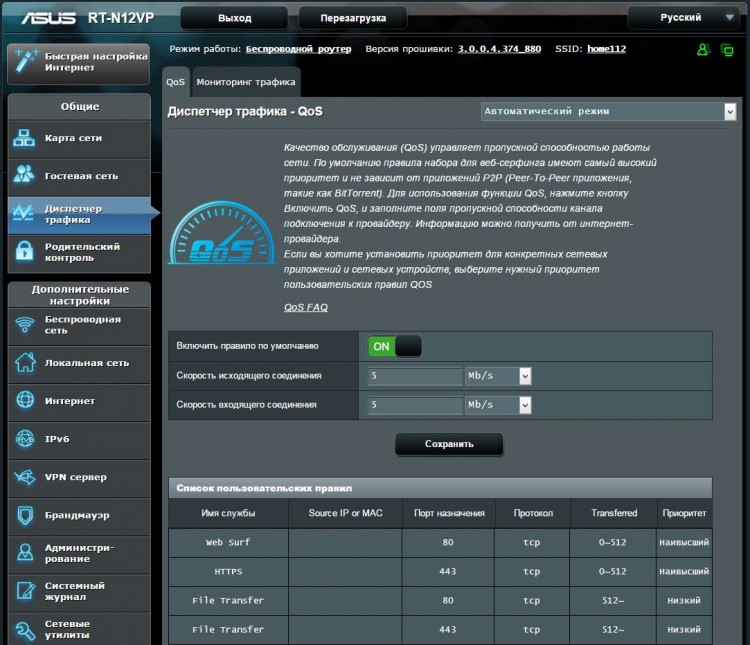
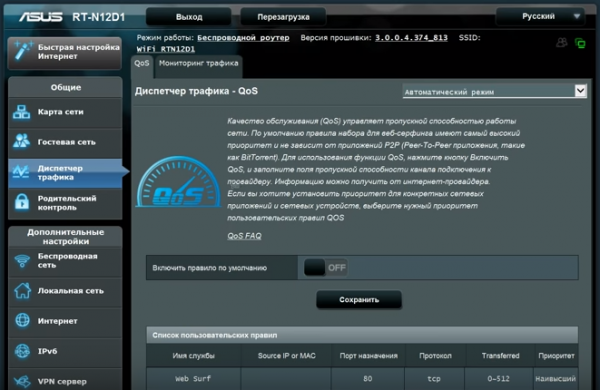
In the traffic manager, you can limit the speed and see the consumption of the total traffic.
It’s a pity that you can’t see how much this or that client has spent (by MAC address). The statistics are general. And only online. If you close the page, the data will disappear. In fact, the thing is almost useless.
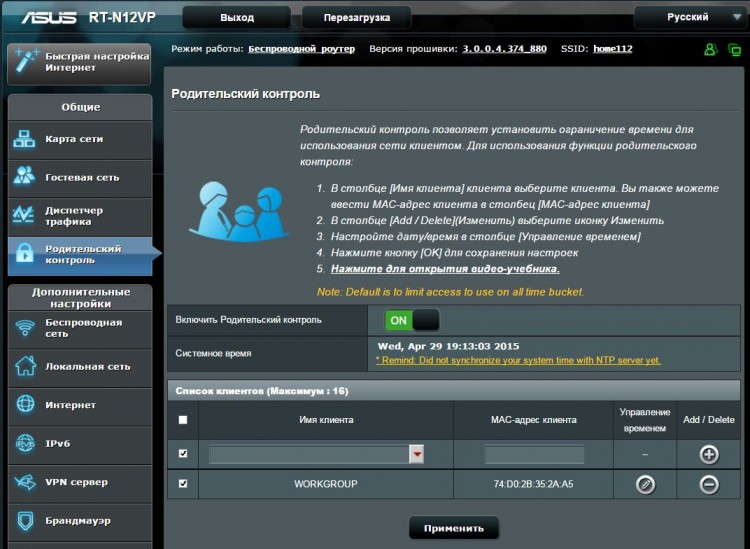
In Parental Control, you can selectively restrict clients' access to the Internet. (by MAC address) You can select specific days of the week and allowed hours. Comfortable enough.
The "Wireless networks" tab contains the settings for Wi-Fi networks.
You can set up WPS, Bridge between Wi-Fi networks.
Create a filter for MAC addresses of allowed clients and more.
In general, everything is standard, convenient and understandable.
Below I will give only the most important parameters for a simple user.
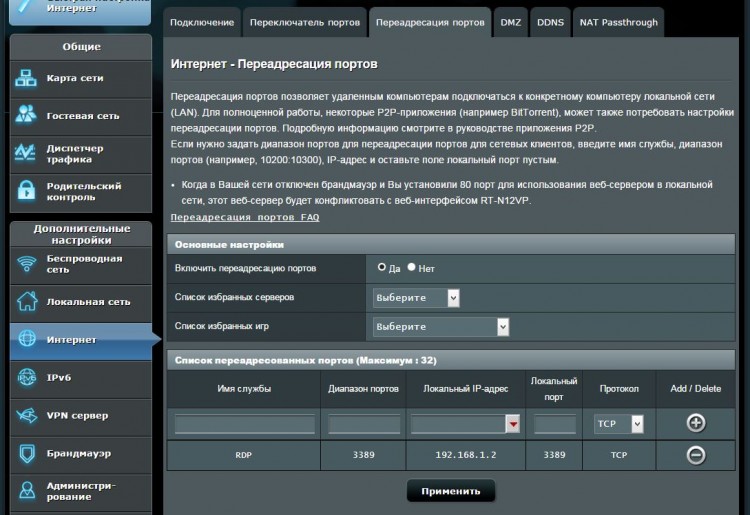
For example, port forwarding is located under Internet - Port Forwarding.
I, in this case, have port forwarding configured for Remote Desktop.
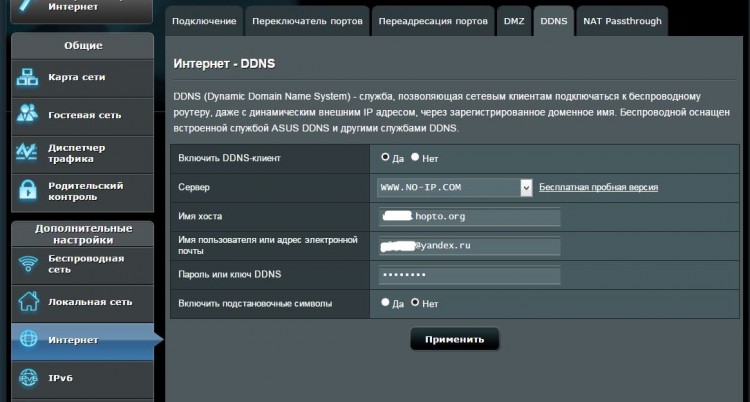
Dynamic DNS service is located in the "Internet" section - DDNS
This is useful when you don't have your own external IP address.
I use this function to work Remote Desktop.
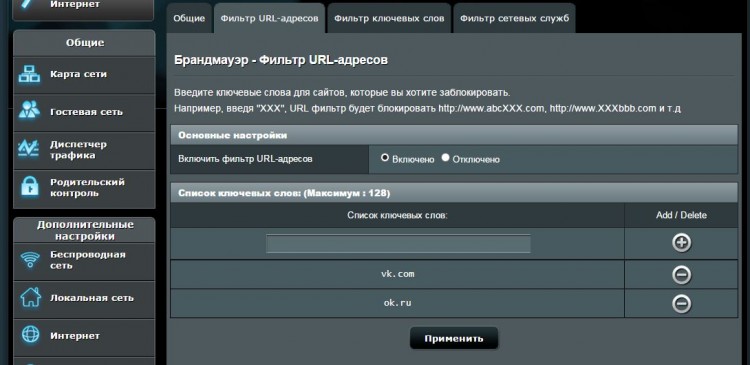
In the "Firewall" section, you can block any sites. For example, popular social networks.
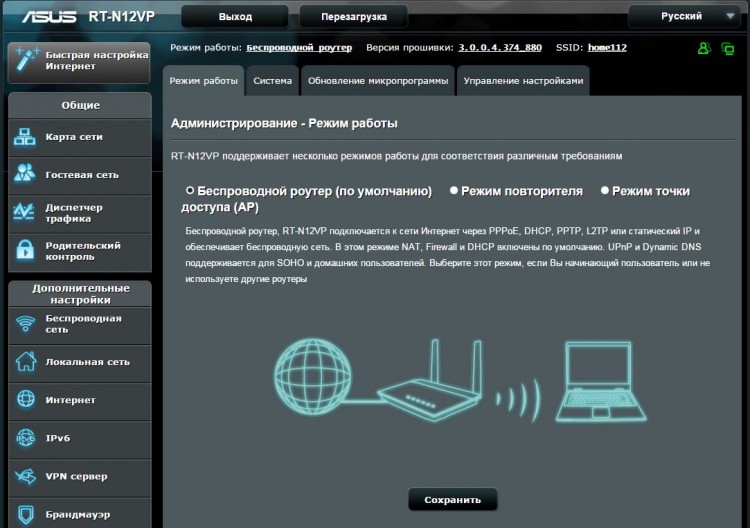
In the "Administration" section, you can change the mode of operation of the router, update the firmware, or change the password to enter the router. All menu items are equipped detailed description.
Tests
Let's test the speed of data transfer over a local Wi-Fi network
My laptop has a Wi-Fi adapter that only supports 150 Mbps connection
The file copy speed was approximately 10 MB/s

Now let's test the speed of the Internet.
For reference speed, let's test without a router. Right through the cable.

Now we will connect the router back and conduct a test through the cable.
Test successful! The speed corresponds to the reference.

Let's do a speed test wifi network using a Windows laptop.
The distance of the laptop from the router is 1 meter.
As you can see, the router "cuts" the speed over Wi-Fi
![]()
Conclusion
In general, the router is normal. Looks great. Very easy to set up.It is felt that programmers from a large quality brand. The firmware is thought out and provided with tips. But the functionality for this money is slightly insufficient. Your competitors have both USB and removable antennas. But do you need it? Everyone will answer for himself.
Slightly disappointing Wi-Fi data transfer speed. I recommend this router to those who have an Internet tariff of up to 50 Mbps.
pros
- Firmware with detailed descriptions.
- Stylish appearance.
- Possibility to connect two set-top boxes IPTV
Minuses
- "cuts" speed over Wi-Fi
- too bright indicators.
- not removable antennas. Direction cannot be set.
- Lack of USB port. Competitors have it for less money.
Thank you very much for your attention.
I express my gratitude to ASUS and the administration of the DNS chain of stores for the opportunity to write a review.
Let's dive into the world of fantasy. You went to the kitchen, and when you try to turn on the kettle, you hear that "This operation cannot be performed and you need to update the firmware", immediately you move to the toaster, and there you will be disappointed, in the form of the phrase - "Software this model is outdated, you need to update the software.
It is clear that the time may come when absolutely all devices will be connected to the worldwide network, but before that happens, let's figure out how to configure a router that combines all available devices into one local network. This article will show instructions for setting up a well-known Asus RT-N12 D1 device.
It all starts with the first turn on.
The new router that we took out of the box looks brilliant and impressive. Experienced users who take it in their hands for the first time will immediately begin to think about how to install the latest version. software. But when performing such manipulations, you should remember that the latest versions should be taken only on the official website, if you disobey this instruction, then your device may turn into a useless brick.
Update - the procedure.
Download the firmware archive to your computer.
We connect the power cable to our router, and then press the Power button, and wait for the device to turn on.
We connect our device with network cable to the computer. One end goes to the computer, and the other end of the wire must be inserted into the yellow socket on the device called LAN. A cable coming from your Internet provider should be connected to the blue socket with the name "WAN".
Now you need to go to the control panel, for this we launch any browser, and enter the local IP in the address bar, most often 192.168.1.1. After pressing ENTER, a window will pop up in which you need to fill in the login and access password. Often, both the password and the login are clogged in the default program - admin. But, it is better to verify this by looking at the sticker glued to the back of the device.
There are some cases when the IP address is different, and even the password with the login. It can be any universal solution, for this reason, we always pay attention to the label to once again make sure that we are right. In our case, the local IP remained unchanged, but the login password was mts.
![]()
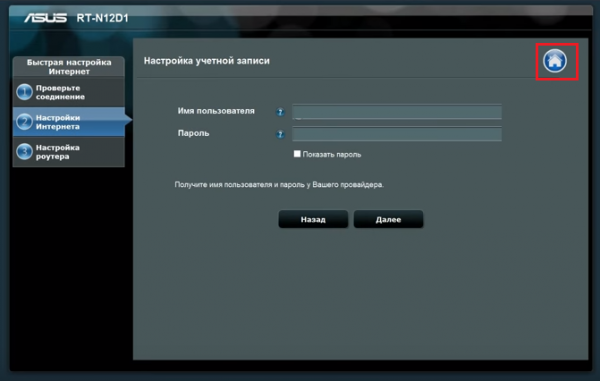
When you first enter the ASUS router control panel, a special window pops up in front of you, designed to quickly fill in the necessary settings for the Internet to work. Now, we are not interested in this item, so you should click on the icon in the form of a house to move to the main page of our menu.
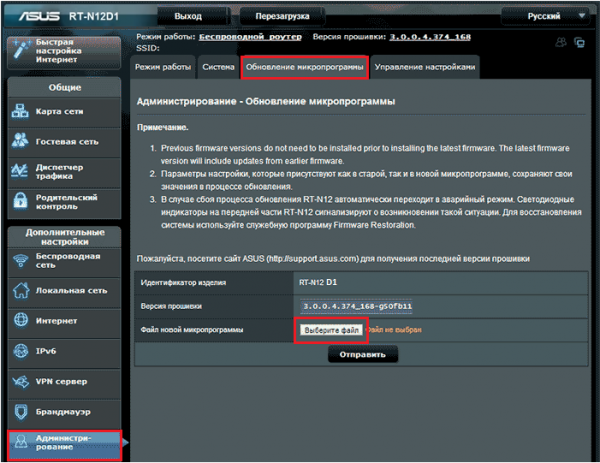
We need to get to the item called "Firmware Update", for this you need to go to the section called "Administration". In some versions of the device, these tabs may have different names. For example, the section may be called "System", and the item we need is "Software Update".
By opening the desired menu item, you will see information such as "Firmware version". Compare it with the one you already downloaded. If your firmware is newer, then select the “Choose file” item and indicate the location of the firmware on the computer, then click on the “Poison” button and see how the update process starts.
It is important to remember that when the update process is underway, a person should not apply any unnecessary actions to this item. You can’t pull out the cable, reboot the device, and so on, because any extraneous action can only harm the process itself, and the firmware will be installed incorrectly.
After installing the firmware, you need to leave the control panel, and on our device, hold down the Reset button for a few seconds, this will reset all settings.
Let's move on to setting up an Internet connection.
Automatic, fast Internet setup.
We connect the cable of the Internet provider, you need to insert it into the blue socket. It is named in the device as a WAN port, in my case, an icon was located next to it, resembling a standard browser.
Open the control panel, select the function "Quick setup of Internet access". It is this function that allows you to quickly determine the type of connection. You need to left-click on the window in which there is the word "Go" and perform the following manipulations.
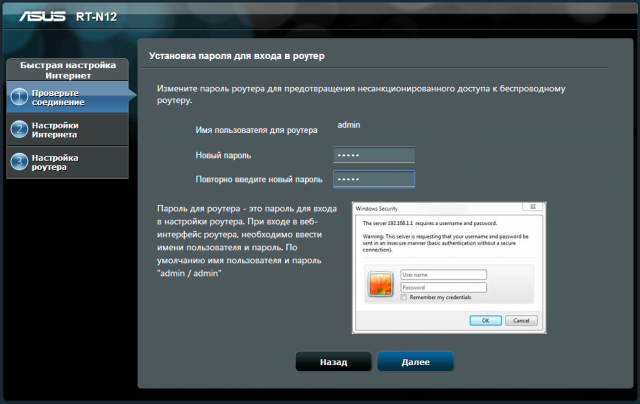
We change the login and password for entering the control panel, you do not need to leave them standard, this will lead to the insecurity of your access to the worldwide network.

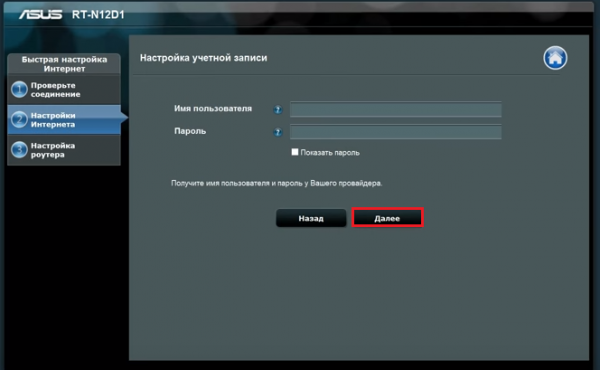
Specify the username and password for accessing the Internet. This data was issued by the provider when we entered into an agreement on the supply of an Internet connection to our apartment.
Specify the name of the wireless network, if necessary, and optionally set a password that will be requested when connecting to this network.
This concludes the quick setup process. You should at the final stage click on the "Apply" button, and notice that your Internet has started working as expected.
There is another way to configure Internet access, it is for advanced users, and this method is called " Manual Internet setup».
Before proceeding, you need to find out the following data from your Internet service provider:
- Internet connection type.
- username and password for Internet access.
- The MAC address to which your contract is linked, this is provided on the condition that the provider uses this technology.
- Subnet mask, default gateway and IP address.
- VPN server, service name, PPPD setting, and so on..
- DNS addresses if they are not set automatically.
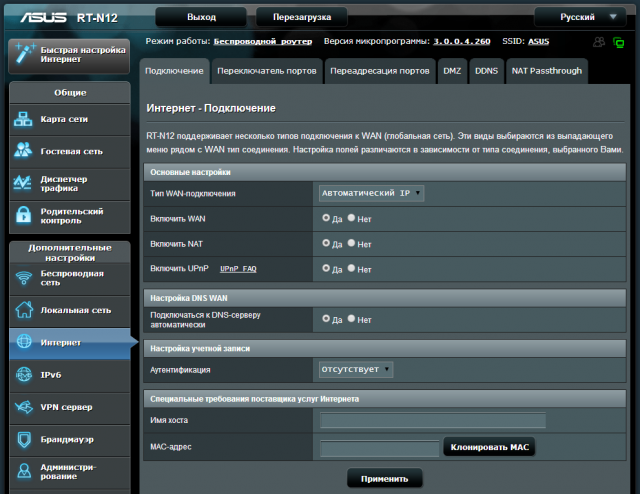
We go to the control panel, and there we select the item "Advanced settings". We are interested in a tab called "Internet". It is there that the network setting is contained, in the "General" tab.
![]()
First, we indicate the type of connection, this is done in the main parameters, we leave the rest of the checkboxes unchanged, because most Internet providers do not use UpnP-type technologies, therefore, they do not need to be configured.
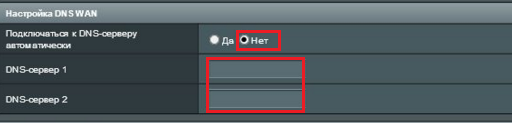
Setting IP address - a field where you need to set the value "Automatically". This is done only if you do not have an additional service called "Statistical IP" connected.
The next DNS WAN field must also be set as receiving automatic settings. Some users prescribe public DNS addresses, and they take them from Google or Yandex.
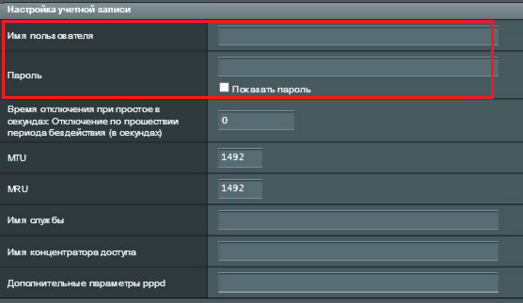
The next section is “Account Setup”, here you need to specify both the username and password. The rest is at your own discretion.
The next section is "Supplier's Special Requirements". Here you need to register the VPN service, host name, and MAC address, and after all this, click on the "Apply" button, it is located at the bottom of this settings page.

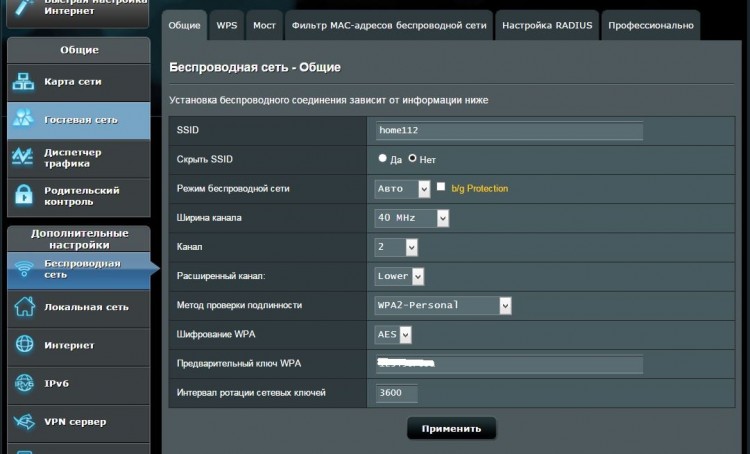
Setting up a wireless network.
To set up wireless data transfer, you need to go to the "General" tab and select the advanced settings item there, and find the "Wireless Network" tab.
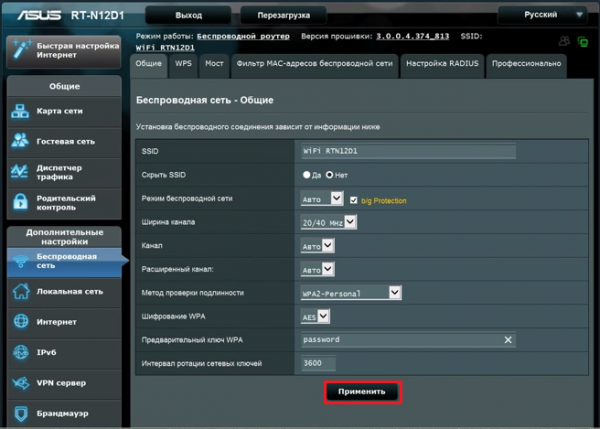
Now you need to fill in all the fields required for the correct operation of the wireless Internet connection.
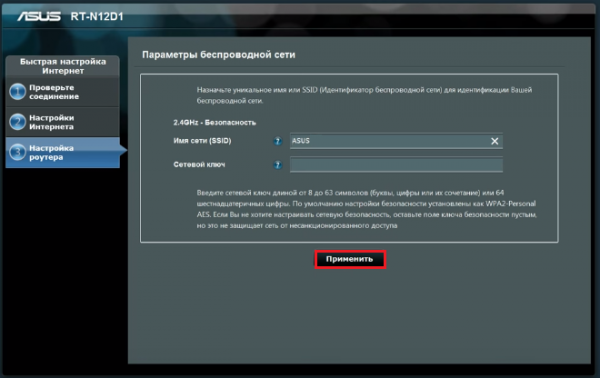
Field "SSID" - the name of the wireless network is indicated here.
Broadcast SSID - a field required to indicate whether the connection is available. If you check the box next to "No", then this will automatically mean that some devices will not be connected to the network.
Wireless network mode - here you need to select the item called "Automatic". This will allow you to connect to the network from various devices without cutting down the speed in downloading and uploading traffic.
The next item is "Broadcast channel width". To increase the bandwidth, it is recommended to select a value of 40 MHZ, but if there are frequent interruptions in the Internet connection, then we reduce this value by half.
The Channel field should not be changed if you have a stable connection. If there are crashes, then you can go through the settings until you can achieve a normal connection.
Encryption type WPA - helps to ensure security during data transfer, select WPA2-Personal, and specify the encryption type as AES.
Wireless network access key - here you need to specify the password that the user will specify during connection.
And the last thing is the key rotation interval, the default solution is always the value 0. Nothing else needs to be specified, otherwise the key may change.
For those who are new to connecting to a wireless network, this will seem incredibly difficult. For this reason, a technology called Wireless WPS was invented for beginners. It allows you to transfer settings from the WI-FI adapter to the router, as if by air, and thereby saves time and human effort.
If you found the “WPS” button on the back wall, where the connector panel is located on the device, then you can breathe a sigh of relief, you will be able to save a lot of your time by simply pressing the button on the router, and then on the WI-FI adapter of your computer, and after that wait a few minutes to sync.

Setting up a local network.
If you do not know what this data is and what it is for, it is better to leave everything unchanged.
The main parameters of any local network on this device are in the tabs called "DHCP server" and "LAN IP".
You can change the starting IP address, of course, within the allowed limits.
A DHCP server is required for all devices to automatically obtain IP addresses. If this option is disabled, then, consequently, all addresses will not be received by computers. On the DHCP tab, a person has the right to change some settings, namely:
- Pool addresses within the network, you can specify the start and end value.
- Lease time for one address.
- Main gate.
- Addresses of WINS servers and so on.
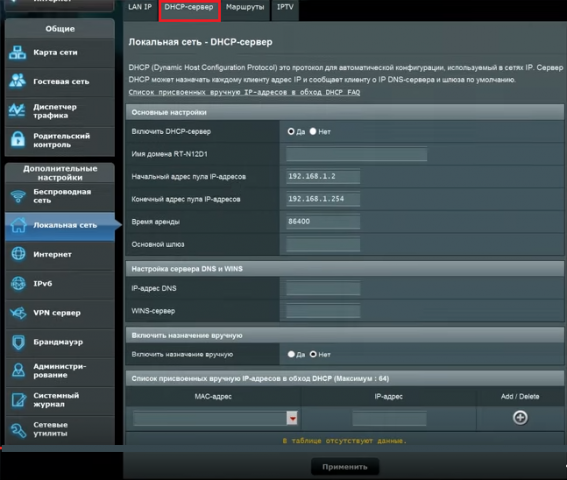
Most people leave this tab unchanged, understanding that when the service is enabled. Then everything happens automatically, and you do not need to worry about the settings.
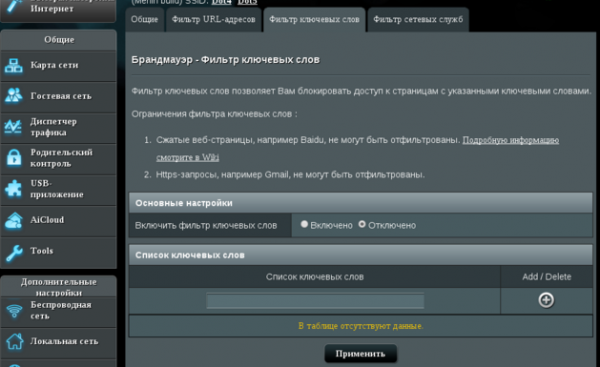
Firewall.
Firewall - is necessary in order to protect our device from unauthorized entry, it will filter outgoing and incoming traffic according to the rules that will be set by the administrator himself. If you are sure that you do not have one hundred percent protection, then it is recommended to enable this solution.

All settings must be made in the "General" tab.
- Turn the firewall on and off.
- Activation of protection against unauthorized entries.
- Choice of registering packages.
It is possible to block some sites, for this, in the "Site Filter" tab, you must specify those addresses that should be blocked.
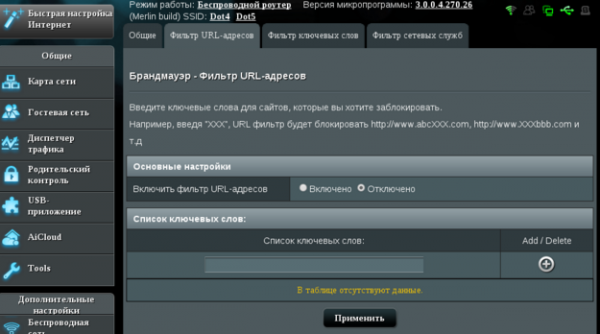
The keyword filter is only necessary if you want to block access to sites that have some words that are forbidden to you.
General tab.
A network map helps a person see a display of current connections.

With the help of a guest network, you can restrict the rights of ordinary guests connected to your wireless Internet connection.
Traffic Manager allows people to control the distribution of all network resources outgoing to different devices, be it a computer, a smartphone, or so on.
Parental control is necessary in order to restrict other people from using the Internet when the main person is not at the computer. Parental control is most used for children.

As you can already understand, an ASUS router can do more than just send traffic to one common network. We have considered several points that are needed to correctly configure the router. It turned out that any setup can be done in several stages, the main thing is to understand all the instructions first so that you don’t get disappointed during the setup. After reading the instructions in full, a person will learn how to configure such devices on their own, without outside help.
The appearance of the rear panel of the router.
1. Quick setup of a new router
If you are connected through a new (unconfigured) router, then when you open any browser, the quick setup page will automatically open.
You need to change the password to enter the router settings.

This will open the page with the configured settings.
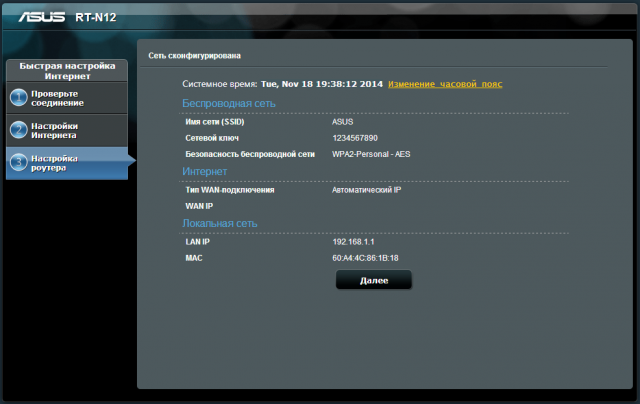
2. Login to the router
To enter the router settings, enter the address 192.168.1.1 in the browser line. After that, a window will open where you need to enter the login information - "Username" and "Password". The default username and password are admin and admin.

3. Firmware update
The firmware of the router can be carried out in the "Administration" section in the "Update firmware" tab. The current firmware version is on the official ASUS website.

4. Internet setup
In the "Internet" section in the "Connection" tab, the settings should look like this:
WAN connection type - Automatic IP.
Enable WAN - Yes.
Enable NAT - Yes.
Connect to DNS server automatically - Yes.
5. WiFi setup
To configure the wireless network on the left, select the "Wireless Network" section, the "General" tab, where you need to change the following fields:
SSID - network name.
The authentication method is WPA2-Personal.
WPA - AES encryption.
WPA preshared key - password for the wireless network.
![]()
Owners of the ASUS RT-N12VP model are strongly recommended to enable