In this article, we will take a closer look at the process of connecting a laptop or Windows 7 computer to the Internet via Wi-Fi. I think the article will be useful to many, since when you first connect to Wi-Fi, there are always a lot of questions. As a rule, they are associated with installing the necessary drivers, enabling a wireless adapter on a laptop, etc. More on that later.
The laptop is a great thing. I do not really understand people who are now buying stationary computers. Except for serious games. Well, you must admit, with a laptop it is much more convenient. If you want a big screen, you can connect it to a monitor or TV. It does not make noise, and if necessary, you can take it with you. And yet, all modern (and not so) laptops have a built-in wifi module. A receiver that allows you to connect your laptop to the Internet via a wireless Wi-Fi network. In the case of a desktop computer, you will need to buy .
All you need is to buy and install (if you don't already have it), it will distribute Wi-Fi to which you connect your laptop. You can connect your computer to a free Wi-Fi network in cafes, shops, etc. Or, to your neighbor's unsecured network 🙂 This is much more convenient than laying a network cable. If for a regular desktop computer this is still normal, then for a laptop this is no longer the case. And it’s not convenient to move around the house all the time with this wire.
Connecting a laptop to the Internet is not difficult, but provided that the driver for Wi-Fi is installed. Many people have a lot of problems because of the driver. If you simply did not install the driver on your Wi-Fi receiver, or you installed Windows yourself and did not install it, then you will not be able to connect to Wi-Fi. But, perhaps, you already have everything installed and configured, therefore, first we will consider the process of a normal connection to a wireless network. If you can’t learn from it, there won’t be a wireless connection, etc., then read the article to the end, we will consider possible problems.
Connect laptop to Wi-Fi
Let's first consider the connection process without any settings and checks there. Why complicate things, maybe you already have everything set up. If everything is fine, your laptop sees the wireless network and is ready to connect, then the Internet connection icon on the notification bar will look like this:
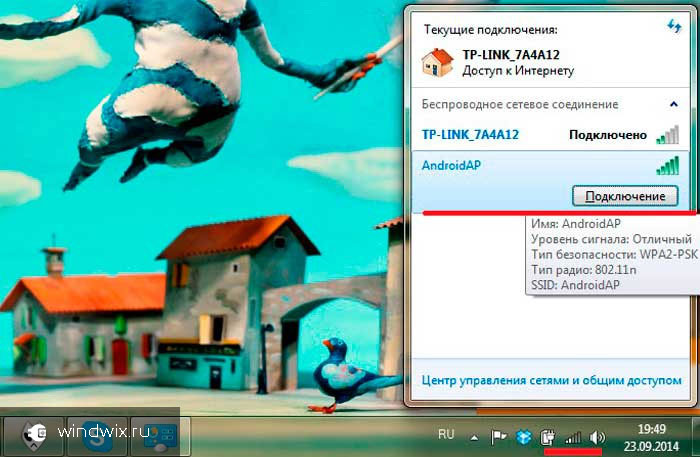
Connection status that looks like network level with an asterisk (as in the picture above) indicates that the laptop sees available networks and is ready to connect to them. Click on this icon, then select the Wi-Fi network to which we need to connect and click the button Connection. In Windows 10, the Wi-Fi connection process is slightly different. If it is needed, detailed instructions.

If the network is password protected, a window will appear in which you need to specify the password and confirm the connection by clicking the button Ok.

That's it, your laptop should connect to the Wi-Fi network. The connection status will be like this:
![]()
You can use the internet.
If you see connection status, it looks like this:
![]() This means that most likely everything is configured on your laptop, but the laptop simply does not see networks available for connection. Perhaps there is simply no coverage in this place. If you are connecting to your network, then check if the router is turned on. If enabled, then .
This means that most likely everything is configured on your laptop, but the laptop simply does not see networks available for connection. Perhaps there is simply no coverage in this place. If you are connecting to your network, then check if the router is turned on. If enabled, then .
He wrote about solving this problem in a separate article:.
This is how the connection will go when you have the driver installed on the Wi-Fi adapter and the adapter itself is turned on. But very often the adapter on the laptop is turned off, or no one installed the driver on it at all. In such cases, many questions arise. Now we will analyze in detail both cases, due to which you may have problems connecting your laptop to a wireless network.
Enable "Wireless Network Connection" on the laptop
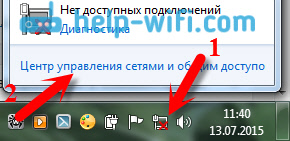
If your wireless connection is disabled, or the driver for Wi-Fi is not installed, then the connection status will look like this:
![]()
This means that it is not possible to connect to the Internet via Wi-Fi, and there is no connection via network cable. As I wrote above, this happens due to the adapter being turned off, or due to the lack of a driver. Let's first check if you have "Wireless Network Connection" disabled. This, of course, is unlikely, unless you turned it off yourself, but you need to check.
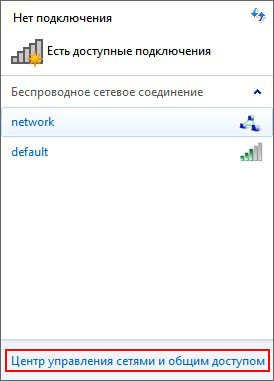
Click on the internet connection icon, and select Network and Sharing Center.
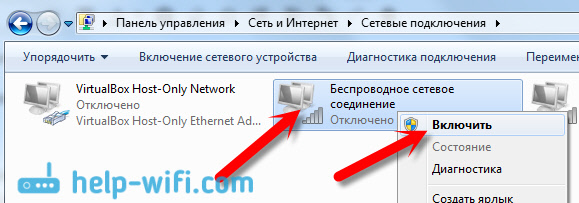
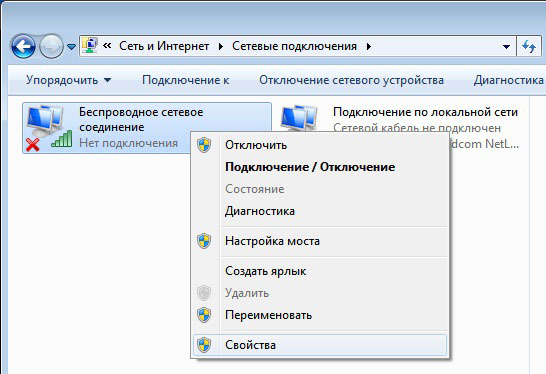
Then choose Change adapter settings.
![]()
Look at the adapter "Wireless Network Connection", if it is disabled, then right-click on it and select Turn on.
After that, the connection status "There are available connections" should appear. (if there is a Wi-Fi network in the radius).
We turn on wireless connections with the buttons on the laptop
It seems to me that now manufacturers do not install separate buttons to turn on the Wi-Fi adapter. But, if you are having problems connecting to Wi-Fi, then charmingly check if there is a special button to disable / enable wireless connections on your laptop. I know for sure that Toshiba liked to make such switches.
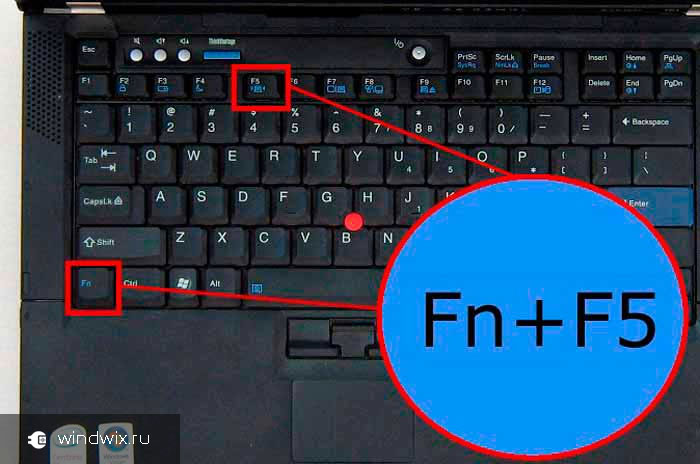
Now, on laptops, a keyboard shortcut is used to disable / enable the wireless network. As a rule, at different manufacturers, the keys are different. But usually this Fn+F2. So on Asus laptops. You can see for yourself, there should be a network icon on the key that is pressed in tandem with Fn. Approximately like this:
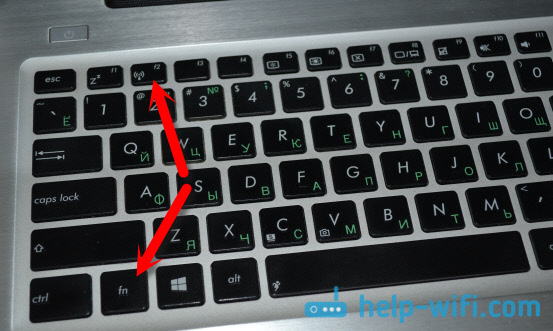
True, my combination of these buttons is responsible for turning off Bluetooth. Wi-Fi does not seem to respond at all. But, yours may be different. It's definitely worth checking out.
If there is no "Wireless Network Connection" adapter at all in the adapter management window, but there is Wi-Fi on your computer / laptop for sure, then this means that Wi-Fi adapter driver not installed.
Now we will check everything and try to solve this problem.
Check and install the driver on Wi-Fi
I have not yet seen a case that would after Windows installation 7, the system itself installed the driver on the Wi-Fi adapter. In Windows 8, this is much better. Windows 10 often installs the necessary drivers itself. So, after installing Windows, in order to use Wi-Fi, you need to install the driver specifically for your laptop or adapter (very often, adapters from different manufacturers are installed in one laptop model. It is because of this that you can see several Wi-Fi drivers on the manufacturer's website).
We go to the device manager.
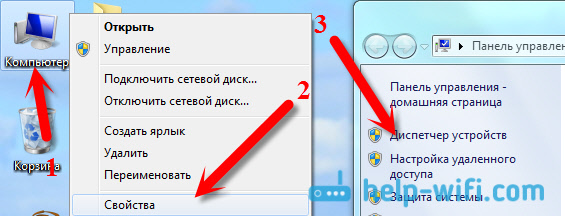
Open the tab in Device Manager Network adapters, and looking for a driver for Wi-Fi. I have it called Atheros AR9485WB-EG Wireless Network Adapter, it is installed. You must also have something like Wireless Network Adapter.

If you do not have a wireless connection, then most likely you will not find an adapter either. You need to install the driver, then Wi-Fi will work. And yet, if the driver on the Wireless Network Adapter is not installed, then there will be at least one unknown device with a yellow exclamation mark in the device manager. It looks something like this:

This is most likely the same Wireless adapter that the laptop does not know how to work with.
Driver installation
All you have to do is download the right driver and install it. It is best to download the driver from the official website of your laptop / adapter manufacturer, and for your laptop (or adapter) model. Best of all, use Google to find the official website of your laptop, for example Asus, then use the site search on the site, indicating the model of your laptop. Most likely, your computer page will be found, open it and find utility and driver downloads there. Find the driver for Wireless and download it for the operating system you need.
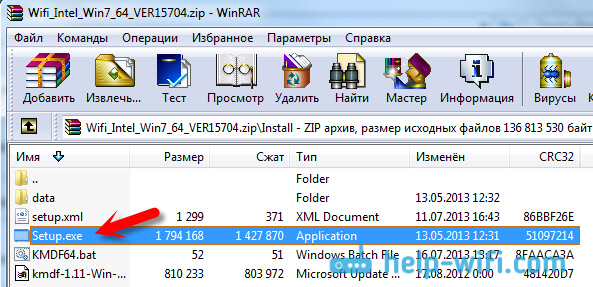
Most likely, the driver will be in the archive. To install, run the .exe file from the archive. For example, the archive with the driver for my laptop:
After installing the driver, restart the laptop and try connecting to the wireless network, following the instructions. I wrote in more detail about installing the driver in an article about.
If some points from the article remained incomprehensible to you, or you still couldn’t connect your computer to Wi-Fi, then write about it in the comments, we will try to solve your problem.
WiFi or Wireless Fidelity (wireless accuracy) is a technology for wireless data transmission over a special Wireless LAN channel. The WiFi network is half duplex, due to the technology itself.
This feature means that only one device operating as an access point can operate on one frequency. An access point can be either a computer with a Wi-Fi transmitter, or specialized devices - routers that support the WiFi wireless protocol.
There are two ways to build a network using the Wi-Fi wireless protocol.
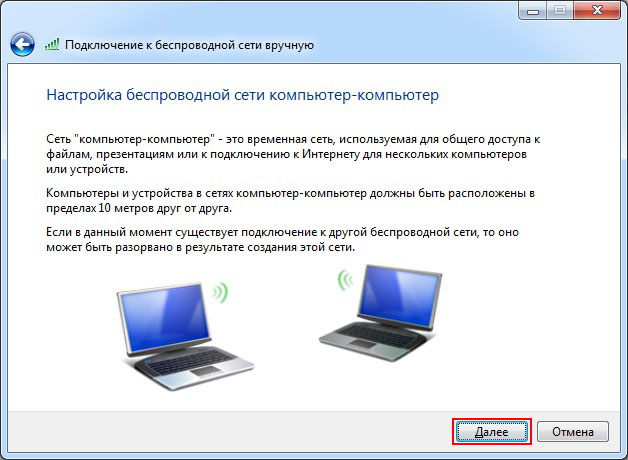
Setting up a Wi-Fi network computer-to-computer in Windows 7
In this article, we will look at how to combine several laptops running Windows 7 into a wireless LAN. wifi network in ad-hoc mode.
To make it easier for you to navigate the Wi-Fi network setup, I will explain the following definitions:
Network host- a computer or laptop connected to the Internet and acting as an Internet gateway. A Wi-Fi connection will be created on this computer.
Other computers on the network- computers or laptops connected to a Wi-Fi network created on the main computer and having access to the Internet through this computer.
Setting up a network host
In the Description: field, enter a description of the computer, such as Stepan's Computer.
Click the Edit button.
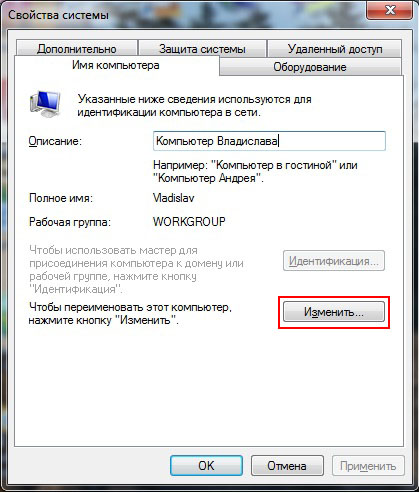
In the Computer name: field, enter a computer name. The computer name must be unique. You cannot specify a computer name that is already in use on the network.
Note: By default, all Windows versions 7,Vista, and in all versions of Windows XP except for Windows XP Home Edition, the workgroup name is WORKGROUP.
Click the wired network connection icon.


Click the Add button.
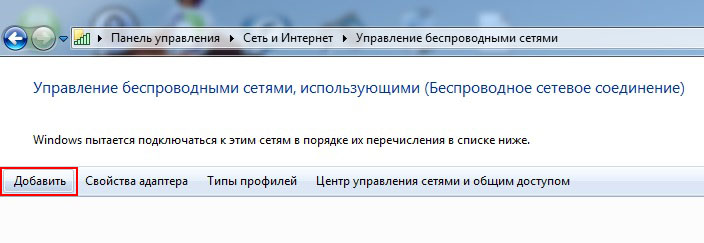
Click Create Computer-to-Computer Network

In the Network name: field, enter an arbitrary network name.
In the Security Type: field, select WPA2-Personal.
If other computers on the network are running Windows XP, select WEP.
In the Security key: field, enter the password.
The password must be between 8 and 63 characters. If WEP encryption is selected, the password must be 5 or 13 characters long. The longer the password, the better. To create a password, it is better to use a password generator.

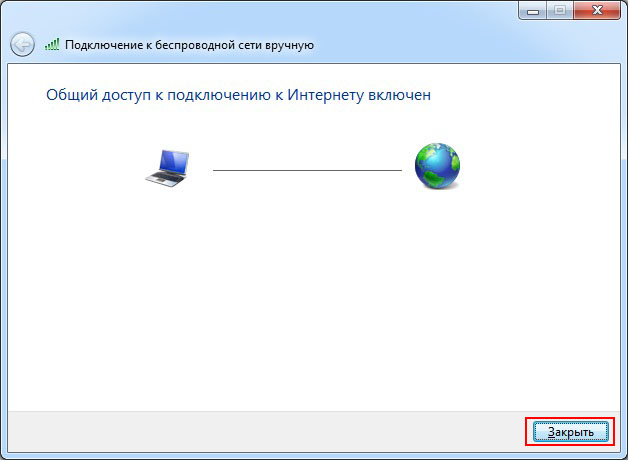
In this window, click Turn on Internet Connection Sharing.
Click the Close button.
Setting up other computers on the network
Select the Properties menu item. Click the Advanced system settings link.

Click the Computer Name tab.
In the Description: field, enter a description for the computer, such as Anatoly's Computer. Click the Edit button.

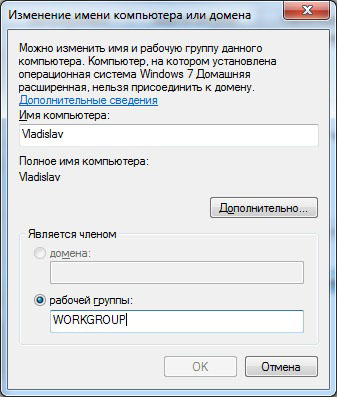
In the Computer name: field, enter a computer name. The computer name must be unique. You cannot specify a computer name that is already in use on the network.
In the Workgroup: field, enter the name of the workgroup. The workgroup name must be the same on all computers on the network.
If you don't want to change the computer name and workgroup name, just click Cancel.
Note: By default, in all versions of Windows 7, Vista, and all versions of Windows XP except Windows XP Home Edition, the workgroup name is WORKGROUP.

Click the network icon.


Right-click the wireless network adapter icon and select Properties.
Double-click Internet Protocol Version 4 (TCP/IPv4).
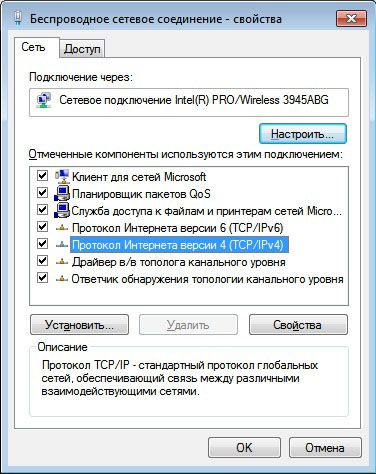
Check the box Use the following IP address:
In the IP Address: field, assign an IP address to the wireless adapter. The IP address must be unique and from the same subnet as the host computer's wireless adapter IP address. The network should not have devices with the same IP.
Since the Wi-Fi wireless adapter is assigned an IP address of 192.168.137.1 on the host computer, the IP addresses on other computers on the network should be: 192.168.137.2 , 192.168.137.3, etc.
Important: If the main computer of the network is running the Windows XP operating system, then its wireless adapter is assigned the IP address 192.168.0.1, which means that other computers on the network need to specify IP addresses: 192.168.0.2, 192.168.0.3, etc.
In the Subnet mask: field, enter the value 255.255.255.0.
In the Default gateway: field, enter the IP address of the host computer - 192.168.137.1.
Important: If the main computer of the network is running Windows XP, then the IP address of the main gateway must be set to 192.168.0.1
In the Preferred DNS Server: field, enter the IP address of the provider's preferred DNS server.
In the Alternative DNS server: field, enter the IP address of the provider's alternative DNS server.
Addresses of DNS servers can be obtained from the provider.
Press ok.

Click the network connection icon.
Double click on your network.

Enter password. Press ok.

All. We set up a wireless network Wi-Fi computer-to-computer in Windows 7.
Setting up Wifi at home and connecting a laptop through it
Consider the option of a Wifi wireless network using a Router, when you already have a computer connected to the network (Internet) by a wired network and you still need to connect your laptop via WiFi.
This option is relevant, for example, if you have Internet from an Internet provider (say, Akado) for one computer that goes over the wire. And you intend to connect the laptop to the same existing network, but via Wifi, in order to access the Internet from it and be able to move it around the apartment without wires.
And also, if the independent availability of the Internet on each computer is important to you. (You can turn off the computer and go to work on a laptop with the Internet in another room or in the kitchen).
To make this possible, you need to understand the scheme, read the article, following the instructions.
Scheme 1. Combining a Wifi router, computer and laptop:
What you need to do to turn on the Router - step by step
If you are satisfied with the cable connection of the first computer (1) to the network and you do not plan to change it to Wifi, and Wifi is needed only for the second laptop computer (2), then you need to purchase a Wireless Router.
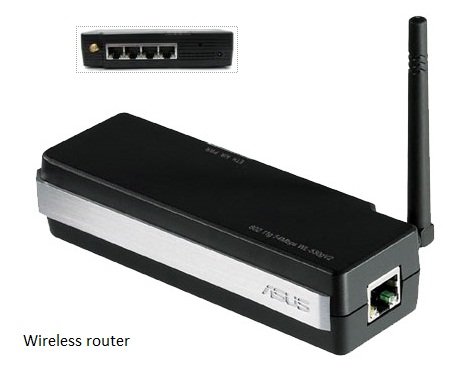
Such wireless router there is the possibility of a wired connection - a UTP (LAN) connector (s), a WAN ("input") connector and an antenna for wireless contacts.
Consider the example of the Router "ASUS WL-530gV2 Pocket Router (802.11g, 1xWAN + 4xUTP)" working according to this switching scheme. Which cost in Moscow in 2009 less than $100.
You can use, for example, the DLINK Router. The instruction is the same, with the difference that the WAN connector is marked "Internet" on it.
ASUS router WL-530gV2 (Pocket router)
In addition to the router, you also need an additional UTP-5 cable of category, 1 m long (a regular cable for a computer network with connectors).
How to connect the router
The router must be connected to the gap between the modem that "gives" you the Internet from the provider and the computer (1).
For this you need:
Turn off the power of the computer, modem. Put the router unconnected next to the modem.
Pull out the cable (UTP-5 type) coming from the modem from the network card of the computer (1) and connect it to the “WAN” input of the Router. This router model has it on the side.
The router is now connected to the internet. You have to distribute it.
We connect the computer (1) to the Router with the purchased additional UTP-5 cable:
One end - to the network card of the computer, the other - to the LAN1 connector of the router.
We connect the router to the power supply, through its own power supply (should be included with it).
The router is connected.
Now you can turn on the power of the computer, modem, router.
Setting up a computer (1) to access the Internet through the Router by wire
Computer setup is actually reduced to zero. If the Router has DHCP (IP allocation service and connection parameters for connected machines), it is enough to connect the PC connector to it and the computer will automatically receive an IP address from it.
The only thing is, if a specific IP address was set in the properties of the network adapter on the PC, then it must be reset to “Obtain an IP address automatically”.
IN Windows 7 this is done in:
« Control Panel\Network and Internet\ Network connections »
Go like this: Start, Control Panel, Network and Internet, then:
View network status and tasks -> Change adapter settings.
Select your network adapter (where you connected the router), right-click - Properties, TCP / IP (IPv 4) - General.
Check "Obtain an IP address automatically" and "Obtain DNS server address automatically".
Click OK, then OK again.
In Windows XP:
Start, Control Panel, Network Connections - select your adapter ("Local Area Connection") - Internet Protocol (TCP / IP) - then everything, as in Windows 7.
Note that the computer will “get” the Internet only if the router is configured correctly and rebooted.
Setting up a Laptop (2) for Internet access
Go to the "Network Connections" of your laptop in the same way as you entered during Computer Setup (1), in accordance with the operating system already on the laptop.
Look for "wireless network connection".
Choose your wireless network, named as indicated in the Router. Let's say mynet.
Click "Connect". If the key was not set when setting up the router (which is not recommended), then the Internet will connect immediately. Or, a window will appear asking you to enter the “Network Key”.
All. With the correct configuration of the router, the Internet should already be available in the laptop.
You can check its work by going to some fairly reliable site, such as www.yandex.ru, www.google.com.
These entered settings will not need to be specified again after the next turn-off/turn-on of the Notebook. It will connect to the internet by itself.
Overall rating of the material: 5
SIMILAR MATERIALS (BY MARKS):
Data encryption
Hello blog visitors.
Wireless technology is in high demand today. Especially for owners of laptops, smartphones and tablets. And the greater the demand, the more often various problems may arise. Later in the article I will tell you how to connect WiFi to Windows laptop 7, and also highlight the main points related to this issue.
general information
Wireless connections via wifi router today they are considered the norm, since users no longer need to pull a lot of wires through the rooms. However, now users are not tied to a specific place. Such connections make it possible to interact with the network. In addition, the devices are used to distribute the Internet. They are considered the most suitable for people who can move freely within the range of the router.
As with any other technology, some problems can appear here too. Further in the text I will try to consider the main ones. And of course I'll tell you the solutions.
Setting
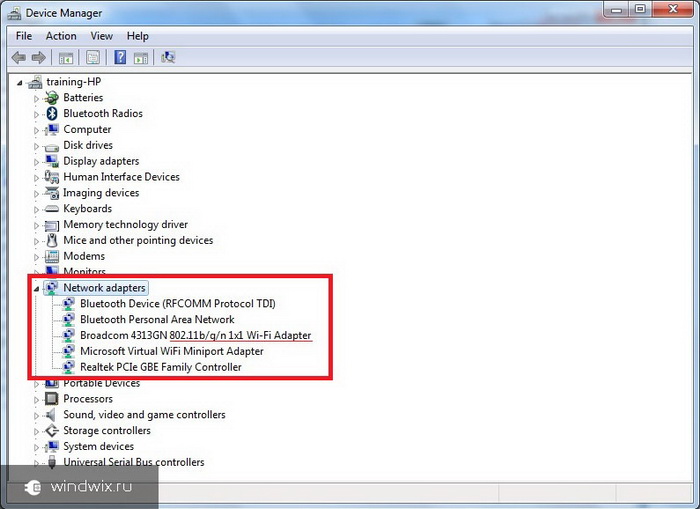
First of all, you need to make sure that the wireless device is installed and ready to use. To do this, we go to device Manager", by pressing " start» and transition to « Control Panel". We will see a list of components, among which we need to select " Network adapters". The hardware used on the computer appears. We mark the line that mentions Wi-Fi and check the performance of the component in the properties.
In case there are problems with software, you need to update it to the correct version. To do this, the corresponding portable memory with all the necessary distribution kit is usually supplied with the laptop. If it is not there, you can always refer to the official page of the creator mobile computer or the element itself. Here you need to specify the model of the equipment, operating system and its rank.
You can resort to the same method after reinstalling Windows, because even if you have a driver disk, they will most likely be designed for a different operating system.
After successful completion, we turn to the icon " Network connections" in tray. A list of all available connections that the hardware picks up should appear.
Network creation
It’s worth saying right away that creating a working network without a router will not work. If there is a need only for the exchange of information between individual machines, simply turn on the desired device, and everything will work.
If an Internet cable is connected to it, users get the opportunity to go to the "World Wide Web". True, for this you need to additionally enter the settings:
Connection
As mentioned above, without drivers for the device, nothing can be done. Therefore, the first thing we do is place the necessary software in the system.
If you have everything installed correctly and have the equipment, let's go directly to the connection itself. To do this, you need to run the wireless transmitter itself on the laptop. This is usually done by clicking the " fn" and one of the functional series " F1-F12". Moreover, on laptops from Acep and Asus, the combinations are different. However, the same can be said about Lenovo or HP. On most of them, on the corresponding key, an icon is drawn in the form of an antenna and waves extending from it.
After that, the module will start and the automatic search will begin. In the lower right part of the screen we will see the corresponding icon. After clicking on it, we will come across a list of all available connections. Usually, each of them has its own security character set, and if you changed the password on the network, you won’t be able to connect so easily.
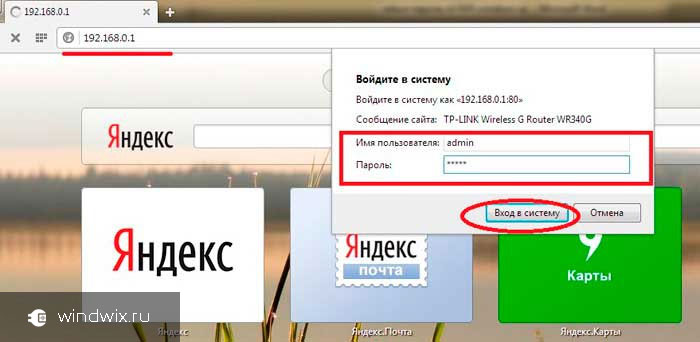
To find out the line we need, we go back to the browser and type " 192 .168.0.1 ". Enter the login information for the router. We are interested in the password item mentioned earlier.
If everything is entered and configured correctly, there should be no problems. Sometimes users cannot create a normal network using the tp-link adapter. This is usually due to either drivers or an incorrect password. Most often, users forget to switch the language or the " cap lock».
Some encounter problems as a result of the fact that previously the computer was connected to the "world wide web" only through a wire. To fix the situation, you need to go to the tray, find the corresponding icon, right-click on it and select " Control center…».

Next, we go to Change adapter settings". Finding the label Wireless connection", and open on it" Properties».

Now we are looking for the item that indicates TCP / IPv4. Mark it and call it again Properties". Go to the tab " Are common».

Now we mark the items that talk about automatically obtaining all the necessary settings. If they are already standing, we select others and return them to their place.
A similar solution worked in earlier versions of Windows Ultimate, although this has not been observed in recent builds.

Of course, individual problems can sometimes appear. For example, when a window with error 651 appears during the connection. In this case, you need to check all connections and settings.
If you suddenly do not understand something, you can always find a video in which everything is shown in detail.
I hope you find all the answers you need here. Subscribe to always know what to do with the computer.