Various weaves are a sign of good taste and allow you to give long strands a neat and well-groomed look. That is why the pigtails long hair with their own hands are a huge success not only among young teenagers, but also among young women. Do you want to learn how to braid beautiful braids? Read our master class more carefully and weave for all occasions!
Classic fishtail
To create this hairstyle you will need massage brush with natural bristles, a hair clip or elastic, as well as water or a product to give smoothness to the hair.
- We comb the hair and lightly moisten it with water or a special tool.
- We divide the hair into two equal parts.
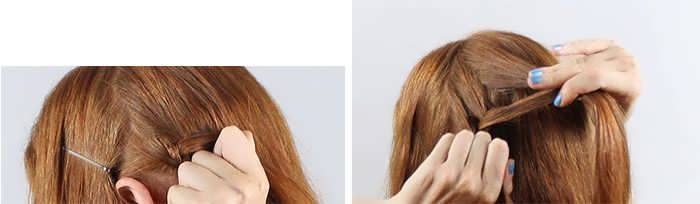
- Separate a thin strand of hair from the right side and throw it to the left.
- On the left side, take a strand of the same thickness and throw it to the right.
- We continue weaving to the edge of the braid.
- We fix the tip of the tail with an elastic band or a hairpin.

Fish tail can be neat and smooth or disheveled and loose. If you wish, you can decorate it with flowers, ribbons or beautiful hairpins.
Snake all over the head
This weaving for long strands is stylish combination thin braids and loose bun.
1. We divide the hair near the face into a clear side parting.

2. We make another parting from one ear to the other.
3. We collect the occipital part in a tight tail.

4. We divide the strands to the right of the parting into three identical parts and weave them into an ordinary three-row braid.
5. After a couple of centimeters, we begin to add thin strands to the braid. You need to take them only on the left. Weaving should be quite tight and dense.


7. We continue weaving, periodically adding strands on the left. We reach the end of the passage.

8. Again we make a loop in the form of a loop and return to the face.

9. You need to create three twists - you will get a retro hairstyle.

10. We fix the tip of the braid with an elastic band and connect it with the tail.
11. On the left side of the parting, we separate three equal strands and weave according to the same pattern. We also fix the tip with an elastic band and connect it with the tail.

12. Divide the tail itself into two parts and twist each of them into a magnificent tourniquet.

13. We lay out the finished harnesses in a circle around the base of the tail and fix it with the help of invisibility or hairpins.

Braid-crown for long strands
Do you want to feel like a real queen? A crown of your own strands will help you with this, as well as the following set of tools:
- Comb;
- Clip, hairpin or invisible;
- Elastic;
- Hairpins.
1. We comb the hair, separate the part from the temple to the ear and pin it with a clip.

2. Immediately behind the ear, we separate three thin strands and begin to weave a French braid from them in reverse, but add only the upper strands.
3. We move to the occipital zone and carefully make sure that the braid goes smoothly and does not crawl up or down. We weave our crown to the place indicated by the hairpin, and continue weaving over the forehead.

4. Having reached the place indicated by the invisibility, we continue the usual weaving of three strands.

5. We tie the tip of the braid with an elastic band and connect it to its base.
6. For reliability, we fix the crown with hairpins. And we decorate the junction with a flower.

Women's braids for long hair
Airy feminine braids look best on long hair. If you have the desire and time, try this option for yourself.
Step 1. We comb the hair in a straight or slightly beveled parting.
Step 2. Separate three not very thick strands from the very face (on the right side).

3. We begin to weave a classic three-row braid from them, adding thin curls either at the top or at the bottom. Weaving should not be tight. Keep it airy and light. Only in this case, the hairstyle will turn out "with a bang."

4. We do the same on the left side. You will have two soft braids.

5. Gently give the weave even more volume - we disassemble both braids with our fingers along their entire length and draw out individual curls.

6. We cross the braids with each other and fix them with hairpins. We hide the tips inside and also fasten with a hairpin.

Pigtail on the edge of long hair
With this simple but original hairstyle, you can quickly tidy up even very long strands.

- Separate the strand at the back of the head and divide it into three identical sections.
- We twist the strands together as for a regular three-row braid.
- Now we start adding individual curls on the right. The hair on the left should not fall into the weave.
- We reach the end of the braid and tie the end with an elastic band.
- To give the braid airiness, gently stretch it with your hands.
Greek braid hairstyle
It will take literally minutes to complete this romantic and very beautiful braid for long hair, but the result will exceed all your expectations.
1. We collect the hair in a ponytail (tight), leaving only a few thin curls near the face.

2. The tail itself must be divided into four identical sections.

3. We take the first of them and divide it in half. Weave a fishtail braid.

4. We do the same with the three remaining sections.

5. We disassemble each braid with our fingers - this will make it lacy and free.

6. We lay the first braid from left to right around the head. Get a headband of hair. We fix it invisible.

7. We put the second braid under the first one from right to left and also fix it with hairpins or invisible ones.

8. Now we take on the third pigtail. We lay it in a circle from left to right.

9. Lay out the fourth braid in the central part of the head in the form of a flower. We fix everything with hairpins and invisible.

Four-row braid in folk style
Do-it-yourself braids for long hair cannot do without the original weaving of four strands. Such styling will make even very thin and sparse strands voluminous.
Step 1. We collect the hair in a ponytail (tight). Its location is up to you.

Step 2. Divide the tail into 4 sections.

Step 3. We impose 1 section on 2 and skip under 3.

 Step 4. We impose 1 section on 4.

Step 5. We start 4 under 1 (it should be in the center).
Step 7. 2 throw from above 3.
Step 8 Skip 4 over 2.

Step 9. Weave the pigtail to the end. We fix the end with an elastic band. To make the styling beautiful, do not make it very tight.

Wide braid for long hair
Unusual weaving in a folk style that will decorate any appearance.
1. We collect all the hair in a ponytail (tight).

2. We divide it into three sections.

3. We begin to weave a three-row braid, leaving thin strands on the sides.

4. We disassemble the braid with our fingers, giving it more volume.

5. Weave the outer braid from the remaining strands and also stretch it with our fingers.

Volumetric braid for long hair
- First, comb the strands with a comb and divide them into three equal parts.
- Weave an inverted French pigtail - skip the left strand under the middle one.
- We do the same with the right strand.
- We separate a thin curl from the general part of the hair on the left, attach it to the left strand and put it under the middle strand.
- We do the same on the right side of the weave.
- We continue the braid to the end.

Step 7. Gently stretch the loops with your fingers, this will add volume to the pigtail.
Step 8. We wrap the hair at the back of the head in the form of a snail. We fix the bundle with hairpins.

Romantic weaving for long-haired ladies
This styling is based on the same spikelet, but the side braid (one-sided) gives it originality.
- We comb the hair with a comb and divide it with a side part so that the left side is much larger.
- We braid the left section of hair into a spikelet.
- From the right side, we braid the pigtail along the very edge, picking up curls on only one side.
- We tie both braids at the base with an elastic band. We decorate it beautiful bow or hairpin.

elegant braid
Step 1. We comb the strands with a comb.
Step 2. Separate a thin strand of hair on the right and weave a one-sided French braid from it.

Step 3. We bring the weaving to the end and tie the tip with an elastic band.

Step 4. We braid the lower part into a spikelet and also tie it with an elastic band.

Step 5. We wrap the ends of the braids under the bottom and fix the bundle with hairpins.

Step 6. We decorate the hair with a bow or hairpin.
An inverted ponytail
Step 1. We collect the strands in a low tail, make a recess near the elastic band and turn all the hair through it. You can attach the bow immediately, or you can leave it for last. With a bow, twisting the hair is a little more difficult, but the result will be different.

Step 2. We form a pigtail from free hair and tie its tip with an elastic band.

With braids braided according to this lesson, you will look just wonderful! Get ready to receive compliments!
Long hair is just made for chic hairstyles. It is for them that there is a huge variety of all kinds of braids and weaves. Lush braid - girlish beauty. But not everyone knows how to tame their curls and create masterpieces from them, at least every day. After all, the ability to weave a braid is one thing, but to give it a chic and expensive look is completely different.
Secrets of lush braids
There are three main options for adding splendor to hair: pigtails, corrugation, bouffant.

- The most harmless, but the longest way. It is necessary to wash your hair and, without drying your hair to the end, braid it into small pigtails. With such a hairstyle, it is advisable to spend the night, and in the morning unwind and boldly start weaving the planned braid.

- The second option is much faster, but you will need a curling iron with a corrugated nozzle and preferably some kind of thermal protective agent for the hair, because frequent use of the curling iron will also not benefit them. We put on curls thermal protective agent and pass the curling iron along the entire length. This procedure will take about an hour, it all depends on the size and density of the hair.

- Bouffant, although the fastest, but also the most undesirable, since with such a procedure, and even not professionally done, the curls suffer a huge shock. For a good bouffant, you need a comb with frequent teeth. We take the curls along the strands and scratch from the ends to the roots. This should be done very carefully so as not to comb the knots. And in no case do not comb the bouffant, because then the whole result is zero.

By braiding a braid on a lush head of hair, we can say 50% of the result. And in order to achieve all 100%, you also need to properly straighten the braid. Any weaving can be stretched, the main thing is to do it carefully so as not to damage it.

We start stretching from the beginning link by link, holding the following links with one hand. It is better to walk around the perimeter several times, straightening a little, than to immediately pull hard.
The best options for lush braids for long hair
On long hair, all braids have a completely different, more impressive look. Just take a look at the following creations. Here is the skill of the hands, and an immense flight of fancy, because with a sufficient length there is a place where to roam.
Lush French braid for long hair


Another option for weaving four strands.

3D 4 Strand Braid - Incredibly Easy Braid
Five strand braid
The five-strand French braid itself is incredibly voluminous. And if these strands are also stretched, then it turns out just a masterpiece, and not weaving.


Weaving a braid of five strands is not an easy task. A video lesson will help to learn all the subtleties and master the technique, and of course training skills.
Lush braid headband
The headband is an excellent decoration for chic curls. Weave. Stretch it out nicely. And we twist the free curls with a curling iron. Delicate, romantic hairstyle is ready.


The scythe itself is unusual. And by adding volume to it, we get a completely different impressive result.


Super technique of a chic fishtail variation
Greek braid, as a variant of lush weaving for long hair
Greek braid great option evening hairstyle. It is so luxurious that it has become a frequent choice of brides and graduates. A real Greek braid is a long work of a stylist and a lot of time. And we will consider a rather lightweight version, the end result of which is in no way inferior to a real Greek braid.


The similarity of the Greek braid is a magnificent version without weaving.
Braids on rubber bands
Very fast, very beautiful and most importantly very lush braids are obtained when weaving with elastic bands. It is impossible not to note such a technique, since it has some solid advantages.


Long hair in itself is an incredible wealth of a girl. Weaving braids on them is a real pleasure. And by making any braid voluminous, you can fall in love. So we grow hair, create, develop and enjoy.
In addition to the fact that this hairstyle looks neat, beautiful and aesthetically pleasing, it is also practical, which is especially important when it comes to children who rarely sit in one place. Any other styling will quickly disintegrate and lose its original appearance.
Despite the variety of types of weaving, there are some standards and principles that are unchanged - these are the so-called blocks. Each of them has twists of strands and their interweaving that are characteristic only for a particular hairstyle. Having mastered several techniques, you can combine them.
Some braids for girls are most popular due to their ease of weaving, others are less popular due to the complexity and time required to create them. However, you can easily find 100 hairstyles with step by step photos instructions.
Weaving rules with ribbons
Ribbons give the hairstyle originality and attractiveness.
When using tapes, it is important to remember the following points:
- Usually used narrow satin ribbons. Wide ones are rarely used.
- To make the image harmonious, special attention should be paid to the color of the ribbons.
- Before weaving, the ribbons are attached invisible to the hair at the base.
Classic three-strand
The classic version is woven from three strands, which alternately overlap one another.
Braids for girls - 100 hairstyles traditionally start with the usual well-known three-strand braid, which even children can weave
Two three-strand braids
This is a favorite hairstyle for little girls. Weaving is based on a classic scheme, only the hair is divided into two parts along a straight vertical parting and braided on both sides.

Two braids crossed at the back of the head

Two pigtails with doodles

Braid horns

Two bundles of three-strand braids

Pigtail from the tail
 Tail braid: weaving pattern with rubber bands
 Three ponytails
This hairstyle resembles the previous one with the only difference being that here three braids are woven from the tail gathered at the crown or the back of the head.
"Harvest"
For this hairstyle, all hair is collected in a ponytail, from which at least 10 braids are braided. Then they are fixed with invisibility, tucked under an elastic band and it turns out, a little untidy, but from this even more romantic and original cocoon.
Fish tail
Braids for girls (100 hairstyles with step-by-step photo instructions are presented in this article) are performed in a variety of techniques.

For a fishtail hairstyle, the hair must be smooth and manageable, so they are lubricated with conditioner or water. Work begins with the temples, where two strands come from. They cross at the back of the head, left under right.
An additional strand is taken on the left and crossed with the right so that the new strand is on the bottom. Next, the strand is taken from the right side and then the entire fishtail is braided using this technology.
French or spikelet
Weaving starts from the crown. A large curl is divided into three parts, and work begins with braiding the usual classic version. Then gradually begin to weave hair from the sides.

Three French braids - dragon
 The dragon hairstyle can be made from three, two or four reverse French braids.
 french waterfall
Take 4 strands of the same volume at the temple, with the exception of 2, which should be slightly thinner than the rest.
Weave according to this scheme:
- 1st under the 2nd and on top of the 3rd;
- 4th under the 3rd and on top of the 2nd.
Then a little hair from the total volume is added to the extreme strand.

- 2nd over 3rd and under 4th;
- then the 1st strand is removed to the side, and instead a curl is taken from the total mass;
- a new one is held under the 3rd and over the 2nd.
Weave according to this scheme, but additional hair is taken not only from below, but also from above.
Spit waterfall
The technique is the same as in the previous version, but those strands that freely fell down in the previous hairstyle are now braided into small pigtails.
Multi-row French waterfall

Two French braids connected into one  Two French braids crisscrossed
Two braids intersecting in the neck area look very original. In order to braid such a hairstyle, you need to divide the hair into 2 parts along a vertical parting, and then divide each part into 2 more parts, but already along a horizontal parting, that is, separate the top from the bottom. For convenience, all parts can be fixed with rubber bands.
Weaving begins with the upper left strand. It is based on French technique with one-sided grip. Having reached the middle, it is fixed with an elastic band. The upper right part is braided in the same way and is also fixed with an elastic band in the middle.

Two French braids with hair added on one side
Another interesting option weaving French braids - this is with a gradual weaving of hair into a braid on only one side.
Circular French braid
 Spit-snail
 Basket
By appearance looks like a wicker basket. Before starting work, the hair is distributed evenly from the crown. The basis is French technology.

The braid is braided from the crown in a circle and only from the outside. She should braid the entire head, and the remaining hair is braided either in a regular braid or neatly secured with hairpins.
Milkmaid's braid (around the head)
One of the simplest hairstyles, the creation of which will require a minimum of time. Hair should be divided along the central parting to the bottom. The parts should be approximately the same in volume.

Each is braided separately, and then they are connected at the crown crosswise, one on top of the other, fixed with a hairpin and the hairstyle is ready.
Four strand
The strand count starts from left to right. The 3rd is placed on the 2nd and brought under the 1st. The 2nd is placed on top of the 4th and brought under it. The 4th is held between the 1st and 2nd, and brought under the 3rd. 2nd. carried out under the 1st and thrown on top of the 3rd. And further in the same way.


Four-strand braid with the main 3rd strand
The 3rd strand is taken for the central one, i.e. all weaving is carried out around one strand, and it itself is not involved, therefore, in finished work accent is clearly visible.

Four-strand braid with ribbon

Five-strand
Learning to braid this option is best from the tail, and in the future it will be possible to do without it.
The tail is divided into 5 strands (counting from left to right) and weave according to the scheme:
- 5th over 3rd and under 4th;
- 1st over 3rd, under 2nd;
- 5th over 4th, under 3rd;
- 1st over 3rd, under 2nd.


Spit - Hollywood wave

Double Hollywood Wave

With elastic bands
Braids with elastic bands are one of the favorite hairstyles for every girl. 100 hairstyles with step by step photos clearly convey the process of creating a hairstyle.
The most popular are two options: with throwing on and with threading. The base is a high tail. It is divided into 4 parts, 2 side ones are connected from above and tied with an elastic band. Divide the strand that remains from the bottom into 2 parts, throw them on top, connect and also fix with an elastic band. And so on until the end.
In the case of threading strands, the principle is about the same, but the technology is slightly different. The hair is divided not into two parts, but not into 4, that is, the top is separated from the bottom. They are alternately threaded through one another and fixed with elastic bands.
Spiral (twist) or tourniquet
Each strand (and there can be from 2 to 6 of them) is twisted into a spiral, and then intertwined. Important point- you need to twist the bundles tightly, otherwise everything will fall apart.

French style twist
 Braid twist
  Braid with elastic bands with the addition of two braids using the twist technique on the sides
A braid or twist can also be woven into one using rubber bands.
Malvinka from two braids
 Malvinka with one braid
  Hairstyle from a braid and crossed strands a la French weaving
 french braid beard
 Swiss
Swiss
The principle of weaving is the same as in classic version, with the only difference being that each strand is twisted into a bundle.

Classical, spikelet or fishtail in the tail
This type of hairstyle involves weaving according to one of the techniques, but the hair is not loose, but tied in a ponytail.
Spit in a braid
This hairstyle looks good on thick long hair. On the crown, you need to make a parting that looks like a triangle, the top of which looks inward. The hair of the selected triangular area is braided using the purl technology. And the remaining hair, collected for convenience in a ponytail, is threaded through those that are braided and fixed on top.

After the base is braided, the threaded curls are unfastened and a pigtail is braided from them, which runs right in the middle.
snake
Work begins with the division of hair along the side parting. From a small strand highlighted in front, a French purl braid is braided. Pickup is carried out only from one, external, side.

Then the weaving turns in the other direction, and the pickup is done on the other side, reaching the opposite edge, it turns around again and the pickup side also changes. Thus, the braid is braided to the bottom and looks like a snake.
French inside out (Dutch, Danish)
Hair is lubricated with conditioner for softness. Weaving starts from the crown. You need to take three strands and start weaving a regular braid and add loose hair to the strands as you go.

But if in the classic French version the strands overlap each other, then in this variation, on the contrary, the strands wind up under each other.
Diagonal Danish braid

Fishtail over French braid
 Fishtail over a French braid: weaving pattern
 French inverted
Work begins not from the crown, but from the bottom of the neck and braids up. The hair remaining on top is either made into a beautiful bun, or hidden inside.

French inverted, parted and diverging on the forehead to the sides
Weaving starts a little above the back of the head. First, two partings are made in such a way that a triangle is formed, the sharp end of which is above the back of the head, that is, at the beginning of weaving. The selected strand should be of such volume that it can be divided into two parts.
Weaving is carried out towards the face. At the base of the forehead, the strand is divided into two parts and thin pigtails are woven from each. One winds up through the left side to the back of the head, the second through the right, and there they are connected.
Bundle with regular braid
Hair should be below shoulder length. They need to be combed well, tied in a high tail. Then they are wound on an overlay designed to create hairstyles with buns (available at any specialty store).

Bundle with two twisted braids
Braids for girls (100 hairstyles with step-by-step photos demonstrate that anyone who has a good example of their implementation can master a hairstyle of any complexity) should be able to weave mothers who have daughters.

The bundle is made in the same way as in the previous hairstyle, but first, reverse French braids are braided on the sides, starting from the temples. Their ends are tied into a ponytail at the back of the head. Next, a bundle is made, but, in this case, the ends are not braided, but hidden inside the bundle and fastened with invisibility. This hairstyle looks more festive and elegant.
Five-strand braid with ribbons
One of the most popular options with a ribbon is five-strand. Two ribbons are used here, which are woven so that in the finished braid they are placed in the middle of the weave.

Oriental
This is a lot of small braids all over the head. Such a hairstyle is quite practical and convenient, because if the weaving is more or less tight and well fixed with elastic bands, then you can wash your head without even unraveling them.

bundle
One braid is braided at the back of the head using a small amount of hair. The second is from the remaining strands and folds around the first in a ring, forming a bundle.
Weaving with rubber bands
Braids for girls (100 hairstyles with step by step photos - the right allowance for a beginner) are often woven using elastic bands, hairpins, ribbons.
The required number of rubber bands is 11 pieces. The parting is done not in the middle, but a little on the side. On the side where there is more hair, 4 horizontal partings are made, and these strands are tied into ponytails. The second and third ponytails are divided into 2 parts. Then the first ponytail and half of the second are connected together and tied with an elastic band, forming a new ponytail.

The same is done with the second half of the second and half of the third, and the second half of the third and fourth. Thus, it turns out 3 ponytails. Further, the first and half of the second, as well as half of the second and third are also connected together, and 2 ponytails are obtained, from which ordinary Russian braids are braided.
bezel
The name speaks for itself - the finished hairstyle is a kind of bezel around the head. The parting is done horizontally in front of the head so that only the frontal zone is involved in the hairstyle.

Weaving starts from the temple according to the French technique. Loose hair is usually braided into a classic braid.
Roman grid
Hair is divided into two parts by means of a horizontal parting. From the resulting parting we separate the curl, but not straight, but slightly with a slope. Braid the French braid so that it goes obliquely. Then another curl is separated, but already with a slope in the opposite direction.
Heart
This hairstyle can be of two options: when all hair is involved and when not all hair is involved.
Option 1
2 partings are made - horizontal and vertical so that 4 squares are obtained. Weaving starts from the lower middle edge of the upper right square (where the partings intersect), using the French braid technology with a fence of curls on both sides. Weave diagonally, that is, from the corner up, then round off the weave, go to the lower right square and weave diagonally down.

The same is done with the other side and connected at the base of the neck. You can fix it with an elastic band and make a tail, or you can continue weaving and, twisting the tails of both braids into bundles, twist them together.
Option 2
Make a vertical parting - from the forehead to the top of the head. They begin to weave on the right side from the middle of the parting. Weaving - a French braid with a one-sided (external) grip.

As we weave, a heart shape is formed. The capture is stopped shortly before the end of weaving. On the second side, they do the same and connect them at the back of the head, leaving the end free. The lower hair is left loose.
Herringbone
The hairstyle has such a name because the parting is done in the form of a Christmas tree (zigzag). Braids originate from the middle of the head, that is, from the narrow ends of the Christmas tree and diverge to the sides. At the end, they can be tied in a tail.

Loop or flower in French technique
Braids for girls (100 hairstyles with step-by-step photos give you a choice) often help out those who want to create a fashionable, but comfortable hairstyle.
This weaving, if we consider individual elements, resembles a loop, and if we look at the composition as a whole, it resembles a flower. The parting is done crosswise, as a result of which 4 sectors are formed, in each of which a braid will be braided in the form of a loop.
A curl from one sector begins to weave from the crown using the French braid technique, smoothly rounding it until a loop is obtained. And so in all four sectors. The loose ends are braided in a classic style and collected in a ponytail. The braids in the tail are intertwined and look like weaving a twist.
Flower from a three-strand braid rolled into a snail

Headband in French technique with a flower
A waterfall of a three-strand braid from one temple to another with strands passed into each link after weaving the braid.
Two waterfall braids on the sides and a fishtail in the center
Two braids are woven from the temples in the technique french waterfall, which are then connected into one braid - "fish tail".
Malvinka, complemented by braids decorated using the “strand in each link” technique

Malvinka from two strands, decorated with knot weaving
In this hairstyle, the strands, braided using the Malvinka technique, are collected in a kind of knot.
Malvinka from two braids braided in the French technique

Tail with two braids braided from part of the hair
To make the hairstyle look neat, and the braids do not fall apart, the ends of the hair are fastened with an elastic band, grabbing even unbraided hair.
Heart of two thin braids (based on Malvinka)
This hairstyle has much in common with the first version of the “heart” weave.
Two twist braids connected into one with a bun
From the temporal lobes, two twist or tourniquet braids are woven, which are connected into one at the back of the head, after which this braid is twisted into a bundle and secured with hairpins.
Spit-waterfall with French braids
A horizontal braid-waterfall of three strands is woven. The strands emerging from it are divided into two parts and weave two one-sided French braids from them, each time weaving one strand. The ends of the braids are fastened with one elastic band.
Shamrock braids

Braid from tails with the addition of strands
The technique is similar to French. First, a tail is made, it is divided into two strands, one additional strand is added to each on both sides, twisted once and secured with an elastic band. Then they repeat the same.

Braid knots based on Malvinka
First, braids are woven according to the Malvinka principle, which are then gathered into knots and fixed with hairpins.
Double braid-twist from the tail with two three-strand braids on the sides
In this hairstyle, two types of weaving are connected - a twist or tourniquet and the usual three-strand.
Braid from the temple with the addition of strands at the end in the French technique on one side
In fact, this is a French braid style weaving to the side. The braid can be braided as a regular French braid or reverse (inside out).
Greek braid

Greek braid with loose hair
This version of the Greek braid is suitable for festive events.
Two French braids with the addition of strands from the temples based on the malvinka
In the Malvinka technique, two French braids are woven, which are then connected into a ponytail.
Tail braided with oblique mesh in a circle

Two crossed one-sided braids from two ponytails at the crown
This hairstyle is neat and practical, because it collects all the hair, which is convenient for the child.
Hair bow with braid

Snake in loose hair

Heart with a tail
First, a regular tail is made. Then the lower strand from the tail is threaded under the elastic and pulled up.

Divide it into two strands and braid one braid from each. The ends of the braids are fixed with an elastic band under the tail.
Bundle of several braids with a donut

Two three-strand braids with interwoven small braids
First you need to part your hair with a straight parting in half, then braid several three-strand braids on each half. After these small braids, braid two three-strand braids on the sides. Small braids are woven in the French technique.
Two one-sided French braids, braided from the temple
Two braids start from the temple, the hair is woven in the French technique from the side of the forehead. The braids are placed one under the other.
Two parallel braids-waterfall from the crown and with a tail
On both sides, two waterfall braids begin to weave, which are then gathered into a tail.
Lush Danish braid
The technique of weaving this braid is similar to the technique of weaving a regular Danish braid. Splendor can be achieved by slightly stretching and fluffing strands from a braided braid.
Tail braided in fishtail technique

Scythe-eight

Combination of fishtail and French technique

Malvinka fishtail with a tail on the back of the head

Crossed strands and small pigtails

Nodular braid-Malvinka

Boho braid
Several small braids braided from the parietal zone and connected into a ponytail at the back of the head.
Double braid-waterfall - bezel
This hairstyle will help separate the hair from the face, while leaving it loose.
Bundle-basket with a flower of hair in the center
Another popular variation of basket weaving, which can be both an everyday hairstyle and a festive one.
French braid with airy strands

Chinese braid

Three-strand braid in the technique of "strand in each link" and a tail on the back of the head
This hairstyle combines a three-strand weave and a ponytail.
Tail braided in French technique

In order for the girl to always look neat, fashionable and stylish at school, mom should learn a few braiding techniques. Based on braids, you can easily make 100 hairstyles if you are guided by step-by-step photos and this is not the limit.
An older girl can do some hairstyles on her own. A braid is one of those few hairstyles that are versatile and suitable for everyday life, holidays and sports.
Video about weaving braids for girls
Video about pigtails for girls - 100 hairstyles - 3 most simple and beautiful:
Video about the 10 most beautiful and easy-to-perform hairstyles on last call:
Beautiful long hair is the pride of any girl. The set of standard styling for long hair is very limited, and very long hair is inconvenient to wear loose. Braids come to the rescue. Weaving a variety of braids is easy to learn.
The main advantage of hairstyles with braids is variety. Depending on the weaving and decorations, the braid will be appropriate in business style and for chic holiday styling. Properly selected braids are suitable for any type of hair, even thin ones. Hairstyle with braids will give the look variety and grooming.
However, trichologists warn that with weakened and prone to hair loss, it is not recommended to often wear tight braids.
Some braids are quite difficult to perform, so you need to calculate in advance whether there is enough time for the planned hairstyle.
How to choose a hairstyle with braids for the shape of the face?
The shape of the face is divided into the following main types: round, oval, triangular, square, rectangular. A well-chosen hairstyle with braids will hide flaws and emphasize the winning sides of your appearance. 
Braid weaving
In order for the braid to weave easily and look beautiful, the hair must first be combed well, if necessary, apply a styling agent. For some types of weaving, you will need a comb with a thin sharp end to separate the strands, for fixing - invisible, silicone rubber bands, hairpins.
Russian braid
Russian braid is the simplest and at the same time the most spectacular type of weaving for long hair. It was the braid that has always been a symbol of girlish beauty and feminine strength.

To perform the braid, the hair must be divided into three equal parts. Next, the side strands are alternately thrown over the middle one. The braid can be braided by tightening it tightly from the back of the head, a beautiful youth hairstyle is obtained by combing the hair to one side and braiding it freely.
Spikelet or French braid
The spikelet is often called the French braid. The braid can be done on your own. Hair should be combed back, at the base of the forehead, select a medium-sized strand. The strand is divided into three equal parts. 

The strands are intertwined like a regular braid, but at the same time, with each braid, strands are added to the side strands from the remaining unused side hair. Weaving continues until all the free strands are in the braid. The remaining loose hair is braided into a regular braid.
Greek braid
This hairstyle combines the spikelet technique on long hair and a regular braid.


First, the hair must be divided with a straight or side parting. One part of the hair needs to be pinned up, a small strand should be separated from the remaining hair and divided into three parts.
To start weaving, you need to weave several braids of an ordinary three-strand braid, then strands of free hair are added, then a regular braid is woven again.
When the braid has gone around the head, you need to weave an ordinary braid from the remaining hair. A circular Greek braid is woven in the form of a crown from temple to temple.
The main difference between a Greek braid and a French one is that when weaving spikelets, strands are added with each braid, and in a Greek braid, several braids do not need to be done every time. To make the weaving look beautiful, the braid should not be tight.
Reverse french weave
Reverse French weaving looks very impressive. Weaving begins as a standard spikelet: you need to comb your hair back and divide the strand selected at the base of the forehead into three parts. 
Weaving differs from the usual one in that when weaving a spikelet, the strands are thrown at each other from above each time, and when weaving a reverse braid, the strands are held under the middle one. Otherwise, the technique is the same: with each new braid, additional strands of loose hair are added to the side strands.
Fish tail
Sometimes it is this weaving that is called "spikelet". Curly hair is not suitable for braids.


The hair must be divided in half, then on the outside of one of the halves, for example, the left, a thin strand is separated, thrown over this half to the middle and combined with the right half.
Now the same thin strand is separated from the outside of the right half, thrown into the middle and combined with the left half. Weaving continues in the same way until the braid is ready. The result is fixed with rubber bands. To make the braid look neat, you need to separate thin strands of the same thickness.
Waterfall
A waterfall braid, also known as a cascading braid, is a combination of weaving and loose long hair. Weaving always begins at the temple from any convenient side. Separate three small strands and start weaving a standard spikelet. 
After the first crossing of the strands, the lower strand must be released and left to hang freely. To continue weaving on three strands, you need to separate the strand from above, make another braid and leave the bottom strand again.
A waterfall braid can be braided in a straight line around the head, lowered to the back of the head, and you can also start weaving from two sides and connect both parts at the back. It is not necessary to braid all hair into a waterfall.
At any time, the waterfall can be continued as a regular spit. Having finished weaving the waterfall, you need to fix the braid with invisibility so that the weaving does not crumble. If the remaining hair is curled, then pretty haircut becomes festive.
4 strand braid for long hair
A 4-strand braid looks unusual and will fit into any style. Hair should be divided into 4 equal parts. The rightmost strand is thrown over the second strand on the right, as if an ordinary Russian braid is being woven. 

But then the working strand is drawn under the next strand and becomes the second from the left. Then the leftmost strand is thrown on top of the second strand on the left and held under the next strand. Weaving continues in the same pattern.
braid twist
This original braid does not require any weaving. In fact, this hairstyle is an inverted tail, repeated several times. For hairstyles, you will need small silicone rubber bands. The hair is combed to one side and picked up with a silicone rubber band. Hair above the elastic is divided in half. 
The tail is threaded through the resulting hole and pulled out. Got the first twist. Then the hair is again picked up with an elastic band a little lower, the tail is again threaded through the hole, a second twist is obtained. Weaving continues as long as there is enough hair. The twists above need to be pulled out a little to make the braid look voluminous.
Spit of flagella
A braid of flagella is well suited as a business hairstyle. The hair is collected in a high ponytail and divided into two equal parts. Each part must be twisted into a bundle, for example, counterclockwise. The resulting bundles are woven together, the result is fixed with an elastic band or hairpin.
Also, a braid of flagella can be braided using the spikelet technique. In this case, the original strand must be divided into two parts, each twisted into a tourniquet. When weaving, the added strands must be combined with the existing bundles, twisting them into the main bundles. Loose hair is shaped as desired.
snake
Also, this hairstyle is called a zig-zag braid. Weaving braids should start from the side. A strand is separated at the temple, divided into three lobes.  Standard French weaving is performed, but with some features:
- The scythe does not go down to the back of the head, but to another temple;
- Side strands are picked up only from above;
- The bottom strands remain free. They will be needed further.
Having brought the braid to the other temple, the weaving must be unfolded and continued in the opposite direction. Side strands are again added only from above. Weaving must be continued until the free strands run out. We braid the remaining hair into a braid.
The snake made using the technique of reverse French weaving looks very nice. Flowers and beautiful accessories turn the snake into a festive styling.
Tail with a scythe for long hair
The combination of a tail with a scythe gives room for imagination. You can braid one or more spikelets to the middle of the back of the head and then collect the hair in a high ponytail. On the contrary, you can collect your hair in a ponytail and braid any of the described braids or even several.
Malvinka
simple hairstyle provides incredible opportunities for imagination. The front and side strands are combed back and secured with silicone rubber or invisible. 
At the same time, they can be twisted into flagella or braided with simple braids, connecting them together. Further, the strand already combined at the back can be braided in any of the above ways.
Shell
The finished hairstyle really resembles sea shell. There are two main options for weaving braids. In the first case, a French braid is woven from the temple diagonally down, while the side strands are picked up only from above. Having finished the diagonal, you need to continue to weave a regular braid and fix it with an elastic band. 
Then, slightly below the first braid, you need to braid another one in the same direction from the temple diagonally down. Additional strands are woven only from above. As a result, free hair should not remain.
The lower braid is twisted into a bundle, the upper braid is twisted around it. The bundle is fixed with pins. The second version of the shell braid is to weave one French braid diagonally from the temple down to the back of the head and then along the bottom of the back of the head to make a soft arc.
The side strands are picked up only on one side, there should not be any free hair left. Next, you need to braid your hair into a braid and wrap it in a circle to make a shell. The hairstyle looks very beautiful if the braid is made using the reverse weaving technique or like a fishtail braid.
Crown
To make a crown, you need to weave on long hair. Beautiful styling is obtained only if the braid can be wrapped around the head. The braid is made using the spikelet technique from the base of the neck in a circle. Hair is divided into two equal parts. 
One part is assigned to the working part, weaving begins with it. At the base of the neck, a strand is separated and divided into three parts. The spikelet is woven along the hairline towards the forehead. Starting from the middle of the forehead, you need to continue weaving down to the back of the head, using the second part of the hair.
If the hair is long enough, then you can continue to weave the braid further and also wrap it around the head on top of the main one. If the braid ended at the back of the head, then it must be fixed with an elastic band and invisible.
bubble braid
For a bubble braid, you will need two ribbons. Hair must be tied into a ponytail and divided into two parts. the ribbons are tied so that one is between the halves of the tail, and the second to the left of the hair. This tape will be working and will braid the selected strands and the central tape.
 Weaving a bubble braid for long and beautiful hair
 Weaving is performed as follows: a working tape is held under two strands of hair and above the central tape. Then the tape is drawn over the strands and under the central tape. Further weaving continues in the same way.
The central tape and strands of position do not change. Every 4-5 braids, the side strands need to be fluffed up, giving the braid volume. Such weaving requires skill.
Openwork braid of 5 strands
Hair should be divided into five equal parts. Weaving starts from left to right. The leftmost strand is thrown over the next one, then the middle strand is thrown over it. 

In fact, one braid of a three-strand braid was made. Then the rightmost strand is thrown over the next one, the middle strand is thrown over it. Weaving continues in the same pattern.
square braid
Hair should be divided into three equal parts. The left strand is additionally divided in half.  The middle strand is drawn between the halves of the left strand, then the halves must be combined, the left strand becomes the middle one. Then the right strand is divided in half, the middle strand is drawn between the halves of the right. Weaving continues in the same pattern.
The combination of beams and braids in the hairstyle
Bunches and braids are perfectly combined in a hairstyle. The bun is especially well combined with French weaving, when the remaining hair is braided and pinned up or immediately stabbed into a bun. 
A bunch of pre-curled curls, decorated with beautiful hairpins, flowers and ribbons is a great evening hairstyle.
Evening hairstyles with weaving
Rosette
A rosette can be made from the entire mass of hair or a small strand can be separated to make a separate decoration. To make a rose, you need to separate the necessary strand and, dividing it into three parts, weave an ordinary three-strand braid. 
During weaving, on one side of the braid, loops should be pulled out, which should decrease towards the end of the braid. Then the braid is folded into a flower shape so that the elongated loops are on the outside, and fixed with decorative hairpins.
Heart
Hair should be divided into two parts with a straight parting. One part is stabbed, on the second, a braid is made with French weaving in an arc from the top of the head to the temple and further down to the back of the head. 
Side strands are picked up only from above. Having fixed the first braid, the same is braided symmetrically on the second half of the hair. It is important that the braids look like a mirror.
triple waterfall
Spit waterfall has already been described above. To perform a triple waterfall, you need to weave a waterfall braid from the temple around the head. Then, from the same temple, the second braid of the waterfall begins, while the lower strands remain free. 
The third braid waterfall again starts from the original temple and the lower strands again remain free. Each of the braids is woven to the end. Loose braids can be beautifully styled and decorated with decorative hairpins.
Simple weaving for girls
Multilayer basket
There are many variants of a braid called a basket. To weave the standard version, you need to select a part of the hair in the shape of a circle just below the top of the head and tighten it into a tight tail. 
Further, a spikelet is woven from free hair so that the outer strands are completely captured, and the inner ones are picked up from the tail. It is important to calculate that there is enough hair for a spikelet around the head. The remaining hair is braided into a regular braid.
Bow braids
To perform this hairstyle, you will need a large hairpin. First you need to weave an ordinary spikelet in any direction. In this case, be sure to leave a small strand on the side of the braid. After the braid is fixed, you can begin to form bows. To do this, in the first braid, you need to thread the hairpin with the round end forward to the side where the strand was left. 
A small strand is separated, sprayed with varnish, folded in half. The resulting loop is threaded into the hairpin and put on the finger. Next, the hairpin is pulled back along with the strand. Taking into account the loop fixed with a finger, a bow is obtained. The remaining tail is laid along the braid, it will be covered by the next strand. This is how each braid of the spikelet is decorated.
criss-cross
This beautiful hairstyle consists of two spikelets braided towards each other. The hair is divided into two equal parts with a straight parting. Each of the parts is additionally divided horizontally. Weaving begins from one of the upper parts with an ordinary spikelet from the temple to the back of the head along a long diagonal.
Having reached the middle of the head, the braid must be fixed and weave the spikelet on the other half in the same way. Then several braids are made of a regular braid, which should pass over the first, and weaving continues down already a spikelet using the lower quarter of the hair. The second braid is woven with a spikelet of the remaining hair diagonally down.
This is how a few basic weaving techniques open up the widest possibilities to diversify your everyday hairstyles, as well as create an unforgettable evening look.
Video clips: weaving for long hair
How to braid like this beautiful braid for long hair. Video master class:
Braiding technique. 3 beautiful and quick hairstyles:
Long hair is one of the natural jewelry that is available to many. Some mistakenly believe that such beauty is a thing of the past (such people prefer short or medium-length hair), but modern stylists have repeatedly proved and continue to prove the fallacy of such judgments. They invent more and more new variations and techniques of weaving braids. We suggest that you familiarize yourself with some of them in the catalog “Hairstyles for girls for long hair photo step by step.
Braids for long hair photo
Here are a few options for the master class ( step-by-step instruction, diagrams, pictures) of modern weaving from two strands with your own hands and at home:
French braid - the original way of weaving starts from the crown. It is divided into two strands. It is necessary to cross them among themselves, left, laying on top of the right. Then, at each crossing, add a braid to each strand. You can thus braid to the end, or you can collect the remaining hair at the neck in a ponytail. A French braid, like a spikelet, can be woven not only in the center. But also diagonally, or in a circle;
Popular articles:
braid from harnesses- just like the French braid, it originates from the top of the head. Also take two strands, but twist them clockwise, forming two bundles. Then twist them together, but already counterclockwise. On both sides, get strands and twist again into two bundles, which you twist together in the opposite direction. Thus, weave the braid to the end;
fish tail- today - this is a very popular type of braiding. It does not require special efforts or absolutely even hair (possible even with curls). Knocking out strands, on the contrary, add charm. Separate strands from both temples and cross them with each other. Then take the next strands, connecting them with the top ones and cross each other already in a mirror image. Weave in this way to the end. Secure with a rubber band at the end.
At the same time, the “Spikelet” remains to be considered the most popular, it is easy to perform, looks great and does not cause much trouble when shaping the hairstyle, moreover, this is the basic method for many variations for any occasion (holiday or every day).
The classic variation of the “Russian braid” does not go out of fashion, both in everyday and festive performance, it is especially beautiful if each cover is slightly dissolved, making it slightly flattened (openwork). Such braids will look spectacular in everyday use (for girls to school), girls on prom or for women for a wedding. It can be one in the center, on the sides, or several small ones along the entire back of the head, collected in a bundle. There are a lot of ideas for weaving, you just have to choose the one that is convenient for you.
A light braid of the “Waterfall” type looks very elegant (simple with one light diagonal braid, or a complicated version with several also light cascading braids, with and without bangs). The rest of the hair can be left loose or collected in a bun. It also looks luxurious in a wedding version (another evening gala event) with and without additional flowers (other elements). You can do it yourself in 15 minutes (quick transformation), and you can easily appreciate the showiness and versatility of the hairstyle.
We add that the shape of the braid can be varied according to your taste, for example, you can make unusual shapes from an ordinary Russian, for example, braid a heart, a flower or even a crown. She can simply and elegantly frame the hair at the frontal part with and without curls, and many more variations in their pure form and with elastic bands, ribbons, bows, veils, etc. The number of options depends only on your imagination. And you can practice doing techniques and learn the art of weaving braids with barbie dolls (a great children's activity for a little girl).
Bang Ideas for Beginners
Beautiful weaving with ribbons
Simple easy ideas for every day
Evening hairstyles for a wedding
Video braiding long hair
For those who like to see the practical implementation with their own eyes, we offer video tutorials of simple techniques for beginners (ambulance in an accessible language). This will allow you to learn the process of weaving fashionable shapes step by step, creating and doing them yourself. We add only a few recommendations for choosing a model for various types faces:
Oval - stylists call this type a "real standard", the owner of this form can experiment and try on a variety of hairstyles, of any type and shape, and all of them will be what is called "to the face", especially in combination with thick hair;
Square - transformational types of hairstyles should be considered. For this type, the “Little Dragon” weaving option is very successful, such a braid originates at the crown, gradually moving to the standard at the base of the head, this method will visually lengthen the shape, will give elegance to the image;
Rectangle - a fishtail braid is perfect for it, it will smooth out slight flaws and add femininity and elegance;
Triangle - with this shape, spikelet variations will look great, it will look perfect in combination with a slightly voluminous bang (additional styling is required).
But in more detail, look at our master class from professionals in their field with a description in the proposed video for free. We add that there are a lot of similar lessons on YouTube, but most of them are from amateurs.