In the New Year's rush, we may not have time to run around the florist shops in search of packaging materials for our little culinary gifts.
It doesn’t matter, because you can use some of the things that are always available at home or in the office.
**
Material for
And FM "Journey to the Kingdom of the Nutcracker"
**
Envelopes for CDs
Yes, yes, simple paper CD sleeves with a transparent window .. They seem to be specially designed for gingerbread!
Transparent bags for CDs are also quite suitable. Their disadvantage is that they do not keep their shape well. It is easy to eliminate by inserting a strip of cardboard cut exactly to the width into the bottom of the bag. In the same bag for cookies, you can put new year card congratulations.


**
Basket-manager from whatman paper
For her, we need an A3 paper sheet.
We cut out a square from it with a side of 297 mm (the length of the smaller side). We divide each side of the square into three and draw it according to these marks, as if we were drawing a lattice for playing tic-tac-toe. We make folds along these lines, the folds should look down. On the four corner squares we make diagonal folds, these folds should look up.
Now we bring the bent corners to the center and with the help of a needle we collect them on a strong thread. We tighten the thread, tie it, fix the knot, cut off the excess thread. We decorate the junction of the corners with a ribbon or something else.
The storage basket is ready. You can put sweets, cookies or other small gifts in it, and decorate the outer sides with appliqué or drawings.


(photos enlarge by clicking)
**
It is easy to make a cubic gift box from the same blank.
It’s just that the corners-ears should not be reduced to the center, but pressed from the inside to the walls and attached - glued with glue, tape or using a stapler.


(photos enlarge by clicking)
**
Pencils, markers, markers
These stationery will help you arrange our box or basket at no extra cost. Before the final assembly on the sides, we draw snowflakes, stars or Christmas trees, and write good wishes addressee.
Today it is fashionable to stylize everything and everything as “houses”. Why not take advantage of this idea - drawing windows and doors is not at all difficult!
**
Stationery files
Any gift will look more advantageous if wrapped in a transparent rustling film - lavsan. Instead, we can use the usual clerical file pockets. It is enough just to carefully cut off the strip intended for the binder, and we are already holding a ready-made gift bag in our hands.
The size of the package, by the way, is very practical. For example, our basket-manager will perfectly fit into it. Well, except that the corners in the center will have to be connected not end-to-end, but slightly overlapped.


(photos enlarge by clicking)
If this package is too big for your purposes, you can simply cut it into sheets and wrap small gifts like candy, tied with a ribbon.
- What is a holiday? they ask you once.
And you immediately answer with a smile:
- This is when everyone is happy, they say good wishes, give gifts…
And in response to you:
- So, if today you give someone a gift and wish something wonderful, then there will be a holiday?
And it's true ... And you can even give a handful of sweets. The main thing is how to do it. Perhaps we should start with unusual packaging. DIY paper box is a great idea for original gift or surprise.
Even clean symbolic gift will be admirable if you present it in its own packaging.
Materials and tools
So, what may be needed in the manufacture of all kinds of boxes.
- Paper.
It is best to take scrapbooking paper - it is good because it can be double-sided, and with a different pattern on each side. Also suitable is thick design paper, colored pastel paper, cardboard (200-300 g / m2), a simple sheet of whatman paper or watercolor paper that you can color or tint with your own hands.
You can also use "yellow" note paper (or an envelope from it), wrapping paper ... and any other that you can use for decoration. - Corrugated cardboard
- Napkins (preferably thicker)
- Ribbons, ribbons, laces
- Beads, buttons
- Ready labels
- Scissors, stationery knife
- Double sided tape, glue stick
- Superglue or glue "Moment" universal ( transparent gel) for fixing beads and other
- Ruler, pencil
- Compass
- Hole puncher
- Nail file (for creasing)
Useful advice. Before taking directly on the paper from which your box will be, try to assemble it from plain paper. You will understand where to cut, how it is more convenient to make folds, how to assemble the box. Plus, you can estimate what size box you need. Often, after all, the first pancake is lumpy - so let this lump be made of simple cheap paper.
Decor. As for the elements for decoration, here you can not limit yourself: make flowers from fabric and paper, combine ribbons and raffia, lace, whatever you think of. The main rule is not to overdo it.
And now for the boxes themselves. There are a lot of options, models and schemes for their manufacture. We offer you the most popular ones - from classic round and square boxes at the base to unusual bonbonnieres. But first things first.
square box
You can give anything in it. From sweets and cookies to soap self made and decorations. Naturally, for each gift there should be an appropriate decor of the box.
In this case, the packaging is stylized as a postal parcel. This gives it a special romance, because the services of traditional mail for sending letters and gifts are used less and less today.
If use colored paper with a picture - the box will have a completely different mood. Choose yours!
You can create such a beautiful paper box in just a few minutes.
This is one of the possible options for making a square box. It will be from a single sheet, without a separate cover. Let's start.

We redraw the scheme of the box on paper. We think over the right size in advance. Cut out.

Carefully bend the workpiece along the dotted lines that are drawn in the diagram.
If the paper is thick enough to make it easier to fold, you can creas it first. To do this, attach a ruler to the fold lines and draw along them with a nail file (with the tip of a compass, the tip of scissors). You should get a groove - a recess along the line. Now all the folds will be clear.

Glue the strips of double-sided tape as shown in the figure. Instead of adhesive tape, you can use a glue stick, but adhesive tape is still more reliable and more convenient.

We decorate the walls of the box from the outside, while it itself is still dismantled. And then we glue it. It remains to invest a gift and bandage the package!
Round base
The box of this model is more suitable for gifts for women. Although everything again depends on the gift and decor. It can be presented with both beads and a tie (if twisted with a snail), as well as an aromatic candle, christmas ball or even a cupcake!
Such a do-it-yourself paper box can later serve as an excellent box for small things (buttons, beads, etc.). 
So let's get started.

Select the desired radius of the circle at the base. We draw with the help of a compass 4 such circles on thick paper and 2 on corrugated cardboard.
We measure 3 strips on paper. Their length will be equal to the circumference of our circles (yes, you have to remember your favorite formula 2πR). The widest strip will be the height of the box, another one will be 1 cm narrower, and the third strip will be the narrowest - for the height of the future lid.
Difficult - only while you are reading this, you should start doing it - and everything becomes simple and understandable! 

We glue the circles of corrugated cardboard with paper. We got the bottom and base of the lid.

We glue the first and second strips, as shown in the figure (vertical shift is approximately the thickness of the bottom of the box, horizontal shift is 1 cm). The front side of the paper should be facing out. We decorate the future wall of the box.

We glue the bottom of the box in a circle with a double strip of paper. Then we glue the base of the lid in a circle with the remaining narrowest strip.
The box is ready! We place a gift inside and close the decorated lid.
Separately, you can not decorate the lid, but tie the entire box with a ribbon. For example, like this: 
Graceful boxes and not a drop of glue!
Is it possible to make a paper box with your own hands quickly and without any glue? Voila! There are more examples of such packages than you can imagine.
Everything is made from one sheet of paper. The main thing is to carefully cut the workpiece and bend it correctly. At first glance, the schemes for some boxes are tricky, but in fact everything is much simpler. Each next box will be easier to collect. We advise you to practice on plain paper first!
When working with thick paper, creasing will again help you a lot. Let's try!
1. Strict box - male version.
Although if you make it larger, made of paper with a delicate print and decorate with a flower, it will be just right for giving lingerie. 

Ideal for sweets and anything lush and airy.
In order to thread a ribbon or lace, make holes in the workpiece in advance with a hole punch. 
Suitable, for example, for loose aromatic tea. Or for some bottles, candlesticks. 
It looks very concise, perfect for a men's gift. 

And with a brighter decor - it will be a good option for a gift to a woman.


Here is the same case, but a little different configuration. This option can be opened and closed, thanks to a kind of clasp.
Lovely bonbonnieres
Bonbonnieres are a special kind of boxes. Bonbon in French - candy, and the name of the boxes comes from the word "candy box". It is bonbonnieres with sweets or sweet dragees that the newlyweds give to the guests at the wedding - in response to congratulations.
Ordering a bonbonniere for each guest is not a cheap pleasure. But it will not be difficult for the bride and her bridesmaids to make bonbonnieres in the style and tone of the wedding.
1. One of the easiest options

2. Elegant.
Reminiscent of a box or a small chest.
Quite a bit more difficult than the first. We make slots in them with a clerical knife, holes, if we want to pull in a ribbon or lace, with a hole punch. 

3. Unusual and delicious.
As a rule, bonbonnieres are located on a special separate table and often on a dish or tray. You can play beautifully with this situation and make bonbonnieres in the form of cake slices. And you need to place them together, as if it were a paper cake. 
To begin with, we draw a large circle (the plane of the cake) and divide it into sectors in order to know the parameters of our pieces.
Then, according to the dimensions, we draw a diagram of the scan of the piece. We make the required number of scans, cut them out and glue them together. You can decorate before gluing, or after - it all depends on the idea of your decor. 
Greetings to all of you, dear audience. Holidays do not end with us all our lives - only Someone's Birthday has passed, as it has already come New Year, and there are other winter-spring holidays ... And for each of them we give presents that we want to present at least interestingly. And what if not a gift box with your own hands will help with this?
I myself love to congratulate my relatives in an original way. It is very nice to see the smiles of those whom you congratulate. And cute boxes always contribute to this! After all, they are the first thing that catches your eye when presenting a presentation.
How to make a gift box with your own hands
Gift wrapping can be very diverse. But there is one rule - the cardboard or paper from which you want to make a box must be of the right quality. In this sense, the classic children's cardboard is far from suitable.
Where can I get such cardboard or paper? First of all, in specialized stores for creativity or even scrapbooking separately. Well, if there is such a store in the city, you say, but what if there is no such store at hand or the prices are exorbitant?
Such leaves will be enough for you to make small souvenir boxes (for jewelry, sweets, toys, etc.). Your family will appreciate
And now I suggest that you proceed to the actual detailed photo master classes, in which there will also be a scheme for creating each individual box.
Master classes on creating cardboard and paper boxes
small boxes
First of all, I want to give you 5 unwrapped patterns with very cute patterns that will make such a wonderful package:

On the first of them - red roses. If you want to impress your lover, then this is for you.
Principles of working with templates:
- Print your favorite scan on thick paper.
- Cut out the future box along the contour and cut it in those places where straight lines pass (focus on light scans - the arrangement of the lines is the same everywhere).
- Bend the box along the dotted lines and glue so that the semi-circular ends lie between the other two and the round ends point up.
- Everything, it remains only to bend the lid properly.


And again roses, but more tender.

And now there are two options for the birthday - sweets with balls and lollipops.


Large rectangular
This is perfect for large gifts (for example, wall clocks). For you, you will need specialized binding cardboard to make the box really convenient. By the way, binding cardboard can also be purchased at specialized stores or on Ali.
Incision sites are marked in orange. The lid can also be made, but with slightly larger dimensions (2-3 mm).

For a man
If the present is intended for a man, then I suggest choosing one of the following options.
Simple shapes are on trend - this is proved by the following 4 templates for creating strict classic boxes. For them, you again need thick cardboard.


If the gift is intended for a lover, then there should be more than enough romance ^^ There are butterflies, and hearts, and all kinds of declarations of love. They can be made from thick cardboard or thick paper.

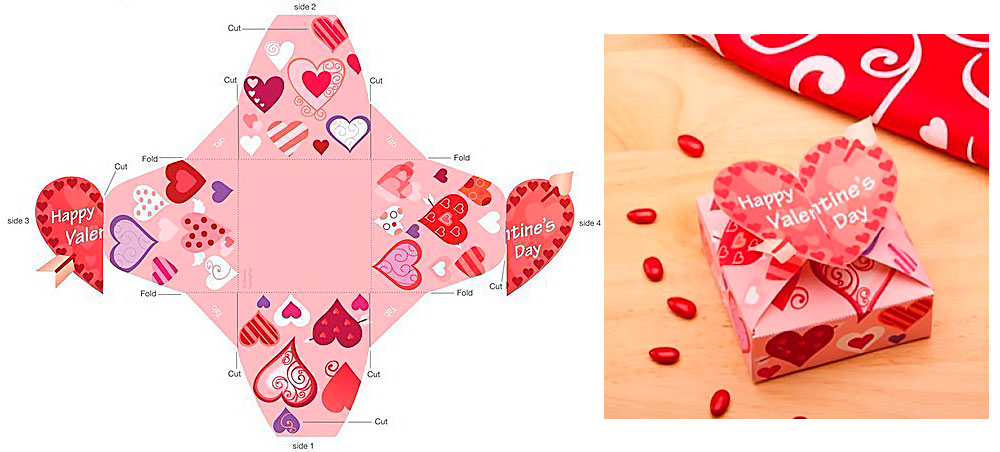

Heart
Heart boxes are very popular, because with the help of them you can express your feelings. Or confess them


Cake
Getting ready for a big party where everyone needs a little surprise? Or maybe a wedding is planned? In both cases, cardboard pieces of cake will come to the rescue.
A beautiful and understandable scheme is suitable for both the bottom and the lid.

Paper boxes
It is not always necessary for boxes to be tight - sometimes it is enough just to create beautiful picture. Then I suggest you use this convenient scheme of 6 different packages:

If you are going to a holiday with a child (or maybe you want to please yours), then make him a cute box in the form of an animal.

Give happy parents this boot. Follow the traditions: girls - pink, boys - blue or blue.

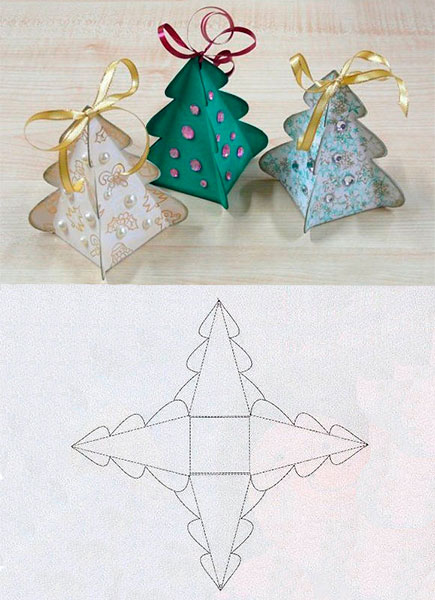
Boxes for the New Year
The mood can be created not only with the help of gifts) Just look at these 8 lovely boxes, each of which can also be great christmas decoration
Especially needed if for some reason there is no Christmas tree. The main thing in this package is to trim the edges nicely and neatly.
Snowflake
Of course, this box itself is wonderful, but the silver paint on the tips of the snowflake can add a twist.
Tip: Give something in this package to a girl who loves Frozen.

sachet
Giving a gift is one of the easiest options.

Box with sweets
For all lovers of beautiful New Year's favors and quick handmade! Take a plastic cup with a smooth surface, cut off the edge and cut the edge.
Bend the cut pieces inward so that they cling to each other. Put the goodies inside and seal the top with something cute.

Another option for candy packaging is a donut. It is a little more laborious, but more effective.


How to decorate a box with your own hands
The design of the box can be very diverse - from simple figures in the form of birds and hearts to intricate flowers and bows. I will write more about the decor of the boxes in the future - do not miss it.
In the meantime, subscribe and comment - see you soon!
Sincerely, Anastasia Skoreva
The tradition of giving gifts to each other new year holidays will never cease to exist. New Year gifts can be very different.
Making delicious surprises
Such an unusual holiday surprise can act as a corporate gift to colleagues or even friends and relatives, and. You can make a whole, which can consist not only of gingerbread and, but also,.
Do not forget about the design of Christmas presents. But how do you wrap gingerbread cookies and gingerbread for a gift? To pack such a present, you can use some.
 Put a beautiful openwork napkin on the bottom. Lay the cake out on a napkin. You can put it in several rows, alternating with each other. box .
Do not forget that the wrapper should carry festive mood, so it is best to choose bright shades with sparkles. For originality, you can glue rhinestones or sequins on the lid of the box yourself.
Another presentation option gift set from gingerbread and cookies - put them on a beautiful one. It is better if it is decorated in a New Year's or Christmas style.
Sweets should also be put on a napkin. Then wrap all this beauty in beautiful transparent paper or film, securing it on top with a ribbon or bow.
This is how you can present Gingerbread Cookie or a gift-wrapped gingerbread, and you don't even have to go to a store that produces gift wrapping.
If a surprise is made to an adult, then in addition you can present a bottle of mulled wine - a drink that in many European countries associated with Christmas. Such an additional present will create a truly New Year's mood.
Recipe
 Those who love to cook can make gingerbread cookies as a gift with their own hands. For cooking you will need:
- wheat flour - 300 g;
- butter (can be replaced with margarine) - 120 g;
- egg yolks - 2 pcs.;
- honey - 3 tablespoons;
- ground ginger - 1-2 tsp;
- ground cinnamon - 1.5 tsp;
- granulated sugar - 130 g;
- vanillin - 1 tsp;
- soda - 0.5 tsp;
- lemon juice - 1 tsp
How to cook:
- In a bowl, mix sugar and flour.
- Soda to pay off lemon juice and add to flour.
- Pour ginger, cinnamon and vanilla there. Mix everything well.
- Whisk the egg yolks.
- Cut the butter or margarine into cubes and add to the mixture.
- Add honey and yolks.
- Knead the dough with your hands and refrigerate for at least an hour.
- Roll out a 0.5 cm thick layer from the finished dough. Cut out cookies using cookie cutters.
- Bake in the oven at 180 degrees for no more than 15 minutes.
Ready-made New Year's cookies can be additionally decorated with icing, chocolate or nuts.
B Gift box for cookies from improvised means
In the New Year's rush, we may not have time to run around the florist shops in search of packaging materials for our little culinary gifts.
It doesn’t matter, because you can use some of the things that are always available at home or in the office.
**
Material for FM Christmas Culinary Gifts
And FM "Journey to the Kingdom of the Nutcracker"
**
Envelopes for CDs
Yes, yes, simple paper CD sleeves with a transparent window .. They seem to be specially designed for gingerbread!
Transparent bags for CDs are also quite suitable. Their disadvantage is that they do not keep their shape well. It is easy to eliminate by inserting a strip of cardboard cut exactly to the width into the bottom of the bag. In the same bag for cookies, you can also put a New Year's card with congratulations.
**
Basket-manager from whatman paper
For her, we need an A3 paper sheet.
We cut out a square from it with a side of 297 mm (the length of the smaller side). We divide each side of the square into three and draw it according to these marks, as if we were drawing a lattice for playing tic-tac-toe. We make folds along these lines, the folds should look down. On the four corner squares we make diagonal folds, these folds should look up.
Now we bring the bent corners to the center and with the help of a needle we collect them on a strong thread. We tighten the thread, tie it, fix the knot, cut off the excess thread. We decorate the junction of the corners with a ribbon or something else.
The storage basket is ready. You can put sweets, cookies or other small gifts in it, and decorate the outer sides with appliqué or drawings.
(photos enlarge by clicking)
**
It is easy to make a cubic gift box from the same blank.
It’s just that the corners-ears should not be reduced to the center, but pressed from the inside to the walls and attached - glued with glue, tape or using a stapler.
(photos enlarge by clicking)
**
Pencils, markers, markers
These stationery will help you arrange our box or basket at no extra cost. Before the final assembly, we draw snowflakes, stars or Christmas trees on the sides, and write good wishes to the addressee.
Today it is fashionable to stylize everything and everything as “houses”. Why not take advantage of this idea - drawing windows and doors is not at all difficult!
**
Stationery files
Any gift will look more advantageous if wrapped in a transparent rustling film - lavsan. Instead, we can use the usual clerical file pockets. It is enough just to carefully cut off the strip intended for the binder, and we are already holding a ready-made gift bag in our hands.
The size of the package, by the way, is very practical. For example, our basket-manager will perfectly fit into it. Well, except that the corners in the center will have to be connected not end-to-end, but slightly overlapped.
(photos enlarge by clicking)
If this package is too big for your purposes, you can simply cut it into sheets and wrap small gifts like candy, tied with a ribbon.