Talented nail master and beauty blogger Nastya Art Simple Nail today will show us how to make a moon manicure with gel polish at home. Yes, not simple, but super-fashionable and already so beloved by many girls, the option with a transparent strip or, as it is also called, with negative space.
To create a moon manicure, you will need: a base, white and pink gel polish (colors can be chosen to your liking), a clinser or nail polish remover without acetone to remove the sticky layer and a top coat. In the video tutorial, Nastya uses products from Kodi Professional.
Instruction:
- First, prepare your nails for coating. Make an unedged or trimmed manicure with soaking. Try to carefully remove the entire subcutaneous tissue near the cuticle, so that in the future there is no peeling of the varnish. Then wipe the nails with a cotton pad soaked in nail polish remover without acetone. This will help remove the remnants of varnish, moisture and degrease the nail plate. Next, using a natural nail polisher (220/280 grit), sand the plates to remove the gloss and apply a dehydrator to remove residual moisture from the nails.
- Apply base and remove sticky layer.
- Add a light pink gel polish to the foil. With a thin brush, draw a semicircle and paint over the sides of the nail plate. Then, with a gel polish brush, paint over the remaining space.
- With white varnish and a thin brush, draw a hole, leaving a transparent strip between it and pink varnish.
- When you draw all the nails, send them to dry in the lamp.
- After that, apply a second coat of pink and white gel polish. Dry in a lamp.
- Finish off with a Kodi top coat. Dry in the lamp and remove the sticky layer. A special tool will help you with this - a clinser, preferably from the same manufacturer as all products. If it was not at hand, then you can use nail polish remover without acetone or a home-made product consisting of alcohol and water in a ratio of 30% alcohol and 70% water.
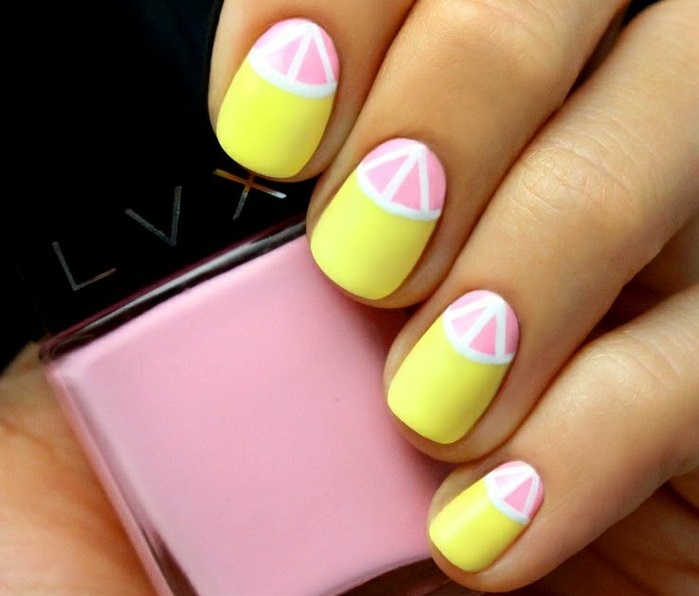
Delicate moon manicure gel polish with a transparent strip is ready! See also the video tutorial.
For almost ten years now, the moon manicure with gel polish, made in various colors and decorated with additional elements and accessories, has not lost its popularity among fashionistas. It is not difficult to make a similar design on your own, choosing the right tools and connecting the imagination to make a unique manicure.Preparatory stage: tools and basic ways to create a pattern on nails
Drawing holes on the nails is a design option that first saw the light of day at the beginning of this century. And if then it was customary to use the most neutral varnishes, and paint over the holes with a colorless coating, leaving them transparent, then modern fashion trends dictate slightly different rules. are now much better.Lunar manicure, which is also called an inverted jacket, can be created using several different colors and shades of varnishes, decorated with additional elements, such as rhinestones or drawings, stickers. Thanks to this, it is not difficult to make an unusual design for every day or for a solemn look. Choosing gel-based products to create such jewelry, you don’t have to worry that nail art will quickly crack.
To successfully make a moon manicure design with gel polish, you need to stock up on some patience and a certain amount of time. In addition to this, separate tools will also be required, in particular, to create an inverted jacket with gel-based varnish. This kind of varnishes are not able to dry, fix on their own, to fix them, you need to have a special UV lamp at home, which is available in nail design stores.
Necessary tools to draw your own moon manicure:
- a certain number of bottles of gel polishes of different shades, depending on the desired combination of colors;
- drying lamp;
- coatings in the form of base and top;
- tools that will create holes on the nail plates;
- additional decorations for nails at will in the form of rhinestones, pebbles, sparkles and so on.
How to draw the desired pattern on the nail plates:
- using a thin brush for nail art and contrasting varnish for holes;
- using special stickers for nails; if there are none at hand, you can use any adhesive tape, paper tape, after cutting out the details you need in shape from them;
- to create a moon manicure design with gel polish, you can also use nail stickers, cutting out the necessary shapes from them; this method excludes the use of two or three shades of varnish, if additional drawing on the nails is not planned;
- quite simple and interesting option applying an inverted jacket becomes foil; it can be translated, in different shades, with patterns, or plain silver, gold, matte; in this case, it is also necessary to purchase a special glue for nails, on which the shiny material will be attached;
- as unusual options for creating a moon pattern, dry sparkles, glitters, rhinestones and other small decorations with which the moon is laid out are suitable; for fixing on the nail plate, the glue mentioned above will also be required.
Simple instructions for drawing a moon manicure
Having abandoned the use of conventional color coatings for nail plates, you must first learn how to properly apply and fix gel polish on nails. It is worth remembering that this kind of thick coating is applied in an even layer several times, while each layer is dried separately, fixing, in the lamp for about 2-3 minutes. On top, it is necessary to cover the nails with a top, dry again and then carefully remove the sticky top film.When applying gel polishes, you need to be very careful. The coloring thick mixture should not get on the skin or cuticles. Previously, the skin on the fingers can be lubricated with oil or cream. You should also have swabs or cotton swabs on hand to remove excess gel before it hardens.
Lunar manicure gel polish step by step: general instructions for creating a design
- The nails are prepared for the creation of a new manicure: the old varnish is removed, the cuticle is trimmed, the necessary shape is given to the nail plates, polishing is performed. At the same stage, it is required to paint over the nails with a special degreasing coating.
- The next step is to apply a base coat to the nail plates, which will even out the surface of the nail plates and prepare them for applying the gel.
- After drying, the base color is applied. Depending on the desire, it can be the base for the holes or for the entire manicure.
- When the first varnish is dry, a pattern is drawn on the nails in the chosen way (using a stencil, brush, and so on). When the drawing is finished, the nails are dried again in the lamp.
- The final touch is the coating of the nail plates with top and drying. If additional accessories are used in the form of rhinestones or other elements, they are also stained with a top coat for fixing.
How to make a moon manicure with gel polish: drawing options
Using foil. When the nails are dry, a small layer of glue is applied to the chosen place where the holes should be located. As soon as it dries a little naturally, a transfer or figuratively cut foil is superimposed on it. Gently straightens and presses strongly against the nail. If the foil is transferable, then after 1-1.5 minutes it must be sharply torn off from the nail plate. The photo shows the final version of the moon manicure using foil.
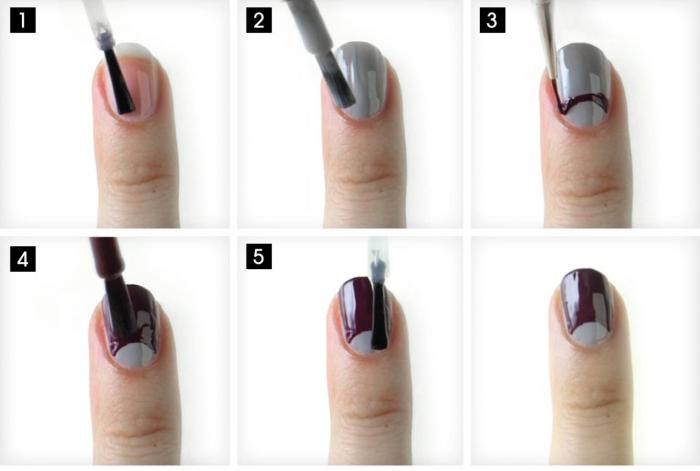
Drawing a pattern with a brush. Having dipped a thin brush in a contrasting varnish, it draws a concave or convex line along the nail. Then the space under it or above it, depending on the wishes and imagination, is carefully painted over. With the help of a brush, you can create drawings of an unusual shape, and make a hole, for example, triangular. In the photo you can see the stages of creating such a design.
Using stickers or analog handy tools. When the base color is applied to the nail and dried, adhesive stickers are attached to the nail plates. Next, the desired area of \u200b\u200bthe nail is painted over additional shade. The stickers are removed and the nails are dried in a UV lamp. Photograph from step by step creation a similar manicure is presented below.

Creation of unshaded wells. This design can be called classic. You can make transparent patterns using all the same stickers. Another option is to use adhesive tape, the edges of which can be cut into triangular or oval shapes. The sticker is attached to the nail, covered with transparent varnish. The unclosed area is painted over with the desired tone, the sticker is removed, the nails are dried. The stages of creating a manicure with an improvised tool are shown in the picture.

Inverted jacket with stickers, sparkles, other decorations. The creation technique is very simple. After applying and drying the main tone, holes are created on the nail plates in the chosen way. For sparkles and rhinestones, glue serves as the basis, as is the case with foil. Stickers just cut out. desired shape and attached to the nails. An example of a nail design option with animal print stickers is shown below.

A visual aid for creating a lunar design (video instruction)
A simple and quick way to create a manicure with holes, complemented by a strip on the edge of the nail, can be seen in the video. In this embodiment, the creation of a pattern occurs with the help of gel paint and a brush for nail art.Examples of inverted jacket designs for nails of different lengths
This kind of pattern looks good on nails of completely different lengths and shapes. In the case of short nails, the manicure looks neat, visually lengthens the nail plates. When the nails are long, you can place the pattern anywhere on the nail plate, adding additional decorations. For inspiration and awakening the imagination to create such nail art, you can see the thematic photos below.Lunar manicure design with gel polish on short nails
The fashion world does not stand still, but is rapidly moving forward in big and small steps. The fashion for clothes, hairstyles, hair coloring is rapidly changing. Even the fashion for manicure changes almost every day.
Today, an elegant French manicure is in fashion, tomorrow a contrasting gradient on the nails is in fashion, the day after tomorrow something else will be in fashion. And these trends need to be taken into account not only by manicure masters, but also by their clients. Firstly, in order not to look old-fashioned, and secondly, it is always nice to be one of the first to try something new.
 Highly unusual manicure- fashion trend
 What is the name of a manicure with a hole?
In fact, a moon manicure or a manicure with holes is an alternative version of the well-known french manicure(French). French - this is when the top of the nail is highlighted with a varnish of a different color from the main color of the nail.
The traditional version uses flesh-colored varnish, white and transparent.


More modern version implies the presence of more contrasting colors, additional patterns, gradients, rhinestones, sparkles.

 french manicure with rhinestones

Manicure with holes - highlighting the nail hole from below with a different color, rhinestones, sparkles, whatever.
So, the main difference between a real jacket and a moon manicure is that a jacket means highlighting the nail from above, and moon manicure - from below.

 traditional moon manicure

Sometimes masters do not use semicircular holes, but triangular ones. Manicure is stylish and unusual.

Some masters, at the request of clients, can combine a moon manicure and a jacket. Then a very beautiful, fashionable, combined manicure is born. In such a manicure, you can add rhinestones, patterns and sparkles. But you need to know the measure, since the abundance of small details greatly disperses attention.


How to make a moon manicure at home: step by step instructions
Making a moon manicure “like on the cover of a magazine” is not at all difficult. But such a manicure will require some accuracy and understanding of the basic principles of creating a spectacular manicure from you.
Even if you are a complete beginner, creating such a manicure will not be difficult if you follow all the tips below.
So, what is required to create a manicure with holes
- nail file
- a few cotton sponges
- orange nail stick
- nail polish remover
- pre-manicure finger pretreatment or something greasy so that the varnish can be easily wiped off the finger
- two colored varnishes and a colorless varnish to fix the work
- special stencil (circle with a hole inside)
- patience
If you do everything right, you will end up with such a manicure.


Now the technology for creating a blue moon manicure:
- Process the nail. With the help of a nail file, make the shape of your nail perfect, and with the help of an orange stick, push back the cuticle, degrease the nail plate and apply the base under the varnish. Treat the finger near the nail with a special mixture so that the varnish that accidentally gets on the skin can be easily removed
- Apply an even coat of base coat to the prepared nail. In our case, it is white varnish
- Now you need to apply a stencil, slightly stepping over the base of the nail to make a crescent
- With a varnish of a different color (in our case, blue), cover the part of the nail that remains without a stencil
- Fix the resulting manicure with a layer of colorless varnish
Advice! Apply a new layer of varnish only after the previous layer of varnish has completely dried. Otherwise, the varnish will be covered with bubbles or simply will not dry out, and your efforts will be in vain.
This is the easiest version of the moon manicure. If desired, you can use other colors of varnish.


How to evenly draw holes on nails with gel polish or shellac?
Drawing an even pattern on nails is a whole art that requires maximum concentration from the master. The exception is if a stencil is used. There is enough precision.
But the hole on the nails must have a perfect shape, otherwise the manicure will look cheap and sloppy. If you do not need such an effect, arm yourself with a brush, gel polish and a lamp and go!
In order for a manicure with holes using gel polish and shellac to come out “as it should”, prepare:
- two gel polishes, contrasting in color
- base for gel polish
- brush thin
- UV lamp
- stencils for french manicure


Now the fun part - what are the ways to draw the perfect hole on the nail?
Method 1:
- Apply the contour of the future hole with a very thin brush
- Paint the hole in 2 layers, drying each layer for 2-3 minutes
- Then apply a color coating above the hole, reaching the border with it, and do the same with it
Method 2:
- Apply colored gel polish to the entire nail, dry well
- On a dried layer of gel polish, draw a hole with a brush, fill the borders of the hole at the base with a varnish of a different color, dry
- Finish the manicure with gel polish, seal the coating
Method 3:
- Mark a place for a future hole
- Apply colored gel polish to the entire nail, be sure to dry it. It is advisable to make two layers
- Apply a varnish of a different color to the hole, dry. Make two layers
- Finish the manicure with gel polish, seal the coating


These were the main ways to create a perfectly even hole using gel polish and shellac. Above was a method for creating a moon manicure using a stencil. This method is also suitable for any type of varnish, not just ordinary.
How to evenly draw a hole on the nails with acrylic paint?
The technique of applying a hole with acrylic paints does not differ from the technique of applying a pattern with gel varnish or ordinary varnish.
To implement the idea of creating a moon acrylic manicure, prepare:
- brush
- base lacquer, lacquer base, colorless lacquer
- dots (or regular needle), possibly a toothpick
- cotton pads
- nail polish remover
- acrylic paints


To make a moon manicure with acrylic paints, follow the instructions:
- Prepare your nails: shape them, push back the cuticle, degrease the nail plate.
- Apply a coat of base polish and base color polish, let it dry.
- Now, with a thin brush, pick up acrylic paint of the desired color, outline the boundaries of the future hole, fill the hole with paint.
- Now an optional step: with the help of a dots or a needle, you can make absolutely any pattern on the nails, in addition to holes - monograms, flowers, butterflies.
- After the paint has dried, apply a coat of clear varnish to seal the work. This step is required.


That's all. Manicure with holes using acrylic paints ready! Such a manicure will not last as long as gel polish, but it is still worth a try.
How to draw a moon manicure evenly with ordinary varnish?
The easiest way to draw holes with ordinary varnish is a stencil. This method was described in detail above, so it makes no sense to write about it again.
Advice! If you don't have a French manicure stencil, you can make your own using cardboard and tape, or use regular duct tape, masking tape, or plastic-coated plaster.
Creating a moon manicure using a special French stencil.
Lunar manicure with homemade stickers with ordinary varnish.


Lunar manicure with shellac using a stencil
Shellac is a type of gel polish that combines the properties of gel and regular polish. Applying and removing shellac is as easy as regular polish.


Unfortunately, there are no special secrets and secrets for creating a moon manicure with shellac. There is a proven scheme for applying shellac, which you need to take as a basis and stick to it throughout the creation of a manicure with holes.
- Give the nail the necessary shape, prepare it for shellac coating, after degreasing it
- Apply shellac to the nail plate
- Fix a layer of shellac
- Manicure ready
In just 5 steps, you can create a moon manicure with shellac. This is much faster than using gel polish, because the latter must be dried after each applied layer. Shellac does not require such an attitude.


How to make a manicure with triangular holes?
A manicure with triangular holes is done a little differently than a manicure with crescent-shaped holes. Nevertheless, even in this design, the moon manicure is quite simple and almost anyone can do it.

So, to create a lunar triangular manicure, you will need:
- Two varnishes of different colors and one colorless varnish
- Nail polish remover, cotton swab
- Two strips of adhesive tape, adhesive tape, adhesive tape, electrical tape (optional)
- Nail file and orange stick for shaping the nail
- Time and patience
Step by step description of the process itself:
- Prepare the nail for applying polish: file the nail plate, remove or push back the cuticle using an orange or cotton swab for this procedure, degrease the nail with a primer or regular nail polish remover.
- Apply a base coat of the color you would like to see in the area of the hole.
- Now cut out thin strips of adhesive tape, glue them in a triangle, as shown in the diagram below.
- Paint over the part of the nail that is not covered with stripes with varnish of a different color. Let the varnish dry. Then remove the adhesive tape.
- Fix the manicure with a small layer of colorless varnish.

How to evenly draw a moon manicure with a transparent hole on short nails?
The very first version of the moon manicure was just the same with a transparent hole. Later, women began to come up with ways to make holes in different colors, because it looks new.
Let's return to the very first option - a moon manicure with a colorless (transparent) hole. To create such a manicure perfectly smooth, you will need:
- stencil
- nail polish remover, cotton wool or cotton pads
- colorless varnish and colored varnish (one bottle each)
- nail file and orange stick
Process:
- Prepare your nails: shape them, degrease and remove the cuticle.
- Apply a coat of colorless varnish, let it dry completely.
- Now attach a stencil to the base of the nail, this is the future hole. Paint over everything above the stencil with colored varnish. Let the polish dry completely.
- Now apply another coat of colorless varnish.
- Ready! A classic moon manicure with a transparent hole will delight you for a long time!


How to draw double holes in a moon manicure with a transparent strip?
Lunar manicure with a transparent strip - a closer version of the classics of all existing species moon manicure.
For such a manicure, it will take significantly more time than for a standard one, because the hole will have to be drawn as much as twice.

The set of materials you will need to create a moon manicure with a transparent strip includes:
- orange stick, cotton pad, nail file
- nail polish remover, sponge
- two colored varnishes and one colorless varnish
- stencils for french manicure with thin inner borders, the more stencils the better
Now about how to create a manicure with transparent holes:
- Attach nail plate desired shape with a nail file, remove the cuticle.
- Now degrease the nail with a special tool or nail polish remover.
- Apply colorless varnish to the entire nail, let it dry.
- Now attach the stencil so that it ends where the hole will begin.
- Paint over the upper area with the first colored varnish (where the edge of the nail is).
- Paint over the area of the hole with the second varnish (if desired, you can use only one varnish).
- Now let each lacquer dry and seal the coat with a thin coat of colorless lacquer.

Take note! Very often there are manicure options in which a transparent strip is filled with rhinestones or sparkles. In such a case, it is not necessary to apply the method just described above. You can do a regular manicure with holes, and apply rhinestones or sparkles to the border of the hole.
Lunar manicure ideas: photo
The article does not describe all options for a moon manicure, but only the simplest ones. More complex manicure options with holes are shown below.
Black and gold colors are a great holiday or weekend combination. The black color is strict, it is perfectly complemented by golden play of sparkles.

A few years ago, a trend appeared - a combination matte varnish with metal elements, which were used as foil or a special varnish with a metallic effect. Delicate moon manicure Bright blue moon manicure 
Video: Lunar Manicure 4 ways to draw a hole! Nail Design!
Lunar manicure is not new trend in the beauty industry, it was popular back in the 40s of the last century. In those days, he could often be seen on the hands of world stars. Perhaps that is why the moon manicure is also called the Hollywood jacket. Now it also does not lose its relevance and looks stylish on modern fashionistas. The technique for performing such a manicure is simple, everyone can master it, you just need to stock up on the necessary materials, tools and a little patience.
We prepare the necessary materials
A moon manicure is often compared to a classic French manicure. They have a similar application technique. The only difference is that in the French version, the edge of the nail is painted, and in the lunar one, its base. It is there that a bright accent is made in the shape of the moon. Hence the name. If we approach the interpretation of the name from a scientific point of view, then perhaps it came from the word "lunula". This is the name of the base of the nail, which is shaped like a crescent.
In the moon manicure, unlike the French one, the emphasis is not on the tip of the nail, but on its base.
No special tools and materials are required to perform this stylish manicure at home. You can even get by with ordinary varnish. However, for a longer lasting result, it is better to stop at gel polish or other resistant coating. But then you will definitely need a special LED or fluorescent lamp for the polymerization of the gel coating.

In modern nail art, it is difficult to do without an ultraviolet lamp.
For a moon manicure you will need:
- manicure set;
- degreaser;
- base for gel polish;
- two contrasting gel polishes or similar shades (depending on the idea you want to implement);
- fixative;
- stencils (there are special ones that are used for French manicure, but you can make them yourself) or a thin brush;
- special lamp for drying gel polish.

With the help of gel polish, you can create a wide variety of moon manicure options.
Getting Started
Only at first glance it seems that it is impossible to make a moon manicure on your own. In fact, everything is not so difficult. There is different techniques its implementation. Who knows how to draw well, he will be able to apply a moon pattern with a thin brush. It is more convenient for someone at first to use special stencils or other improvised materials (sometimes it is advised to take ordinary tape instead of stencils). In any case, everyone is able to cope with the task.
How to make a manicure with a brush: step by step instructions
- We put our hands in order, remove the cuticle, smooth the shape of the nails, lightly grind them with a nail file.
- We apply a base coat and let it dry for a couple of seconds under the lamp (in the UV lamp - 2 minutes, in the LED lamp - 30 seconds).
- We cover the estimated area of the “moon” with the first gel polish (in our case, white). To get a thick and rich color, you need to apply two layers.
- With the help of a thin brush and a contrasting varnish (in our case, blue), we draw the border of the “moon”. We do this slowly so that the drawing is neat and the same. If you can’t draw a straight line, try putting three reference points on the nail: the first one is in the center of the nail, and the other two are along the edges where the line will begin and end. Now connect these dots.
- We cover the nails with top and dry under the lamp. Lunar manicure is ready.
We paint over the upper part of the nail in several layers.
Stencil manicure
Manicure stencils are a real find for those who like to experiment at home. Special stickers greatly facilitate the task of creating a stylish manicure. With their help, it turns out even and flawless. And if you buy stencils of different shapes, then also original ones.
On sale you can find stencils of different types:

The main stages of the technique of applying a moon manicure using stencils:
- Apply a second varnish above the stencil. When it dries well, carefully peel off the stickers. Top coat your nails.
Prepare base coat, top coat, two contrasting coats and stencils.
Cover the nails with the base (let them dry), then with the varnish that is selected for the hole. It is advisable to cover the entire nail plate with it so that it is even and the second varnish fits well on it.
Apply the stencils when the base coat is completely dry. If you have chosen curly stickers, try to glue them evenly on all nails, otherwise the manicure will look careless.
Photo gallery: 20 ideas for a moon manicure
Lunar manicure enchanted fashionistas around the world
Rhinestones make the moon manicure more festive and elegant
A simple but very attractive version of the moon manicure
With the help of stencils, every fashionista is able to independently make a beautiful moon manicure
Lunar manicure is easy to recognize by the highlighted "crescent" at the base of the nail
An option for those who are bored with classic manicures
Red moon manicure is doubly popular
To create a moon manicure, it is fashionable to use not only bright, but also pastel colors.
Lunar manicure is able to emphasize a romantic look
For a moon manicure, not only an oval, but also a square shape of the nail is suitable.
An original and simple solution for everyday manicure
Double contour moon manicure is also easy to perform.
Sometimes a moon manicure is combined with a French one - it turns out unusual and stylish.
White and pink manicure - a timeless classic
To make a double moon manicure, you need to use the stencil several times
One more fashion trend- do a moon manicure with a transparent line
Lunar manicure looks perfect on both long and short nails
This version of the moon manicure will help create a bright look for holidays and parties.
Extravagant and bold decision will emphasize your individuality
The original version of the bright moon manicure
This is not new to nail art. It has long been used by fashionistas all over the world. And I like it first of all because it is able to visually lengthen the nails, make them even more elegant.
What is the difference from the usual moon manicure?
The classic moon manicure is the presence of a contrasting “crescent” on the base of the nail. In the reverse moon manicure, in addition to the hole, the contour of the nail is also covered with contrasting varnish.

Reverse moon manicure visually lengthens the nails, makes the hands more refined
Usually for such a manicure they take two contrasting varnishes, one of which is white - they draw a border on them. You can often find white-pink or red and white combination but other combinations are not excluded. Recently, it has become popular to use gold or silver lacquer for the contour strip.
Video: how to make a reverse moon manicure at home
Lunar manicure is always fashionable, stylish and creative. It is suitable for weekdays holidays, looks perfect on long and short nails, suitable for fashionistas of all ages. Lunar nail design is a great addition to a strict suit, bright summer dress or exquisite evening wardrobe. But its main advantage is its simplicity of execution. Try it and see for yourself!