And let's do needlework with you ... remember, we have already begun to get acquainted with? Let's move on to practice today and consider the technique of papier-mâché from threads. To begin with, let's figure out how to make a cocoon of threads and think about what application it can find ... there are quite a lot of different master classes on this topic on the Internet ... I will tell you my approach to this type of creativity.
So let's get started...
papier mache from threads - how to make a cocoon
In order to make a "cocoon" of threads using the papier-mâché technique, we need:
- balloon
- thread - ordinary sewing thread, but thick (it used to be marked as No. 10, now I don’t know ... preferably cotton, (it’s just better to impregnate cotton with glue), you can take thicker threads, you can even rope, but then a little the technology of lubricating it with glue will change. Today we will work with a simple thread. True, I used two threads of different thickness here (what were the remnants - they went into business)))
- needle - long
- glue. Here I want to say that I use OFFICE glue (silicate), and not white (pva). Why? Firstly, I was taught this way a long time ago))), and secondly (and this is the main reason) when cured, the stationery glue “glazes” and becomes very hard, unlike PVA, which is quite plastic and “soft”, like rubber , and when dry, it becomes like rubber ...
 After we have prepared all the components, we proceed directly to creativity))) we thread the end of the thread from the coil (ball) into the needle and pierce the jar of glue,
  pull the thread through the glue, remove the needle
  Now we will wrap the ball with a thread, slowly pulling it through a jar of glue ... The thread itself will be smeared and saturated with glue)))
  How many threads do you need? According to your taste and desire))) It took me about two coils ... When you decide that the thread is enough - just cut it off ... if it seems to you that there is not enough glue on the thread, then take a regular brush and go over the surface of the cocoon with glue, just don't overdo it ))).
And forget about the craft until tomorrow ... let it dry thoroughly)))  The cocoon has dried up ... it has become hard ... we take a needle and pierce the ball))). After that, we extract it from the cocoon ...
  my ball was torn into two parts ... I just pulled the first one out by the “tail”, and in order to get the second one you need to or find a place where it’s enough large gap between the threads or just make a hole with scissors. This is the basis of most papier-mâché thread crafts. That's how they do it and any interior crafts, toys .... my imagination, today, was only enough for a vase))).
How to make a thread vase
We cut the cocoon into two unequal parts ... In principle, these details can already be adapted for a nest))) for ....  or shove it in there)))….
 but we'll move on...
and glue these two parts together, only upside down))) Actually, in the papier-mâché technique of threads, it is supposed to sew the parts together with a thread, but in this case I need the fastening to be “hard”, so I used glue pistol...  It turned out a vase of threads ...
I didn’t think of anything smarter than how to cover the resulting vase with spray paint ...  In my opinion, it turned out quite badly)))
The approach of the New Year holidays makes us think about how to organize a worthy farewell to the old and the New Year. In our family, first of all, it was decided to update the outdated and no longer very attractive Christmas decorations, which, in fact, we did with our seven-year-old niece (so that we didn’t have to run around shops and markets in search of something new in the last hours of the outgoing year). We decided to make Christmas balls from our own hands.
We wanted to make them different ways. For one, we use the decoupage technique, for the second we use the trimming technique, and the third, made from the remnants of the “paper dough”, we simply wrap in a candy wrapper.
What we need to work:
To make balls:
old newspapers;
threads;
toilet paper;
paper table napkins;
PVA glue;
satin ribbon about 20 cm long - 3 pcs.
For decoupage:
white acrylic paint;
paper napkins with a pattern;
soft brush.
For trimming:
corrugated paper 2 colors;
candy wrappers;
glue stick;
stick for sushi;
scissors.

Operating procedure:
We make balls. We take 2 bowls. Tear toilet paper into one into small pieces, napkins into the second. Pour the contents of both containers with water and leave to soak.


In the meantime, we crumple newspaper sheets and roll 2 dense balls of different sizes out of them, wrap them with threads (so that they do not straighten). In the process of winding, we attach ribbons in the form of loops (for them we will hang ready-made toys on the Christmas tree).

We squeeze the soaked paper base for papier-mâché thoroughly and, pouring PVA glue, knead the “dough”.


Now we glue the newspaper blanks with the resulting adhesive mass, trying to form even balls. From the remnants of the "dough" we roll up a small lump - it will make the third toy. In this form, leave until completely dry (two days).

We make balls. We got 3 balls of different sizes. We will decorate the largest one using the "" technique. First, cover it with a layer of white acrylic paint and set aside to dry.

In the meantime, we take on a ball of a slightly smaller size - we will decorate it voluminous application from corrugated paper and candy wrappers, using the "facing" technique. We cut off strips about 1 cm wide from the “corrugated” rolls and cut them into squares. We do the same with wrappers.

We put the end of the sushi stick in the center of the paper blank and wrap a square around it. We get something like a tube.

We coat the end of the resulting figure with glue and glue it to the ball.

Thus, we make out the whole toy.

In the papier-mache style using threads, each craftswoman can create interesting crafts or amusing toy for your child and elements of stylish decor. In the article we will show master classes on making simple crafts.

Flower vase
 For work you will need:
- balloon;
- PVA glue or papier-mache paste (it is also prepared independently);
- paper;
- brushes;
- threads;
- cardboard;
- scissors;
- film;
- scotch.
Mastering:
- inflate a balloon (the shape and dimensions of the vase depend on its size);
- glue the base with paper using paste or glue (this should be done in several layers);
- after the paper dries, gently pierce the ball;
- attach cardboard to the bottom of the vase;
- make another layer of paste or glue;
- without waiting for drying, cover the vase with a film and remember until wrinkles form and leave to dry;
- glue the product with any thread patterns.
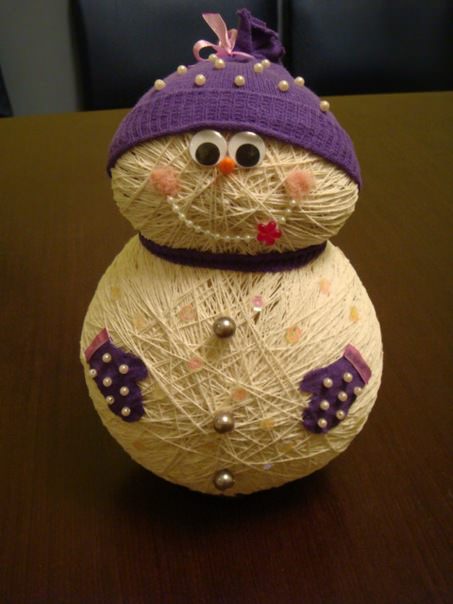
Snowman
For work you will need:
- cotton threads (or viscose);
- 5 balloons;
- PVA glue;
- large "gypsy" needle.
 Step by step:
- Inflate the balloons (try to have them of different sizes, these will be the head, chest, torso and arms).
- Wrap them with threads soaked in the glue mass and leave to dry completely (so that the balls do not lose their shape, wind the threads thickly and in different directions).
- After drying, pierce the balls with a sharp movement with a needle.
- If you want the snowman to look respectable, paint the blanks with spray paint (silver or blue).
- Glue all the parts together (to keep them well, it is recommended to slightly press the gluing points into each other).
- Considering that the snowman turned out to be faceless in every sense, it is recommended to fashion his nose out of plasticine, make his eyes out of buttons or beads, and make his mouth out of fabric or corrugated paper.
- The snowman is ready. If desired, stick a broom to him or wrap a scarf around his neck.
Strawberry and lemon
There is nothing complicated in the manufacture of thread delicious usefulness.
- For a lemon, inflate the fingertip so that the shape is slightly elongated at the bottom. Wrap with yellow threads soaked in glue.
- To make strawberries, do not fully inflate the fingertip and intercept it in the middle. Wrap with red thread.
- From green paper, cut out leaflets for your “products” according to the pattern.


lilies of the valley
 Step by step instructions:
- Wrap several cocoons (three sizes) in white. The smallest ones will be buds, and cut those that are larger from the crown to the middle.
- Bend each resulting petal outward.
- Glue their edges with silver braid or white lace.
candy bowl
 Progress:
- Cut one of the filament cocoons in half.
- Press the half you want to the table with a round jar and twist it in place a few times. This will tighten the threads at the bottom and your candy box will become stable.
- Decorate the hem with ribbon or braid.
Video: Thread products
Bracelet decorated with fabric
 Materials and tools:
- bottle (plastic);
- PVA glue (dispersion);
- a strip of fabric (width - twice the diameter of the bottle);
- wrapping paper (2 colors);
- tassel;
- needle and thread;
- scissors.
We make a bracelet:
- Paste the bottle with papier-mâché, outline the shape and carefully cut the blank.
- Cut the bracelet along the lines, soften the sharp corners by rounding them.
- Cut out a piece of fabric and glue the edges.
- Wrap the workpiece with a cloth, smearing the paper with glue on both sides.
- Glue the workpiece into a ring.
- Secure the resulting bracelet with a thread.
- The accessory is ready.
To enjoy papier-mâché threading, follow these simple rules:
- To prevent the threads from sticking to the base, smear the ball with petroleum jelly before work.
- Starch paste is suitable for making crafts. The recipe is simple: four teaspoons to 1 glass of water.
- Seal the puncture site with tape. So the thread will slide tighter.
- You should not dry the craft next to working heating devices, because the ball bursts from hot air.
- To prevent the craft from deforming, dry it for a day.
- It is better to work with gloves and an apron, this will protect you from unnecessary trouble.
Video: Making papier-mâché jewelry
Helpful Hints
You can easily decorate your Christmas tree with Christmas balls made by hand. Involve children in the processthey will like it very much.Also colorful Christmas balls can be used asgift to relatives and friends. There are many ways to make Christmas balls and we will tell you about some of them.
- How to make a snowflake
- How to make a Christmas tree
How to make a Christmas ball. Method I: funny buttons

You will need:
Styrofoam ball.
* You can replace the styrofoam ball with an unnecessary tennis ball or any rubber ball. The most important thing is that you can stick pins into this ball.
Buttons.
* Buttons can be of different sizes and colors.

The secret is simple, you can see it from the picture - just stick the pins through the holes of the buttons into the ball around its entire circumference.
Christmas balls from threads. Method II: magic thread
And here's how you can make a New Year's ball from a thread.
You will need:
Thread of any color;
The container in which you will dip the thread;
PVA glue;
inflatable ball;
Jewelry to taste.
Christmas paper balls. Method III - papier-mâché and colorful buttons

Another interesting way to make a Christmas ball. Don't forget to involve your kids in the process.
You will need:
Plasticine;
Wrapping;
Buttons;
PVA glue;
tassel;
Decorative tape;
Stationery knife;
Paints, gouache (for example, with the effect of mother-of-pearl).
1. We make a ball out of plasticine.
2. We glue the ball with 5 layers of wrapping paper using a simple papier-mâché technique, i.e. tearing off small pieces of paper and gradually sealing the plasticine ball with them (you can learn more about this technique.)
* You can use 2 colors of paper for convenience, so you know what number of layers you are sticking.

3. Wait for the paper on the ball to dry (just leave it overnight, but don't use the battery to speed up the process).
4. Using a utility knife, carefully cut the mold into two pieces. Thus, you will get 2 halves of a paper ball.
5. Glue the halves with PVA glue, gluing small pieces of paper along the seam. During gluing, the decorative ribbon also needs to be fixed with paper and glue inside (see picture).
6. Now you can safely glue the buttons on the ball, smearing them on the back with glue.

* You can not glue the buttons, but sew them on with threads, but this must be done before you start gluing the halves of the ball.
7. Use paint to give a joyful color to your Christmas ball.
Christmas handmade balls. Method IV - golden Christmas balls

You will need:
Plastic ball of any size.
* You can replace the ball with an old New Year's ball or another toy of a similar shape.
Clay Moment;
Decorative ribbon;
curly pasta, coins or buttons;
Paint (sprayer, gouache, etc.).
1. Glue curly pasta, coins or buttons to a plastic ball.

* Leave some space for sticking the ribbon.
2. When the glue dries and the glued material is firmly in place, you can glue the decorative tape so that you can hang your product on the Christmas tree.
* When the tape is attached, you can cover its glued part with one of the used decor elements (for example, a coin).

3. Paint the ball and let dry.
* If you are using a sprayer, it is best to paint indoors.
Unusual crafts made of fabric and thread in a photo and video master classUnusual crafts made of fabric and thread in a photo and video master class
Using the papier-mâché technique using threads, each craftswoman can create both interesting crafts or an amusing toy for her child, as well as a stylish decor element. This will require patience, perseverance, creative imagination and the knowledge of some little tricks. 


Ideas for crafts from threads and papier-mâché
Papier-mâché flower vase Sometimes the question of where to put the flowers becomes urgent. Of course, you can buy a suitable vase, but it is much more economical and interesting to make it yourself. Our master class will help you with this.
Required inventory 
For making a vase
you will need:
- balloon;
- PVA glue or papier-mâché paste (you can also make it yourself);
- paper;
- brushes;
- threads;
- cardboard;
- scissors;
- film;
- scotch.
Making a vase
It won't take you long to create this cute craft. So:
- inflate a balloon (the shape and dimensions of your vase depend on its size);
- with the help of paste or glue, glue the base with paper (you should glue it in several layers);
- after the paper dries, gently pierce the ball;
- attach cardboard to the bottom of the vase;
- make another layer of paste or glue;
- without waiting for drying, cover the vase with a film and remember until wrinkles form and leave to dry;
- after drying, “arm yourself” with threads and glue the product with any patterns.


Winter crafts: snowman new year holidays, but the old woman-winter does not think to give up her positions. You can brighten up this cold season by making cute
or papier-mâché fabrics. If you want a cute snowman to live in your home, to the delight of your kids and you, follow the recommendations that our master class offers.
Getting Started
The technology for making this craft is quite simple. First you need to make a few balls-cobwebs, and from these blanks you can “blind” your snowman. 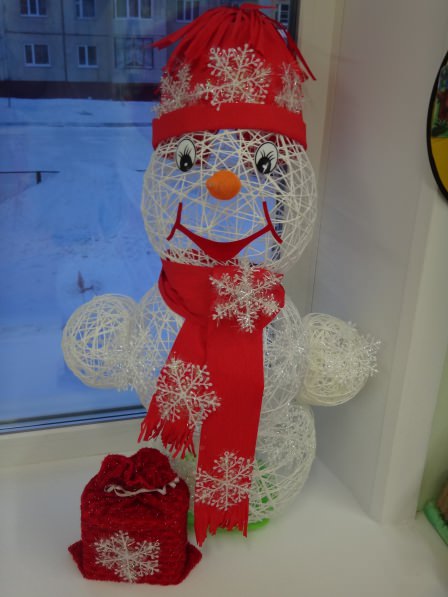
To work, you will need cotton thread (or viscose), several small balloons, PVA glue and a large "gypsy" needle.
The snowman is ready. If you wish, you can hand him a broom or wrap a scarf around his neck. 


Strawberry and lemon From balls (you can replace them with fingertips) and threads, you can make simple, but original crafts, which can also be used as decorative elements.
There is nothing complicated in the manufacture of thread delicious usefulness. How to craft them? Our master class will tell you!


lilies of the valley 
If you have a vase made using the papier-mâché technique, but there are no real flowers, then why not “settle” lilies of the valley from threads there?
To do this, you will need to wind several cocoons (three sizes) in white. The smallest ones will be buds, but larger cocoons should be cut from the very top to the middle. Bend each resulting petal outward. Glue the edges of the petals with silver braid or white lace.
candy bowl 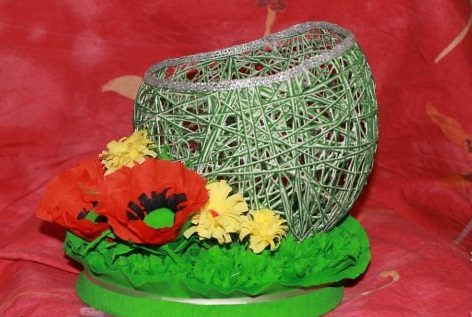
Using the papier-mâché technique, you can also make a cute teapot or a candy bowl from threads. To do this, you need to perform the following manipulations:
Video: do-it-yourself thread crafts
Bracelet decorated with fabric

Using the papier-mâché technique, you can make not only crafts, but also stylish jewelry items. Our master class will help you create a unique "designer" fabric bracelet. And do not rush to get rid of old woolen threads and floss threads, with their help, you can also weave excellent bracelets and
.
Inventory
To create a fabric bracelet, you will need:
- bottle (plastic);
- PVA glue (dispersion);
- a strip of fabric (its width should be twice the diameter of the bottle);
- wrapping paper (2 colors);
- tassel;
- needle and thread;
- scissors.
We make a bracelet


In order for working with threads using the papier-mâché technique to bring only pleasure, you must follow simple rules:
And finally: it is better to work with gloves and an apron. This will keep you out of unnecessary trouble.