My tricky way of typing tablet computer. Working in field conditions, I often type tests, enter textual information. I share my experience. (10+)
Typing on a tablet
I often work on the road, camping, standing up and in general in places where it is impossible to place a laptop. The tablet also did not save, since typing text on it in the described conditions is inconvenient. There is nowhere to put it, and if you hold it with one hand, then type the text on weight, with the other hand, on touch screen akin to circus art. It’s not possible to quickly prepare an up-to-date post.
I thought about the problem for a long time and found a solution that is convenient for me. It is not at all a fact that it will suit you, but I will share it anyway. I must say right away that if you do not own blind printing, then this method will not work for you.
We need a tablet with the ability USB connections keyboards. Let's find a keyboard consisting of two halves. We fix the keyboard halves on the tablet case on the reverse side as shown in the figure.
I just glued this keyboard to the case. The resulting design is shown in the figure (rear view).
We place a tablet computer in such a case, clamp it between the palms, holding it with our thumbs. The remaining fingers of both hands will be behind the tablet, just where the keys of our keyboard are located.
The tablet should be held horizontally with the wide side. Position the keyboard so that the "Z" key is opposite the little finger of the left hand, and the "?" opposite the little finger of the right.
If you are good at touch typing, then the main thing is to distract yourself from the fact that the keyboard is rotated 90 degrees and is on the other side. The motor reflexes of the hands themselves will soon begin to find the right keys. The problem only occurs with the spacebar, which I usually press with my thumbs. Now thumbs up on the front of the tablet. They perform clicks on the screen. You have to press the spacebar with your index fingers, which is quite unusual.
In all other respects, it turned out to be a convenient wearable design that allows you to quickly type while standing, sitting, lying down, hanging upside down, parachuting, etc.
![]()
I am typing.
Unfortunately, errors occur periodically in articles, they are corrected, articles are supplemented, developed, new ones are being prepared. Subscribe to the news to stay informed.
If something is not clear, be sure to ask!
Ask a Question. Article discussion.
More articles
The inkjet printer cartridge is drying up. How to deal with dry hair...
How to deal with dry inkjet cartridge? The ink dries up. Dry...
Mobile cellular internet. Operators. MTS, Beeline, Megafon, Skylink....
Comparison mobile internet different carriers...
Homemade ladder. With my own hands. Prefabricated, collapsible, sk...
How to make a reliable folding ladder yourself ....
Electrician's tutorial. Features of the home network. Let's learn electrical installation...
Everything you need to know an electrician - self-taught. Tutorial. Features of household lighting...
How to conduct a wire underground, in the ground. Laying tips....
Tips for underground cable laying. How to lay the cable in the ground? Let's lay a wire...
Gas reducer. Operating principle. How To Adjust The Outlet Pressure...
How does a gas reducer work? Operating principle. How to adjust the pressure on the...
Assemble, make a bed yourself, with your own hands from chipboard, laminated ...
The article provides a plan for assembling a bed from polished chipboard. And it is possible according to the same schemes ...
Heating a wooden house with underfloor heating. Practical experience. Review....
Feedback on underfloor heating for heating a country wooden house. Practical experience...
A graphics tablet, no matter how convenient it is for network surfing or playing RTS, still, first of all, remains a tool for a digital artist or retoucher. This is especially true for professional-grade tablets, such as Wacom Intuos. The best instruments in any profession, whether it be a violin for a musician, a hunter's gun or a set of master keys for a thief, have always been created individually to fully comply with the habits and concepts of convenience of their owner. Make to order Graphics tablet, it is probably possible, but its potential cost and the effort that will have to be expended make one think about the wisdom of such a step. However, even serial models have all the possibilities to meet any needs.
In fact, we were a little cunning - the tablet is not an artist's tool in itself, but only in combination with a vector or raster graphics program. And it is precisely in establishing a "relationship" between these two elements that lies the secret of a productive and comfortable work. ok, setting professional tablet requires thoughtful reading of a multi-page manual, for which there is not always enough time or patience. And often users are limited to the most basic functionality, or constantly turn to the keyboard "for help", which is not very convenient. Therefore, we decided to talk a little about some of the features of the interaction of the tablet Intuos5 and a graphic editor. As an example of the latter, take AdobeLightroom.
Touch Ring
One of the main advantages of professional graphics tablets Wacom- high degree of pressure sensitivity. With this option, you can change the stroke diameter of almost any tool by simply pressing harder or lighter with the pen on the surface of the tablet (don't forget to select Shape Dynamics and Pen Pressure). Similar opportunities are provided Adjustment Brush(adjustment brush) in Lightroom. They can be used, for example, for fine retouching of hair or foliage on trees. This work requires subtlety and without the use of a tablet it takes many times more time and forces you to constantly refer to the corresponding menu of the graphic editor.
Perhaps someone will find it more convenient to change the hiding power of the brush by pressing. In this case, changing its size can be "hung" on the touch ring touch ring. To do this, it must be in the first customizable mode (the first LED must be lit), then the thickness of the stroke can be changed by moving your finger free hand left and right around the circle.
By using touch ring you can also scale the image itself, scroll through the catalogs of brushes and shapes, control the rotation of the canvas or the selection of the active layer.
Another interesting option its use suggests Lightroom. In all its modules, the current directory is located at the bottom of the screen in the form of a photo scroll bar. If you move the mouse cursor over it, then the photo selection can also be controlled using the touch ring. There is no need to switch to the module Library.
Lightening and darkening
One of the most important elements of retouching is the processing of light and dark areas of a photo. Differently placed light accents can completely change the viewer's experience. For example, when processing a portrait in, the lightening and darkening modes allow you to correctly adjust the color of the eyes. To do this, you need to create a new layer in the mode Copy Merged and with the tool Brush make a black and white drawing on it, darkening and brightening the desired areas of the image. Areas outside the outline of the design can be removed by erasing excess areas with the back of the tablet pen. In this case, the size of the eraser will correspond to the previously set tool size.
Adobe Lightroom, although it is intended mainly for managing a local photo bank, it also allows you to make serious adjustments to each specific image. Yes, with the help Adjustment Brush(adjustment brush) you can do the same work as with masks and levels in. For example, using the function exposure(exposure) you can give a normal 16-bit RAW image the effect of an HDR photo. To do this, using the adjustment brush, you need to darken the light areas (exposure parameter, on average, should be -1.45) and lighten the dark ones (with an exposure of about +1.75). Then treat areas with deep shadows and adjust the overall brightness with the sliders Recovery(recovery) and fill light(light fill) Basic Panel(main settings control panel).
Express Keys
On the keys Express Keys located above and below the ring touch ring to the right or left of the working surface of the tablet (depending on which hand you initially set up the tablet for, i.e. left-handed or right-handed), you can assign the main functions and keyboard shortcuts used in the work, so as not to divert your attention to the keyboard. They are easily accessible for pen-free operation. In the fourth generation Intuos to remind yourself which command was assigned to each of the keys, you could look at the illuminated OLED displays to the right of each button. But this turned out to be inconvenient for users (you need to switch your attention from the monitor to the tablet) and therefore in Intuos5 all settings can be seen on the monitor with one press of the topmost key Express Keys(call Express view). The keys can be programmed for each application separately, so that the set of functions in photoshop will differ from the set of functions in Lightroom.
work in the last Express Keys can simplify dramatically. For example, one of the keys can be assigned the function of adding selected photos to Quick Collection(operational selection) to perform this action easily and without transition. In the module Develop(processing) Tablet keys can be configured to directly control settings in Basic Panel. The "+" key sequentially switches such basic functions as Temp(Colorful temperature), Tint(hue), exposure,Recovery(restore), etc. The "#" key increases the value of the main function by five units or functions exposure by 0.1 steps. The "-" key decreases the value of the main function by five units or functions exposure by 0.1 steps.
Radial Menu
The circular menu is called up by long pressing on the working surface of the tablet and in addition to Express Keys is used to quickly call the necessary functions. The menu is highly configurable for each application through the Tablet Properties dialog box. Wacom" (Windows) or System Preferences > Tablet Wacom" (macOS).
AT Lightroom very handy to have on hand Virtual Copy(virtual copy), which creates a copy of the photo with the current level of processing and the possibility of further processing, regardless of the original. In the already mentioned dialog, in the "Tool" line, for this you need to select the "Functions" icon, and then the "Circular Menu" tab. In the lower half of the window, an image of a circular menu will appear, in which you can select a free control segment. On the right, in the "Function" section, select "Keyboard settings". Now you can enter the combination CTRL+" or? +", and then assign the name " Virtual Copy". After the procedure is completed, the function Virtual Copy will appear in the corresponding segment.
Thanks to its multiple levels of nesting, the Radial Menu is great for grouping keyboard commands, such as a variety of export functions. Adobe Lightroom. To do this, having opened the settings window, as described above, create a submenu in a free segment by clicking on it. On the right, in the "Function" section, select the "Submenu" property and below in the "Label" field, enter a name. In this case, we will introduce the function " Export". After creating a submenu, we can select it from the list on the left side - a new radial menu will be displayed in the middle.
Many users often ask themselves: what is the best graphic editor for android? And some do not even know what it is, so at first I want to give a little information - a graphic editor allows you to edit photographs and other images, and is also able to create them yourself.
There are two types of editors - vector editor and raster editor. Using the vector option, you can create vector drawings yourself, and in the second case, you can only process ready-made photographs and drawings.
What is the best option for a graphic editor to choose for your android, you must determine for yourself. Because there are actually a huge number of such applications. We can only make an overview of the best representatives for you and suggest which program you can choose from among the many options.
SketchBook Express
An excellent graphics application for professionals is SketchBook Express. It is simple in design, but very convenient - all buttons are clear. When creating drawings, there is no interference, and if necessary, the menu can be entered with a single click.
It is also easy to change settings and parameters. This program allows you to change the colors and sizes of brushes, font sizes and much more. If you install such a graphics editor on your android tablet, you will soon be able to make real masterpieces. Anyone who has a subtle sense of the world can take this graphic editor as a friend who really wants to help, because detailed help (Help) with step by step instructions and visual representation.
This is a very complex application, and it is used for tablets with good screens, but I want to say that for android it will be the best option when choosing a graphic editor in our time.
Snaptastic
The second popular software is Snaptastic. It, unlike the above-described Autodesk Sketch Mobile, does not have such an abundance of features and bells and whistles. We can say that the graphical application - Snaptastic is the golden mean among those programs that are recommended to be installed on your android tablet.
It is very light and simple, but at the same time powerful and comfortable. Has a great interface design. The image that is in this moment processed, always in front of the user. If you need to change the parameters, then just move the slider to the left or right, and the effect of the change is immediately superimposed on the photo.
Another very important convenience is that if you don’t want to waste your personal time adjusting contrast, brightness and other parameters, the Snaptastic graphics editor will set everything up automatically. To do this, its settings provide eighteen templates that provide quick processing of photos.
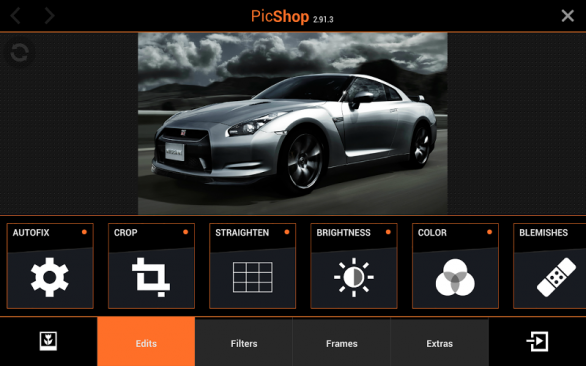
PicShop - editor for smart people
And one more unique novelty, which is considered one of the best, which we recommend you install on your Android tablet or smartphone - PicShop. PicShop is a wonderful and original innovation in the world of graphic editors for android.
Many users acknowledge that this is the most powerful application among its kind, and besides this, it has an "ICS" interface. Only a few programs can boast of having such an interface.
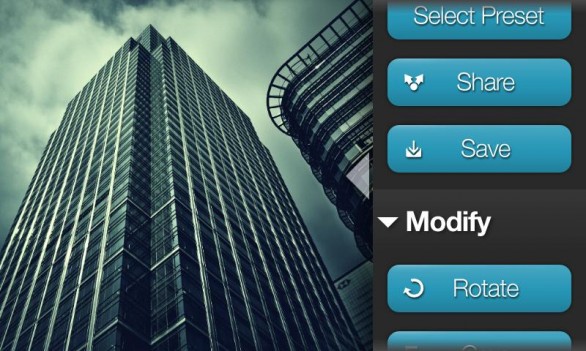
The application has an excellent set of filters and a wide variety of tools for retouching, adjusting brightness and contrast, color gamut and saturated images, sharpness and clarity. Given that the filters are not hardcoded, it is possible to change the strength of their effect. The editor has the ability to rotate the image in different directions, as well as the “tilt-shift.” function, which users love so much.
8MP - largest size photos that is allowed in this editor.
The PicShop app for android also has additional features - stickers and frames that can be used when decorating and editing photos. If you decide to become a real heelster, this editor is for you! In a word, PicShop is an amazing program that will make your images unique and unrivaled.
Fresco Paint - powerful and trendy
If you have an android - smartphone or tablet, and you want to create a graphic masterpiece, then you need to install a powerful and functional application. The Fresco Paint program for android will be a good helper for both experienced photographers and artists, as well as beginners.
This program has a very simple and user-friendly interface, and along with this there are very great opportunities for drawing and decorating photographs. The Fresco Paint application for android is unique in that it has many features and settings: a large selection of brushes of various sizes, overlay layer on layer, a variety of filters.
All tools can be adjusted to the desired size and texture, the colors can be adjusted to the required shades and transparency. What is unique is that the program duplicates and hides layers, rotates and mirrors the image, and merges and scales.
If you install this application on your android, you will be able to achieve originality and uniqueness in the design of photos and creating drawings using a variety of filters. Sharpening and blurring, saturation and exposure, brightness and posterization are just a few of the app's features.
The choice is yours
There are a lot of similar graphic editors that can be installed on android. Which one to choose is up to you.
Here are some more of them that were not included in our review, but which you should pay attention to: Adobe Photoshop Express, Photo Studio PRO for android, Moldiv - Collage Photo Editor, Pixlr Express - photo editing, Catwang for android tablets, Camera FV- 5, Perfectly Clear for android, Photaf 3D Panorama.
Everybody graphic applications have unique functions and will be able to make your photos original and bright, and images and drawings iridescent and extraordinary. Install a graphic editor for your android and create new masterpieces!