To make a Christmas tree, we need: green yarn about 80 g (I have NAKO Bambino 50g / 130m, 25% wool, 75% acrylic); red yarn for a star; filler; hook number 3; large beads, glue.
Description of knitting Christmas tree:
With a green thread, we collect a chain of 70 air loops - v.p. (the number of loops must be a multiple of 7), we close in a ring.
1 row: Three ch. for lifting, double crochet (CCH) in each loop.

2 row: Three ch. to lift and begin to tie the CCH of the previous row, do 7 CCH, 1 ch, again 7 CCH, tying the next CCH of the previous row; a feather is obtained; then we skip 5 dc and tie the dc of the previous row - 7 dc, 1 ch, 7 dc, tying the dc of the previous row. So we continue to the end of the row, at the end of the row we make a connecting column in the ch. lifting chains; I got 10 feathers.


3-8 row: we knit similarly to 2-3 rows.
9 row: in this row we make decreases, but attention! Feathers should remain in a checkerboard pattern; in the interval where there are three feathers, I knitted CCH not in each loop, but through one, so twice. You should get 56 CCH.

10 row: we knit as the second row, the number of feathers is 8.
11.13, 15 rows: 56 CCH.
12,14,16 rows: 8 feathers.
17 row: we make decreases, do not forget about the order of the feathers. It turns out 42 CCH
18, 20, 22, 24 rows: 6 feathers.
19, 21, 23 rows: 42 dc.
25 row: we make decreases 28 CCH.
26, 28, 30, 32 rows: 4 feathers
27, 29, 31 rows: 42 dc.
33 row: we make decreases 27 CCH.
34, 36, 38, 40 rows: 3 feathers.
35, 37, 39, 41 rows: 27 CCH, we break the thread.

We decorate the Christmas tree. I glued beads to the top of each feather.

Making a star we take a red thread, we collect 5 ch, we connect it into a ring.
1 row: 10 sc knit in a ring;
2nd row: 15 sc
3rd row: 20 sc.
We knit two circles of the desired size, it all depends on the thickness of the yarn.
We divide the number of loops of the last row of the circle by five, and in these places we connect with two ch. both circles; there are five holes. Then we tie these holes, evenly decreasing to the top, so we knit 4 tops and fill them with filler.

We knit the fifth peak, gradually filling it. It turned out to be a massive star.

Sew a star to the top of the Christmas tree.
We fill the Christmas tree with synthetic winterizer, knit a circle equal to the circumference of the bottom of the Christmas tree and sew it on. Already in the process, I put a cardboard box so that the Christmas tree was stable.

The beautiful Christmas tree is ready to celebrate the new year. All with the coming!

Nothing creates a Christmas mood like a beautiful Christmas tree. And if it is still soft, fluffy, hand-tied.
Such a knitted Christmas tree can be a nice New Year's gift for your family and friends.
You can add a sweet New Year's gift to it. Moreover, sweet gifts have long become a traditional surprise not only for children who want to find sweets under the New Year tree, but also for adults. New Year's sweet gifts for 2015 should be purchased in advance, because before the holiday itself, their cost will go off scale. The site http://s-podarki.ru presents a whole catalog of sweet gifts for every taste and budget.

To knit a Christmas tree, we need:
Yarn "Grass";
Main yarn - your choice
Sintepon or holofiber as a filler
Round base (CD will do)
We start with the top of the main yarn.
1. We wind a thread around the index finger, such a ring is also called the "Am ring", often used in the creation of small knitted toys - Amigurami.

We knit 5 columns b / n. 
We remove it from the finger and pull the thread so that the ring closes. 
Next, we knit a cone of 5 rows, evenly adding 2-3 columns b / n in each. 
Then we knit 2 rows of Grass yarn without additions. 

Then again the main yarn - 5 rows. The number of rows, both from the main yarn and from "Grass" depends on the thickness and type of yarn chosen. And now we continue to alternate to the desired height of the Christmas tree. 

In order for the Christmas tree to turn out in the shape of a cone, you need to make uniform additions in rows from the main yarn. The main rule here is that the closer to the base of the Christmas tree, the less we make additions. 
When the desired height is reached, we fill the Christmas tree with filler. But we are not in a hurry to tear off the thread. Having stuffed the Christmas tree, it is necessary to attach a solid base to the bottom, due to which our Christmas tree will be stable, you can damage CDs. And if the base is easily inserted into the Christmas tree, you can cut off the thread and put the workpiece aside. 
Now we knit the bottom of the Christmas tree. To do this, you need to tie a circle with b / n columns in a spiral from the main yarn. Its diameter should be approximately 0.5 cm larger than the diameter of the base (disk) of the Christmas tree. 

The finished circle can be connected to the Christmas tree with connecting posts. 
Approximately in the middle of the work, we insert a solid base and finish the connecting process. We hide the tail-thread inside with a hook. 
The Christmas tree is ready. 
The crown can be decorated with a knitted star. And for decoration, use everything that your creative imagination tells you: bows, beads and bells. 

The New Year holidays are rapidly approaching, and we are all thinking about how to decorate our home. In addition to the main "New Year's beauty", people often decorate the interior with small original Christmas trees. There are many ideas on how to DIY Christmas tree. A Christmas tree can be made of tinsel, cardboard, beads, knitted with your own hands and there are a lot of other techniques for its execution.
The photo master class will help you learn how easy and simple crochet the original Christmas tree with legs for New Year's decor of the apartment. Moreover, it is not at all necessary to have extensive knitting experience, elementary knowledge is enough.
To tie crochet herringbone You will need:
- yarn "Grass" of green color,
- white and red yarn
- hook,
- scissors,
- a piece of foam
- some wire with a diameter of 3 mm,
- a sheet of cardboard A4,
- 6 barbecue skewers
- scotch,
- stationery knife,
- hot glue gun,
- decor: ready-made or homemade eyes and nose.
We make a cone from a sheet of cardboard. If you do not have a whole sheet of A4 format, like mine, then you can glue it with tape. The connection point is also more convenient to fix with tape.

From a piece of foam, you need to cut a small cone that would fit snugly in our large base cone.
You can use a ready-made foam cone instead of a cardboard base.


We connect 3 skewers together with hot glue. I shortened the skewers by about 5 cm.
We fix them in a cone.


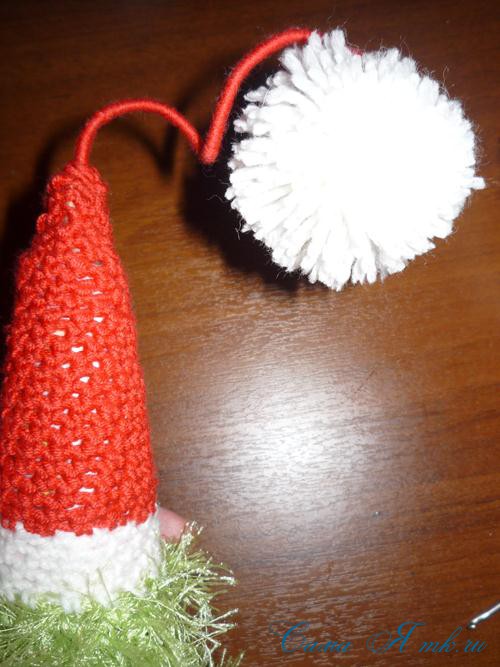
Let's make a hat with a curved crown near the Christmas tree, for this, we additionally attach a wire to the center with hot glue.

I tentatively, for myself, divided the Christmas tree into 4 parts.
We will knit a Christmas tree from the bottom up.


First you need to dial a chain of air loops (Fig. 1), its length depends on the diameter of the cone. I did not close the chain in the ring, it was more convenient for me.
We begin to knit with single crochets (Fig. 2), so the knitting turns out to be denser and fluffier. You can also knit with a double crochet, it all depends on your desire.
Periodically applied to the cone, gradually reducing the number of loops.
You can stick to some kind of system, I personally reduced the loops by eye. The most important thing is that it happens evenly.

Having connected, approximately, 2/4 of the entire Christmas tree, I fixed the knitting a little with hot glue on the cone and connected the side edges by crocheting.


I left the last part on the cap, knitted several rows of white yarn, then red, to the end of the cone.


We fasten the loop so that it does not bloom.


We cut out the boots from the foam plastic with a clerical knife and tie them with yarn. We collect approximately 4-5 air loops and tie them “in a circle”, so we knit the oval sole of the boot and go up, reducing the loops if necessary.
I hope that needlewomen and knitting craftswomen will not scold me much, but in crocheting I have remained only at the initial level. 🙂
Therefore, I tied it purely intuitively, according to a foam blank.
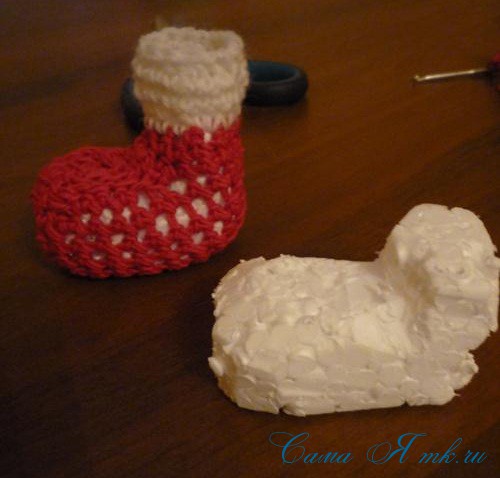

It remains to put the Christmas tree in boots. Do not place them evenly, spread them a little, then your Christmas tree will be more stable.
I forgot to say that the legs, for greater decorativeness, can be wrapped with yarn. In my case, this was not necessary, since they are almost invisible.
Glue the eyes, nose and mouth with hot glue.

Like this tree with legs turned out!


Such cheerful Christmas tree can be placed on your New Year's table. In addition, it is completely safe, so it can be placed in the children's room. And when the holiday is over, such a Christmas tree will need very little space in a box on the mezzanine. And she will delight you again next year. This little one handmade Christmas souvenir, can also be a wonderful New Year's gift, which will undoubtedly bring joy to your family and friends.
I was glad to help!
Here comes the warm, bright autumn! Despite the fact that the sun is still warming a little less than in summer, experienced craftswomen are already preparing for the winter with might and main, buying skeins of yarn and looking for knitting and crocheting patterns. Today we invite you to take a step back from the classic socks, hats and sweaters, focusing on the main holiday of the year - the New Year! The crocheted Christmas tree, which we propose to knit today, will be a great gift for family and friends, as well as decorate your Christmas tree, creating an incredibly warm and cozy atmosphere in the house.
crochet Christmas tree
For work we need:
- fluffy yarn - 2-2.5 skeins of 50 grams;
- crochet No. 2 for the bottom and No. 2.25 for twigs;
- holofiber;
- CD-ROM;
- rhinestones, sequins, ribbons, beads for decoration.
How to crochet a Christmas tree: work scheme
Christmas tree base
1 row: we perform a sliding loop, we knit 3 ch into it. and 9 s. s n., connecting loop.
Important! Starting from the second row, we knit columns with a crochet only for the back wall of the loop to create stripes on the Christmas tree.
2 p.: in a circle 3 c. p., *s. s n., 2 p. from n. in sl. n. *, from * to * x 5, after which s. with N.Yu in the same loop where the 3rd century is knitted. p. \u003d 16 s. from n.
3 p.: 3 c. p., * 2 s. from n. in sl. p., s. from n., s. from n.*, p. from n. in the same paragraph, whence 3 c. p. \u003d 21 s. from n.
4 p.: 3 c. p., s. from n. to the end of the row, connect.
It should be like this:
The further scheme of work is as follows:
5 p.: 3 c. p., *s. from n., s. s n., 2 p. from n. in sl. n. *, from * to *, after which s. from n. where the 3's come from. p. and connect = 28 s. from n.
6 p.: 3 c. p., s. from n. to the end of the row.
7 p.: 3 c. p., *s. from n., s. from n., s. s n., 2 p. from n. in 1 p. *, from * to *, p. from n. in the same paragraph, whence 3 c. p. and connect = 35 s. from n.
8 p.: 3 c. p., s. from n. to the end of the row.
9 p.: 3 c. p., *s. from n., s. from n., s. from n., s. s n., 2 p. from n. in 1 p. *, from * to *, p. from n. in the same paragraph, whence 3 c. p., connect = 42 s. from n.
10 p.: 3 c. p., s. from n. to the end of the row.
11 p.: 3 in. p., *s. from n., s. from n., s. from n., s. from n., s. s n., 2 p. from n. in 1 p. *, from * to *, p. from n. in the same paragraph, whence 3 c. p., connect = 49 s. from n.
12 p.: 3 in. p., s. from n. to the end of the row.
13 p.: 3 in. p., *s. from n., s. from n., s. from n., s. from n., s. from n., s. s n., 2 p. from n. in 1 p. *, from * to *, p. from n. in the same paragraph, whence 3 c. p., connect = 56 s. from n.
14 p.: p. from n. to the end of the row.
15 p.: 3 in. p., *s. from n., s. from n., s. from n., s. from n., s. from n., s. from n., s. s n., 2 p. from n. in 1 p. *, from * to *, p. from n. in the same paragraph, whence 3 c. p., connect = 63 s. from n.
16 p.: 3 in. p., s. from n. to the end of the row.
17 p.: similarly add 7 p. evenly = 70 s. from n.
18 p .: according to the pattern with. from n. to the end of the river
19 p.: similarly add 7 p. evenly = 77 s. from n.
20-21 pp.: p. from n. to the end of the river
22 p.: similarly add 7 p. evenly = 84 s. from n.
23 p.: p. from n. to the end of the river
Please note: starting from the fifth row, you need to constantly knit 7 more stitches through one row. The number of loops must always be a multiple of 7! If desired, you can knit a Christmas tree of any height.
Here is what kind of preparation for the Christmas tree you should get:
Christmas tree branches
They will have two rows. You need to tie them on every third row of the base, starting from the second line from the top. The first row must be knitted with. from 2 n. in order to make the branches of the Christmas tree longer and cover the base.
1 row: for the front walls of the loops of the 2nd row of the base. Attach the thread with a connecting column, then you need to knit like this: * 3 in. p., s. from 2 n., 3 c. p., 2 p. from 2 n. * in the same p., 1 c. p., skip next. 2 p. and then again you need to knit * 2 s. from 2 n., 3 c. p., 2 p. from 2 n., 1 c. p. * and until the end we do the same every 2 p. in the 3rd. Then we join with a connecting column to the top of the column from 3 c. n. As a result, you should get six branches.
2 p .: we connect with the arch (connecting loops) and knit further from it * 3 s. with n., 3 picot with a cross, 3 s. from n., 1 c. *, from the next arch we knit the same thing and so on until the end of the row, after which we fix and cut the thread.
This is how the first row of a Christmas tree branch fits in:
Next, you need to skip two rows of the base and knit on the third. When knitting the second and all further rows of branches, you need to do this: * through 2 loops into the 3rd, through 2 loops into the 3rd, through 3 into the 4th *, alternating. When the whole Christmas tree is tied up, it remains to tie only the bottom.
Christmas tree bottom
Simply put, we need to knit a flat circle. We knit 6 s. without n. and then like a regular flat circle, increasing the number of loops to the required (in this case, up to 84, since there are exactly so many loops at the base). And then we make another 1-2 p. from 84 s. without n.
The diameter of the circle will be slightly larger than the diameter of the disk.
We fill the Christmas tree with filler and sew our circle with a disk. More precisely, we tie with connecting loops.
Here we will get such a knitted Christmas tree:
It is beautiful in itself, but by the New Year it can be decorated. Make your own decorations! You can, for example, sew ribbon bows, beads, snowflakes ...
Christmas decoration “Christmas tree”: video mk
Knitted Christmas tree for beginners
For work we need:
- yarn in two additions (50 grams per 200 meters);
- knit crochet No. 3;
- multi-colored small buttons and beads.
- The size of the finished product will be 15 x 12 cm.
Scheme
Master Class
First tier of branches
We make the initial ring with green thread and crochet, then we adhere to the scheme.
1 p.: 3 c. p.p., 8 p. from n.
2 p.: 3 c. p., turn knitting, p. from n. in the first s. from n. previous row, 3 s. from n. in sl. 3 s. from n. previous row, 5 s. from n. in sl. s.s. n. pr., 3 p. from n. in sl. 3 s. from n. ave. r., 2 p. from n. in the last s. from n. pr.
3 p.: 3 c. p.p., turn knitting, p. from n. in the first s. from n. ave. r., 6 p. from n. in sl. 6 s. from n. ave. r., 5 p. from n. in sl. With. from n. ave. r., 6 p. from n. in sl. 6 s. from n. ave. r., 2 p. from n. in the last s. from n. pr.
4 p.: 3 c. p., turn knitting, p. from n. in the 1st s. from n. Ave. R., 9 p. from n. in sl. 9 p. from n. ave. r., 5 p. from n. in sl. from n. Ave. R., 9 p. from n. in sl. 9 p. from n. ave. r., 2 p. from n. in the last s. from n. pr.
5 p.: 3 c. p., turn knitting, p. from n. in the 1st s. from n. Ave. R., 12 p. from n. in sl. 12 s. from n. ave. r., 5 p. from n. in sl. With. from n. Ave. R., 12 p. from n. in sl. 12 s. from n. ave. r., 2 p. from n. in the last s. from n. pr.
6 p.: 3 c. p., turn, p. from n. in the 1st s. from n. pr., 15 p. from n. in sl. 15 s. from n. ave. r., 5 p. from n. in sl. With. from n. pr., 15 p. from n. in sl. 15 s. from n. ave. r., 2 p. from n. in the last s. from n. pr.
The second tier of branches
7 p .: turn the work, ss. in the 11th s. from n. pr., 3rd century p.p. + s. from n. in ave. from n. pr., 7 p. from n. in sl. 7 s. from n. ave. r., 5 p. from n. in sl. With. from n. pr., 7 p. from n. in sl. 7 s. from n. ave. r., 2 p. from n. in the last s. from n. pr.
8 p.: 3 in. p., turn, p. from n. in the first s. from n. Ave. R., 10 p. from n. in sl. 10 s. from n. ave. r., 5 p. from n. in sl. With. from n. Ave. R., 10 p. from n. in sl. 10 s. from n. ave. r., 2 p. from n. in the last s. from n. pr.
Third tier of branches
9 p.: turn the work, ss. at 11 s. from n. pr., 3rd century p.p. and s. from n. in sl. With. from n. pr., 4 p. from n. in 4 w. With. from n. ave. r., 5 p. from n. in sl. With. from n. pr., 4 . from n. in sl. 4 s. from n. ave. r., 2 p. from n. in the last s. from n. pr.
10 p.: 3 c. p., turn knitting, p. from n. in the first s. from n. pr., 7 p. from n. in sl. 7 s. from n. ave. r., 5 p. from n. in sl. With. from n. pr., 7 p. from n. in sl. 7 s. from n. ave. r., 2 p. from n. in the last s. from n. pr.
Knitted Christmas tree is almost ready! It remains only to fasten and cut the thread.
If desired, it can be decorated. Take a thread of a different color and attach it to the end of knitting and crochet the edges with connecting posts (see diagram). We carry out the trunk according to the scheme and knit the connecting posts to the end, after which we fix and cut the thread. We decorate the finished Christmas tree with colored buttons or beads and a beautiful decoration is ready!
We hope that today's master class will be useful for you. Happy knitting and even loops!
New Year's toy "Herringbone": a detailed video master class in 2 parts
Selection of schemes


In autumn, you often begin to think about the coming of the New Year with its festive mood, meetings with friends and family, and, of course, gifts. In addition, the New Year has been associated with the Christmas tree for all of us since childhood! Let's talk about her.)
Fortunately, people are increasingly thinking that it is not worth cutting down a living Christmas tree for the sake of a few holidays. "Cross" and I fully support this decision and believe that a do-it-yourself Christmas tree is much more interesting and humane! In addition, these are great options for those who have nowhere to put a large Christmas tree (for example, there is no free space, or an active small child is in this free space).
We bring to your attention a large selection of master classes on creating a decorative Christmas tree with your own hands, which will serve as a wonderful decoration for your home and an original gift for a wonderful holiday!
Christmas tree made of cones
A very original Christmas tree with your own hands can be made from pine cones. But we will not use the whole cones, but only their scales, so that the Christmas tree is not too bulky.

So, to begin with, we will separate its scales from the cone. This can be done with a sharp knife, wire cutters or secateurs.

Be careful, take care of your hands!

The next step is to make a cone from thick paper or cardboard, which will be the base of our Christmas tree. We turn the paper into a cone, glue it on the side and cut off the excess at the base.


Then we just take the scales in our hands and glue them in a circle, starting from the base of the cone.

You can glue each new row in a checkerboard pattern, you can, as here, one above the other.

You can glue a clove on the top of the Christmas tree (such a spice))

After the glue dries, you can start painting our beauty. To do this, you can take spray paint or regular acrylic paint.
If you choose acrylic paint with a metallic effect, then your Christmas tree will look much more spectacular.

Then we cover the ends of the "twigs" with PVA glue and sprinkle sparkles on them.


This beauty is obtained as a result of these uncomplicated actions:

Exactly according to the same principle, you can decorate the cone with chains and beads, decorative cords, ribbons, braid, etc.

Another very popular way to make artificial Christmas trees with your own hands is to weave them from beads. This is perhaps the most painstaking way, but for lovers of beading, nothing is impossible!
The detailed process of weaving Christmas trees from beads cannot fit in one article, so we share with you links to master classes previously published on "Cross".


Christmas tree made of paper and cardboard
If you have nothing to do in the workplace) or just want to add a little holiday to the office, make a Christmas tree out of paper. What's easier?)

And this Christmas tree is very similar to the design one, don't you think? It’s all the fault of the colored designer cardboard, which is so beautiful and bright that you don’t need to decorate the Christmas tree with anything else) which simplifies the process of making a Christmas tree with your own hands.


Secondly, for the manufacture of a designer Christmas tree, you can use threads that are wound on a paper cone using the technology for making openwork balls.

Thirdly, flower netting and bouquet netting.

The manufacturing technology of these three Christmas trees is very similar, so the process of their creation is shown in one master class.
Feather Christmas tree
Yes, they do too! You can buy feathers in hardware stores, or maybe you have stocks of bird feathers? For brightness, they can be dyed with food coloring. It looks original, beautiful and so airy!

Candy tree
A candy tree is not only beautiful, but also delicious! Such a gift for the New Year will be appreciated by everyone: both adults and children! Watch the video tutorial from Kateryna Bay and create!