To begin with, let's figure out what kusudama is, where this term came from and what it means. Kusudama is such a paper spherical figure, as well as a type of origami, it is made from several identical origami figures that are glued together. Kusudama is also the forerunner of modular origami. This term came to us from Japan. And originally it meant a medicinal ball, the Japanese placed medicinal herbs in it and hung it over the patient's bed. Also, this ball served as a storage for incense and aromatic mixtures from dried herbs and petals. But now these balls are called balls of happiness, and they are used as a home decor item or are a great decoration for a wedding, birthday and any other holiday. Kusudama can also serve as a gift for relatives and friends for any celebration. Therefore, we propose to make origami kusudama together.
First, we suggest viewing the image of this figure, as it comes in different sizes, shapes and colors.


There is also an opinion that kusudama is not a type of origami, as it is done with the help of many parts with the participation of glue and scissors, while others, on the contrary, believe that this is just a type of origami, since earlier this art also involved scissors and glue.
Introduction to technology
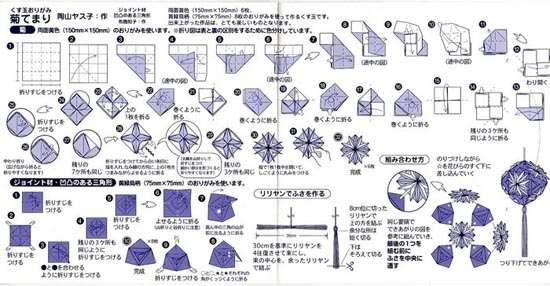
To begin with, we suggest that you make one of the easiest types of this craft to get acquainted with this figure. This will be a kusudama flower, and we offer you a scheme for assembling this figure. This is how all the elements of this figure will look, which then will need to be glued and shaped into a ball.

For work, we need 60 square sheets of paper measuring 7/7 cm and PVA glue. From this amount of paper, we should get 12 flowers, which will consist of five such forms.
We bend our square sheet of paper so that we end up with a triangle.

Now we bend the corners of the triangle to the top point and get a rhombus.

Then fold the previously folded sides in half.


And now you need to bend the upper corners of those sides that we bent so that they are even with the main figure.

Fold both sides in half and glue the resulting triangles together.

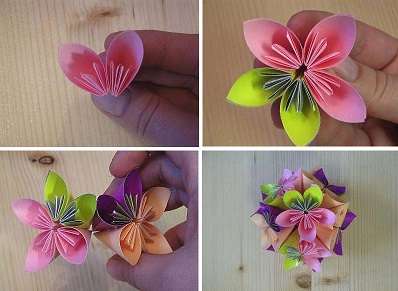
And now we need to make 5 of the same petals and glue them together to make a flower.

You can watch the video for more detailed information and find out the answers to all your questions:
Now, in order to get a ball from these twelve colors, we need a few more minutes.

For this work, we need glue, string or a beautiful ribbon and beads for decoration.
Take 6 flowers, place one of them in the middle, and glue the other five around the central flower.

Now we will glue the flowers together, we will apply the glue little by little, starting to the right of the center fold line.

When the glue sets well, we move on to gluing the next flower.

Glue very carefully, first the first six colors, and then we get one hemisphere, and then the remaining six, and we get the second hemisphere. By themselves, they look very beautiful and can already serve as a decor item. But still, let's finish our figure.

Now let's make a lace or ribbon, depending on what you choose, on which the kusudama will be held. To do this, take the beads and string them on a cord. We fix the first and last beads with a knot to fix them in place.

It remains for us only to connect the elements of our future ball, for this we need to apply a small amount of glue inside the fold.

Then we glue the lace to the upper and lower petal, but the glue must be applied exactly in the center of the petal. We will glue the second part of the ball when the glue dries on the first one.

Well, that's all, our kusudama ball is ready. You can hang it above your bed, in your living room, or use as holiday decor. And also it will serve as a great gift.

You can also watch a video on how to assemble this ball correctly.
star model
There are a lot of Kusudama models in the world. And this kusudama resembles a three-dimensional star.

In order to make such a ball, we need 30 square sheets of paper 7/7 cm in size, they can be of different colors, then the figure will come out more beautiful, scissors and glue.
We present you a video that explains in detail how to make such a ball.

Ball with magic
The magic ball is slightly different from the kusudama, as it is folded from one sheet of paper, but you will have to invest a lot of strength and patience. Because for this we need to make several hundred folds and folds. But in the end, you will not regret how much you worked, as you get an original toy, gift and decor.

For this craft, let's take a sheet of paper measuring 15/30 cm. Let's watch a video to learn how to make such a beautiful figure.
Video on the topic of the article
And now we present to you another selection of videos, thanks to which you will learn how to make other kusudama balls.
Kusudama is a three-dimensional figures assembled from a large number of paper modules. This art direction originated in ancient Japan, when kusudama balls were used to mix dried herbs and incense. Today, these balls are popular among designers and handmakers who use pieces for decoration interiors.
Simple patterns for beginners
It is believed that kusudama is a kind of origami, although in fact this is not entirely true. A distinctive feature of true origami is that no glue is used when folding paper. But the modules in clusters will have to be glued together to get a three-dimensional figure.

Photo assembly in pieces
One of the simplest types of kusada is called, which means “cookie cutters”. Its elements are reminiscent of iron molds, which used to extrude figures on dough. In order to make a similar figure, you need to prepare 30 identical squares of paper measuring 7 * 7 cm. Give preference to thick paper so that the form holds well. Start manufacturing with simple modules, which are then interconnected.
How to collect kusadamu flower look at the assembly diagram for beginners:
Scheme of assembly by pieces

A simple kusadama scheme
You need to bend the side corners and end up with a rectangle from a square. Wrap the lower right corner up, bending so that it turns out to be the side of a parallelogram.
Cookiecutter assembly step by step on the diagram:
Fold the top left corner down. As a result, you will get a full-fledged parallelogram. Now you need to hide the corners with the pencil inwards.

After that, the module is turned over, folded in half and diagonally. A double triangle should form inside the module. It remains to bend the corners on both sides up and the module is ready. From all the squares you need to make such modules, and then collect them into a Kusudama Cookiecutter ball.
Watch the video: Cookiecutter master class
Master class with a photo: a ball with Kusudama flowers
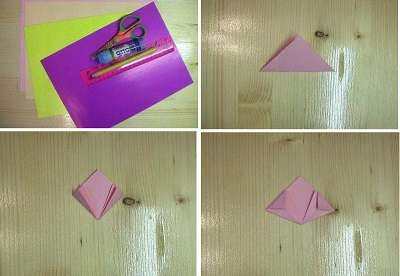
An original and bright decoration made of paper can be made not only by an adult, but even by a child. You need to prepare the following materials:
- colored paper
- PVA glue
- Scissors
- ruler

Cookiecutter assembly diagram
One ball will consist of 12 ready-made flowers, each of which is assembled from small modules. Cut the colored paper into 7cm x 7cm squares. Since you need five squares per flower, you will need all 60 squares. You can make them in different colors or combine 2-3 colors.
Scheme of assembly by pieces
Each square is folded diagonally twice to highlight clear lines and the center. Fold the square diagonally into a triangle, and then fold the edges towards the center so that you get a rhombus.
Now you need to unfold the corners and bend each of them inwards. As a result, the triangles will decrease and you will get a figure as in the photo. It consists of three leaves, so it can be called a shamrock.
Bend the corners of the resulting shamrock, and then fold the module so that the triangles are inside. Press only the edges to make the figure voluminous. You have one module ready for making a kusudama flower for beginners.

When you make several of these modules, you can assemble a flower out of five. Connect the modules together with glue so that they hold well.

Photo of balls in pieces
As you can see diagrams for assembling kusudama balls simple enough for beginners, so you can make original shapes. Learn new paper art techniques and make or decorate the interior of a school, kindergarten or home. Kusudami is not just an art, because with its help you can unleash your creativity. Working with small modules has a positive effect on hand motor skills, so try making kusudama balls with your children.
Kusudama is a three-dimensional figures assembled from a large number of paper modules. This art direction originated in ancient Japan, when kusudama balls were used to mix dried herbs and incense. Today, these balls are popular among designers and handmakers who use kusadas to decorate interiors.
Also read: Kusudama technique for beginners step by step
Simple patterns for beginners
It is believed that kusudama is a kind of origami, although in fact this is not entirely true. A distinctive feature of true origami is that no glue is used when folding paper. But the modules in clusters will have to be glued together to get a three-dimensional figure.

Photo assembly in pieces
One of the simplest types of kusada is called Cookiecutter, which in translation means "cookie cutters". Its elements are reminiscent of iron molds, which used to extrude figures on dough. In order to make a similar figure, you need to prepare 30 identical squares of paper measuring 7 * 7 cm. Give preference to thick paper so that the form holds well. Start manufacturing with simple modules, which are then interconnected.
How to collect a kusadamu flower, see the assembly diagram for beginners:

Scheme of assembly by pieces
Start folding each square twice diagonally to create fold lines and a center. After that, bend the two extreme opposite corners to the center, and then, without unbending them, fold the two sides to the middle.

A simple kusadama scheme
You need to bend the side corners and end up with a rectangle from a square. Wrap the lower right corner up, bending so that it turns out to be the side of a parallelogram.
Cookiecutter assembly step by step on the diagram:

Fold the top left corner down. As a result, you will get a full-fledged parallelogram. Now you need to hide the corners with the pencil inwards.

After that, the module is turned over, folded in half and diagonally. A double triangle should form inside the module. It remains to bend the corners on both sides up and the module is ready. From all the squares you need to make such modules, and then collect them into a Kusudama Cookiecutter ball.
Watch the video: Cookiecutter master class
Master class with a photo: a ball with Kusudama flowers
An original and bright decoration made of paper can be made not only by an adult, but even by a child. You need to prepare the following materials:
- colored paper
- PVA glue
- Scissors
- ruler

Cookiecutter assembly diagram
One ball will consist of 12 ready-made flowers, each of which is assembled from small modules. Cut the colored paper into 7cm x 7cm squares. Since you need five squares per flower, you will need all 60 squares. You can make them in different colors or combine 2-3 colors.

Scheme of assembly by pieces
Each square is folded diagonally twice to highlight clear lines and the center. Fold the square diagonally into a triangle, and then fold the edges towards the center so that you get a rhombus.
Now you need to unfold the corners and bend each of them inwards. As a result, the triangles will decrease and you will get a figure as in the photo. It consists of three leaves, so it can be called a shamrock.
Bend the corners of the resulting shamrock, and then fold the module so that the triangles are inside. Press only the edges to make the figure voluminous. You have one module ready for making a kusudama flower for beginners.

When you make several of these modules, you can assemble a flower out of five. Connect the modules together with glue so that they hold well.

Photo of balls in pieces
Interesting article: How to make a kusadama flower
Make 12 flowers and then start assembling flower kusudama ball for beginners. You can put a thread in the middle of the ball so that the finished craft can be hung.

As you can see diagrams for assembling kusudama balls simple enough for beginners, so you can make original figures with your own hands. Learn new paper art techniques and make beautiful crafts for a gift or to decorate the interior of a school, kindergarten or home. Kusudami is not just an art, because with its help you can unleash your creativity. Working with small modules has a positive effect on hand motor skills, so try making kusudama balls with your children.
One of the components of the origami art that is popular today is the classic kusudama, which we will describe in detail how to make it with our own hands. Initially, these balls of paper elements folded in a certain way were used for medicinal purposes. Crushed medicinal plants were poured into the ball, and then tied up in the house. Today, the classic kusudama scheme is used to make various crafts that serve as decorations and decor components for gift wrapping.
We offer you a kusudama master class for beginners, thanks to which you will learn how to make the main element of the craft. Having made several of these paper elements, you can create balls and entire compositions using the Kusudama technique.
We will need:
- paper;
- glue;
- scissors.
- We fold a square piece of paper (you can use sheets for notes) in half diagonally. We should get a triangular shape element. Then bend its two lower corners to the top. Now the part has turned into a square.
- The sides that we folded to the top in the previous step should now be folded in half again. As it shown on the picture. In this case, the lower part of the part is still a square.
- We straighten the resulting triangles on the sides so that a finger can enter them. The opened folds in the form of pockets will give the detail a look reminiscent of the facets of a diamond.
- Turn the piece back to you. Turn both side triangles outward.
- Apply glue to the front side of one of the flaps. Connect the left and right flaps to make a cone. Since the glue needs time to dry, secure the cone with a paperclip.
- We need at least four such details. The more of them you make, the more voluminous the craft will be.
- Next, apply glue to the seam of each part and alternately connect them in the shape of a flower.
- Once you are sure the glue is completely dry, remove the staples. Kusudama flower is ready!


 |
 |


If you make 12 of these flowers according to the instructions of this origami master class, then by gluing them together, you will get a kusudama ball, which will be a great decoration for your home. It is not necessary to use single color paper. A ball made of multi-colored parts will look more fun.
 |
 |
- The kusudama ball can not only be hung. If you fix it on a stem (wooden or plastic rod), you get an impromptu bouquet that will please the eye for a long time.
- It is not recommended to use rubber or super glue to make kusudama. Despite the fact that they dry faster than PVA or stationery, the craft may look sloppy.
- Try to make the folds on paper more clear and sharp so that the kusudama looks neater.
- Crafts made of thin paper will look more elegant. It is easier to work with it, as the glue dries faster. In addition, thin paper will make the ball more fluffy, as more details will be needed.
- Cover the work surface that you will use when creating the craft with paper or a tablecloth so as not to stain it with glue.
Having mastered the classic kusudama, you can start making more complex options: and electra kusudama.
Kusudama is the Japanese art of making paper ornaments. This creative activity is available to people of all generations and statuses. All you need is to show your imagination and make a beautiful decor element. If you are a creative person and are not afraid to learn something new, then you can try to make a small craft, for example, a paper kusudama ball. A magic ball, the schemes of which can be easily found on the Internet, is made very simply and quickly.
General information
The art of making paper decorative elements came to us from Japan. In this country, children from a very early age are taught to make paper animals, birds, lanterns and other figurines. This not only develops their creative abilities, but also teaches them to be neat and prudent. Adults are also not against such entertainment. They gladly take a piece of paper and begin to invent various figures.
This art form has become very popular due to its accessibility. The work uses a minimum of materials and tools that can be easily found in your apartment or bought inexpensively. Ready-made crafts can not only decorate the interior in an original way, but also become a good gift for a person close to you.

In itself, the art of kusudama is a kind of well-known origami. It involves the manufacture of a ball figure from modules glued together (in most cases they are flowers made from a square piece of paper).
If you have at least an hour, then you can take it with the art of paper origami. Kusudama balls can not only decorate a living space, but also calm the nerves, as well as cheer up. Researchers in Japan and various European countries have proven that kusudama and other varieties of origami have a beneficial effect on human attention and memory. Passion for this art improves the well-being of people of all ages.
Before you make a kusudama magic ball, you need to correctly select all the necessary materials and choose one of the varieties of this art. Kusudama is not limited to strict frames and can be made using various figures, shapes and shades of color. The modules that make up the finished figure can be made in different styles and assembled into all sorts of flowers. The attractiveness of the appearance of the finished paper origami ball depends on these parameters. Schemes and varieties can be as follows:

The most commonly used is the classic kusudama. Its basis is the triangles from which the module is created. With their help, an original and very beautiful ball is formed. At first glance, it may seem that the manufacture of such crafts takes a lot of time and effort, but this is not so. The classic ball is made quite simply and quickly. Everyone who takes the first steps in origami is advised to start acquaintance with art from them.
In addition to simple and accessible schemes for everyone, there are more complex ones, for example, a kusudama flower. Such a craft takes much more time and is done after obtaining certain skills in the manufacture of simpler figures.
There are many ways to make an origami paper ball. All of them are simple, but require tolerance and accuracy. If you do everything right, then the finished product will turn out to be original and unusually beautiful.
One of the most unusual is the openwork ball-kusudama. This paper craft will be a wonderful decoration for your apartment or office. Such a ball can be hung in any corner of the room or decorate a Christmas tree with it. For its manufacture, you will need the following materials and tools: 30 paper strips of white and blue, strong knitting thread, PVA glue.
The process of creating an openwork ball is simple and consists of the following steps:

This crafting option is perfect for inexperienced needlewomen. You can involve your children in the work on the ball. This will not only help them develop fine motor skills, but also allow them to show their imagination and creativity.
To complete the work, you will need the following tools and materials: 30 squares of paper of any color, decorative tape, glue.
Such a figure is made as follows:


Bluebells are liked by most flower lovers. They are very easy to make out of paper and combine into a ball. For a beginner, this technique will seem complicated and obscure, but it’s worth delving into the details a little and all difficulties will be eliminated by themselves. To work on such a ball, you need: 60 squares of paper of any color, paper clips, PVA glue, a large bead, knitting thread.
Detailed description of the manufacture of the ball:

The flower theme is one of the main ones when creating a modular kusudama ball. It is characterized by bright colors and shades of materials from which the product modules are made. The finished result is colorful and uplifting for everyone looking at it. To work on such a craft, you need: a sheet of colored paper, a pencil, scissors, PVA glue, a ruler for drawing circles.
This original decoration is made as follows:

Kusudama technique is becoming more and more popular every day. Making paper crafts from simple and affordable materials captivates needlework lovers around the world. This creative process allows you to usefully spend time and create an original product that you can decorate your apartment with.
Attention, only TODAY!