A golden collection of unusual crafts begins with a very bright accessory. We would even say - a gadget - tape recorder from fruits, greens and vegetables.
To create this retro masterpiece you will need:
- medium size cardboard box;
- green onion;
- cucumber or young zucchini;
- carrot;
- sweet pepper;
- orange or grapefruit;
- radish;
- lemon;
- toothpicks and double-sided tape for fastening.
We reveal the entire process of manufacturing a tape recorder step by step
- We glue the front, back and top of the box with double-sided tape.
- We attach green onions to tape.
- Prepare the details for finishing the tape recorder.
- Cut cucumber or zucchini into one wide strip and two narrow ones.
- Cut off a circle of carrots, and also prepare the top and a semicircle.
- Cut two slices of lemon and orange(or grapefruit).
- Make details from radishes, peppers, carrots.
- Attach all parts to the tape recorder using toothpicks or double sided tape.
- A cassette player can be made from a plastic box or cardboard.
Master class number 2: funny little animals
The second masterpiece that you can make with your child for the exhibition is cute little animals from spotted zucchini. Looking at such pictures, I can’t believe that such beauty can be made at home with your own hands, however, to implement this idea you will need a little time, patience, desire and the following ingredients:
- 2 round zucchini;
- carrot;
- olives;
- toothpick, knife.

How to make a mouse and a dog from a zucchini?
- For each product cut the zucchini in half- the upper part will act as a muzzle, the lower part will act as the body of an animal.
- Connect 2 parts of the vegetable so that you get a figurine of an animal.
- From leftover zucchini make ears- oval for a dog and round for a mouse.
- Fasten the ears to the top of the head by making incisions on the head of the mouse. Attach the puppy's ears with toothpicks.
- For peephole cut 4 circles from the white part of the zucchini and cut 3 olives in half.
- From the halves of two olives, make pupils by attaching them with toothpicks, fix the remaining two as spouts.
- For the dog cut carrots in the shape of flowers, and for a mouse - in the form of a butterfly.
- Fasten the decorations, make a ponytail from the stalk.
Master class number 3: green turtle
Another simple master class on how to quickly and beautifully turn ordinary vegetables into an unusual animal.
To make a beautiful turtle you will need seasonal vegetables and supporting materials:
- cabbage, cut in half;
- 2-3 zucchini;
- black peppercorns;
- toothpicks.

Getting Started
- Cut the zucchini into 5 pieces 5-6 cm thick. Make a head from the extreme part, 4 paws from the rest and attach everything with toothpicks to half of the cabbage.
- Cut the remaining zucchini into circles, 1 cm thick.
- Secure the circles with toothpicks on top of the cabbage.
- Make eyes out of black peppercorns.
Fruit and vegetable crafts: crafting with kids
Not all kids like to eat vegetables and fruits, and this is not a secret for parents. What if you show the kid how bright, and at the same time, useful crafts can be in kindergarten from vegetables and fruits.
 For example, an ordinary pumpkin can turn into a creative basket or flower vase.

 A zucchini is not a zucchini at all, but plane or fairy-tale ship.
 Corn easily turns into fairy-tale characters - you just need to make a little effort and show your imagination.

 Original do-it-yourself vegetable crafts for kindergarten on the theme of autumn are obtained from almost any product that we can also eat at home in the form of salads or first courses. Tell your child about this.

Childhood is the time for a flight of fancy when an apple can turn into a funny owl, and sour lemon - in a yellow solar mouse. Such simple crafts can instill in your child a love of vegetables and fruits. In the process of work, offer him to eat a piece as a reward - he will agree with pleasure.
Simple and original crafts for kindergarten: getting ready for the exhibition
Light and unusual options for fruit and vegetable crafts are not at all uncommon today. Parents try to surprise educators and everyone around them. But first of all, of course, they strive to please their children.


 The most autumn berry watermelon- great material for cool crafts. Pull out the pulp and bones from a small watermelon, and turn the frame into a funny frog.
 Who's rushing to the fall ball in their zucchini mobile? This is Smeshariki!
 Mother's hands for the child are the most caring and most tender. They can honor the back for the night, and create similar beauty from ordinary products.
 Every good parent is ready to do anything for the sake of their child - even to do cute piglets from potatoes. The material is the simplest - potatoes and plasticine.
 You will definitely win this year's best idea contest if make such a bright dinosaur.

 Autumn is the time of pumpkin and crafts from it. We will consider any interesting way that allows
Autumn is a beautiful and sad time: nature says goodbye to warmth and sunny mood. But do not rush to yearn for the outgoing summer. The gifts of autumn will delight you with their exquisite and unique taste, bright colors and indescribable aroma. And the kids will be able to make crafts from vegetables and fruits for the exhibition at school with their own hands. Dear mothers! Get ready to create with your children, and our step-by-step instructions will help you create funny characters from fairy tales and cartoons based on ordinary vegetables, fruits.
What crafts to make from vegetables and fruits for the exhibition "Gifts of Autumn"
Exhibitions-fairs, traditionally held in schools, are a reason for children to rejoice, admiring the creations of others, and a “headache” for mothers who, in the evenings, and sometimes at night, bring children's masterpieces to perfection for the competition. In order to have time to fulfill your plans, to purchase the necessary things - from natural materials to cardboard - discuss with your child in advance the idea of \u200b\u200bdo-it-yourself crafts from vegetables and fruits for an exhibition at school.
You will find a rich selection of plots and characters in printed children's educational magazines, online publications on children's creativity. Free YouTube channels on needlework will tell you how to decorate crafts beautifully, helping your child (and mother) understand the intricacies of craftsmanship. The theme of the exhibitions "Gifts of Autumn" is multifaceted: heroes of popular cartoons, fairy tale characters, animals, birds are cheerfully placed on autumn glades in the middle of a fairy forest.
For crafts you will need: vegetables; fruits; natural materials; glue, scissors traditional for needlewomen; varnish to preserve and preserve the craft; various textures, quality paper; cardboard; plasticine. Here is a forest beauty - a “nutty” squirrel is stocking up for the winter, somewhere a “pineapple” owl hoots at a bitch, a “carrot” horse is carrying a pumpkin carriage with Cinderella, a “potato” Cheburashka is playing merrily with the onion boy Cipollino, and the “lemon » Goldfish fulfills the most cherished desires.
Crafts in honor of All Saints Day - Halloween look bold, stylish. Pumpkin - the queen of the garden - is certainly present in all sorts of guises: as a vase for a maple bouquet of "roses"; like a magic lantern that drives away evil spirits; like an exquisite carriage or ship for travelers. The sketch will not do without a black cat and a funny witch in a pointed hat.
Step-by-step instructions for crafts from fruits and vegetables to school
Does your child dream of making a bright, unusual DIY craft for the autumn fair exhibition at school? Our step-by-step instructions will tell you, your child, an easy, fast, high-quality way to make a real masterpiece using seasonal vegetables, fruits, natural materials, tools, and needlework accessories. You will need a little imagination, diligence, a huge supply of patience in creating "works of autumn art" for an exhibition at school.
"Hedgehog" of pear and grapes
Hedgehogs, although glorious, kind creatures, are still very prickly. Playing with them is very problematic, but cute, affectionate and not at all prickly kids, for which you need pears and grapes that are not only funny, but also edible. We will analyze step by step the method of preparing these pear-grape crafts for an exhibition at school with our own hands:
- Take a large plate, garnish with lettuce leaves, creating a forest entourage.
- Cut each pear in half, placing the cut on a plate.
- Prepare the "grape spines": cut toothpicks in half, clean the uneven edges with sandpaper. “Dress” the grapes on the halves of the sticks so that the sharp edge of the toothpicks remains free.
- Insert soft needles, leaving room for the head.
- For the eyes of the Hedgehog craft, elderberries, chokeberries or peppercorns are suitable for an exhibition at school.
- A small but curious spout will be a pea of allspice.
- The dish for the exhibition at school is ready!
"Giraffe" from carrots or potatoes
"Autumn" giraffe is a funny and fun do-it-yourself craft that even little schoolchildren can prepare for the fair exhibition at school. You will need:
- carrots - 7 pcs.;
- potatoes - 2 pcs. (for carrot and potato crafts);
- matches;
- peppercorns for the eyes - 2 pcs.

- Wash all vegetables thoroughly and pat dry.
- A larger carrot or oblong potato will be the giraffe's body.
- Smaller - head. If the giraffe is completely "carrot", prepare 4 rectangular figures for the legs.
- A long thin carrot will serve as a neck for the Giraffe craft with your own hands.
- It remains to connect the parts with toothpicks.
- Cut off half of the match, leaving the part with the sulfur head for the horns. Gently push into carrots or potatoes.
- For the eyes, use pepper or acrylic paints. Do not forget to draw beautiful spots with them. Leave the craft to dry and boldly take it to the exhibition to school!
"Caterpillar" from apples
Autumn fruits are ideal for creating unusual crafts. Juicy, ripe, fragrant apples will be an excellent basis for the miracle masterpiece "Caterpillar". You will need 5-6 apples of approximately the same size, toothpicks for fasteners, 1 carrot, several rowan berries, a grape, a flower for decoration.

- Cut the carrots into thin - no more than 5 mm thick - rings.
- Prick an apple with a toothpick in the place of the tail, thread one ring of carrots and connect with another apple. Repeat the process, forming the body of the "insect".
- When there is 1 apple left to serve as the head, attach it vertically as shown in the photo.
- The remaining vegetable rings will serve as the legs of a leisurely caterpillar. Attach the carrots with toothpicks to the bottom sides of the caterpillar.
- We attach a grape as a nose.
- Chokeberry will replace the eyes, and will also serve to create funny antennae horns.
- A dried flower will turn a caterpillar into a flirtatious lady, and a stylish top hat into an elegant gentleman.
- Autumn fruits, rowan berries as a decor will provide an opportunity to show imagination when making crafts.
How to make "Racing cars" from vegetables and natural material
The easiest way to make a racing car is to cut a half of an apple peeled from the core into equal large strips, as shown in the photo. Four grapes will pass for the wheels. Having ensured the "mass character" of such crafts, you can recreate rally races or an autumn city with cars scurrying through the streets.

Vegetables will serve as an excellent material for a racing car. A student of a middle or high school can do such a craft with his own hands, and the kids will need the help of their parents. Cut out the driver's seat in an open super car with a knife, making the steering wheel out of a small "round" carrot or cucumber. Rings of vegetables are suitable for wheels: zucchini, carrots, attached with toothpicks.
"Turtle"
To make a do-it-yourself Turtle craft for an exhibition at school, you will need the following vegetables:
- round pumpkin of small diameter;
- 4 gherkins and one cucumber with a rounded end for the head;
- pumpkin seeds - 2 pcs.;
- sunflower seeds - 2 pcs.;
- toothpicks for fastening.

- Wash and cut the pumpkin in half. Remove seeds and pulp.
- Carefully cut out the pattern with a knife, repeating the shape of the turtle shell.
- From the four sides of the body, make small arches-cuts of a semicircular shape, into which attach the gherkins. These will be the legs of the animal.
- Using toothpicks, attach a small piece of a rounded cucumber - this will be the head.
- Fasten the pumpkin seed and half of the sunflower husk with plasticine, forming eyes. Glue with double-sided tape or plasticine to the head.
- A wonderful handmade vegetable turtle will certainly impress the kids at the autumn fair at the school!
"Vase"
Volumetric vegetables with a dense skin - zucchini or zucchini, eggplant, pumpkins, melons; A “wonderful” fruit - pineapple will be an ideal basis for creating an autumn craft “Vase of Flowers” for an exhibition at school with your own hands. To make the vase stable, you need to cut off a small circle at its base. Decide on the required height by cutting off the excess part. Then, using a knife, remove the core of the vegetable or fruit.

If desired, decorate the surface of the craft with an intricate or simple pattern. Autumn flowers will look beautiful in a vase - oak trees, asters, marigolds. Do you want your DIY craft for an exhibition at school to look really autumnal? Collect yellow maple leaves and make magical roses, as in our photo. Form flowers by fastening with thread or wire.
How to make "Piglet" from zucchini and rowan berries
A small, plump zucchini; a circle of cucumber for the ears and a thin strip of peel for the tail of the spiral; a patch of radishes (carrots), chokeberry berries - a small list of easy-to-do, but such a fun craft "Piglet" based on vegetables for a school exhibition:

- Cut the cucumber slice in half. Attach the ears as shown in the photo.
- Using two matches on the back of the zucchini, attach the "patch". Matches will simultaneously perform the role of nostrils and fasteners.
- Attach rowan berries with toothpicks. They will be the eyes of the pig.
- It remains a funny tail and your creation is ready!
"Hare" from cabbage
You will need:
- white cabbage - 2 pcs.;
- zucchini - 2 pcs.;
- carrots with tops - 1 pc.;
- plasticine.
“Cabbage stalk” is a fun and funny craft that will delight the kids at the exhibition at school. It is easily made with your own hands by elementary school students based on seasonal vegetables:

- Connect both cabbages with toothpicks. The one that is larger will serve as the body.
- Cut the zucchini in half lengthwise. Then divide the larger one into 2 equal parts: these are the paws of the toy.
- A smaller zucchini will serve for long, long ears.
- Fasten the paws and ears with toothpicks, as shown in the photo.
- Using plasticine, make eyes, a muzzle and a mouth for a bunny.
- Do not forget that this "beast" loves raw, healthy vegetables. Therefore, one cannot do without juicy carrots in the paws of the “oblique”.
Do you want to make a funny and absolutely kind Babka-Hedgehog for an exhibition at school with your own hands? Get vegetables, fruits in advance:
- banana - 1 pc.;
- 3 potatoes;
- 1 apple.

- Cut off the rounded part of a large stupa potato and one medium one for stability.
- Smaller potatoes will go on the nose and hands of the "sorceress".
- Fasten the stupa, the body with toothpicks, attaching the arms and the apple head.
- Cut off 6-7 cm of the banana from the side of the tail. You can eat the insides, and cut the peel into small, narrow strips, imitating the unique hairstyle of Baba Yaga.
- Put the peel on the apple.
- Matches are suitable for the eyes, and a long strip of the same banana skin will become a broom.
Cartoon characters "Smeshariki"
Favorite "Smeshariki", made from vegetables, fruits and improvised materials with their own hands, will bring great joy to the children and will quickly find their buyer at the fair at the school. For the wise Sovunya, you will need beets; Nyusha "fits" a tomato; orange / lemon Losyash, potato Kopatych, onion Hedgehog, apple Krosh will make a fun company. Plasticine or polymer clay will serve as a material for hands, feet, decor elements. Small branches will become Losyash's horns, and mountain ash, chestnuts, and leaves will emphasize the autumn mood.

Video
Vegetables, fruits, natural material will be needed for a variety of do-it-yourself crafts for an exhibition at school. Exquisite apple-basket will decorate the children's table. An indispensable attribute of All Saints Day - a luminous pumpkin - will emphasize the mysterious, mysterious atmosphere of the holiday. "Carrot" flowers, apple-grape Princess Frog can be made with your own hands even by kids.
Photo of original crafts
Interesting, unusual heroes of fairy tales, cartoon characters, funny forest animals come to life in the caring hands of miracle masters. Vegetables, fruits, berries, nuts will be an excellent basis for original, unique crafts: a handsome peacock, an eggplant duck or an egg chicken. Exhibitions "Gifts of Autumn" in schools will delight children, providing an opportunity to show their talents and ingenuity. Our photos will help you to get creative ideas, to get acquainted with handicrafts made by other guys.
Elizabeth Rumyantseva
For diligence and art there is nothing impossible.
Content
The first educational instances that parents and children go through are children's early development schools, circles, courses. Teachers of these institutions are often asked to work with kids at home, and in order to be able to check this, vegetable crafts for kindergarten are brought to the exhibition. Such competitions allow each child to gain new ideas, knowledge and develop logical thinking.
And to make it easier for parents to complete an interesting craft, we offer step-by-step master classes of the best vegetable options.
Step-by-step lessons on making children's crafts from vegetables for the kindergarten
Crafts from vegetables for kindergarten can be very different and unimaginable. The more unpredictable the accessory, the more attention will be paid to it, thereby increasing the child's self-esteem and creating a positive attitude towards him. In order for homework in the form of vegetable crafts for kindergarten to be done perfectly, we recommend that you view the best options for master classes.
Ship from a zucchini

- We prepare a zucchini, 30-40 cm long and 7-10 cm in diameter. It must be washed under water, dried with towels.
- We put the zucchini on the most stable side so that its back end (with the spine) is slightly raised. If the vegetable does not want to become the way you want, then it is easy to cut it a little at the bottom to make the bottom even. With this treatment, the boat will not fall and lean to the sides.
- We cut out the upper part of the zucchini so that the edges of the vegetable remain intact by 5-7 cm. In this way, we form the bow and the back of the ship closed.
- If, after cutting out the upper part, it turned out to reach the seeds and entrails, then they need to be pulled out and the zucchini completely cleaned of seeds. After this procedure, it is better to dry the vegetable with paper towels.
- Using a knife from one side and the other in the center of the zucchini, we cut out small square windows (3 each), with a width of each side 1-2 cm. So we will have a hole so that we can insert the “oars of the ship”.
- Near such windows, a vegetable anchor is cut with a knife or a ready-made accessory is attached (made of cardboard, carrots, zucchini skins, etc.)
- At the beginning, at the end of the ship, we insert wooden skewers, 10-15 cm long. Instead of them, it is allowed to take green branches of a shrub or a vine.
- In the center of the vegetable ship, we insert similar skewers exactly vertically, this will be the basis for the sails.
- We prepare sails from cardboard or thick colored paper. They can be of different sizes or the same, large or small, rectangular or square - all this at the request of the child.
- We string the sails on skewers, slightly bending the cardboard. In this way, “inflated” sails of a vegetable ship are obtained.
- Through the extreme skewers and the central, highest, we pull the thread, which will imitate the ropes.
- We insert small wooden toothpicks or sticks into the cut-out windows, this will be the basis of the oars of the vegetable ship.
- Using plasticine, we sculpt the edges of the oars and attach them to the sticks that are already ready.
- It is allowed to decorate a ship from a zucchini with any little men, animals, cartoon characters.
eggplant penguin

- To make such a vegetable craft for kindergarten very beautiful, you need to prepare several medium-sized eggplants and bright purple, black coloring.
- We take a knife with a small tip (possibly a clerical one), we begin work.
- The green eggplant caps do not need to be removed, they will be penguin caps. But on the other hand, the spine should be cut evenly so that the animals are stable.
- With a knife, cut out 2 eyes from a vegetable, at a level of 1.5-2 cm from the top cap. A little lower we make a round hole for the nose.
- We take a small carrot, cut off 2 cm from its lower end and insert such a spout into the resulting hole for the nose.
- On the "belly" of vegetable penguins, we outline an oval with a knife and inside we clean the eggplant to green pulp. From the skins that remain, we cut out several circles with a diameter of 1 cm and use a toothpick to pin them in the center of the “belly”. In this way, we got unusual buttons on the stomach of animals.
- Gently with a knife from the left and right sides of the eggplant we make a small incision in the skin, turn it 2-3 cm up. In this way, penguin wings will turn out.
- It is allowed to decorate the original vegetable crafts with greenery, autumn leaves, artificial snow or stones.
Funny faces or pumpkin men

- We take several small pumpkins, wash them, dry them.
- Using a can of paint, cover each pumpkin with bright orange or yellow paint. We are waiting for the vegetable to dry.
- Using a black or dark brown felt-tip pen, a thin marker or a bold pencil, draw the contours of the eyes, nose, mouth (if you want to create an unusual craft, you can finish drawing teeth, mustaches, glasses, moles, nostrils).
- We paint the eyes, nose, mouth with the desired colors (blue, white, red shades of felt-tip pens).
- Similarly, on the vegetable, draw the edges of the hair or hat, paint in the appropriate color.
- We put pumpkins-men on a tray, decorate them with leaves, belts, earrings, beads, other accessories and present them!
Original cauliflower lamb

- We prepare small pieces of white cauliflower, long carnation flowers, hard black olives with a stone, a knife, toothpicks.
- We pierce each clove with a wooden skewer and insert it into the cabbage. We carry out similar actions with 3 other spices. In this way, we get legs, the fur of a vegetable sheep.
- As a head, we take one black olive, pin it with a toothpick to the cauliflower.
- On the sides with a knife, we cut small parts of the olive to make ears.
- We do the same with the eyes. In order to make them look more organic, it is allowed to use grains of round rice, buckwheat or white berries. The eyes are glued artificial from old small toys.
- It is advisable to put the resulting vegetable sheep on green grass, moss, or create a special composition for them.
Cartoon characters Smeshariki from potatoes and onions

- Cooking an onion of bright orange color, medium size. My potatoes are the same size, color doesn't matter. Additionally, among the vegetables, it is possible to take beets, lemon, tomato, small squash.
- In order for the vegetable figures to be stable, one edge of the bottom should be cut off a little with a knife.
- We knead multi-colored plasticine in our hands, make eyes, nose, mouth for each Smeshariki.
- To make the vegetable craft spectacular, the body parts of the heroes should be done in the color that is used in the torso (onion with orange, beets with purple, lemon with yellow, etc.)
- Place the resulting vegetable Smeshariki on a beautiful pallet, after laying out the base with grass or autumn leaves. Such a simple craft will be even more original if it is supplemented with small multi-colored mushrooms, berries and fruits.
How to make crocodile Gena from cucumber and Cheburashka from potatoes

- For such a vegetable craft, you need to take several large potatoes, cucumbers, colored paper.
- We cut off a ring from the potato, 2 cm wide, put it across the remaining piece, pin it with toothpicks. In this way, we got a torso, a head.
- We cut off 2 circles of potatoes, 1 cm wide for the ears and pin them similarly to the head on toothpicks or wooden skewers.
- We cut off several small pieces for the legs and arms from the potatoes and attach them in the same way.
- With the help of colored paper and scissors, we cut out the eyes, nose, mouth, buttons for the body for the Cheburashka. Glue them with glue to the dried potatoes.
- Cut the cucumber into 2 pieces in proportions of 60%, 40%. The larger piece will serve as the body, and the smaller one needs to be cut from the whole edge and insert a small piece of toothpick. In this way, an open mouth was obtained, we attach it to the body with a skewer.
- We cut off small pieces for the legs and arms from another cucumber and attach them in the same way.
- From colored paper we cut out the eyes, nose and glue it to the finished cucumber crocodile Gene.
- We decorate the vegetable composition of Cheburashka and Gena the crocodile with leaves, vegetables, fruits, and other gifts of nature.
A simple craft for children a flower made of carrots using the technique of kirving

- We prepare several large carrots, wash them under running water. It is desirable that such a vegetable be a little sluggish, for this it is recommended to leave it warm for 2-3 days.
- We clean the carrots with a knife along the entire length, make vertical triangular cuts.
- Cut the carrot into thin slices. In this way, figured petals of the future vegetable flower are obtained.
- We prick circles of carrots on a skewer, bending them up. It is worth lowering the largest petals down, and the small ones will be located at the top.
- The leaves of such a vegetable rose from carrots are allowed to be made using onions, dill, parsley or other herbs.
Funny hare from white cabbage for the autumn holiday in the garden

- We prepare a small cabbage, separate the topmost sheets from it - 2 pcs.
- We clean the carrots, cut it into 2 parts, make vegetable legs from each half.
- We fasten the cabbage to the carrots, thereby obtaining the basis of the hare on the legs.
- We attach the 2 remaining leaves of cabbage with toothpicks to the top, making ears.
- Eyes, nose of a vegetable hare are performed with the help of black olives.
- The mouth is allowed to be made using red bell pepper.
Very beautiful autumn composition in a basket of vegetables and fruits

- Such a fantasy vegetable craft should be framed in a beautiful basket of vines, zucchini or pumpkins.
- It is necessary to put bright tomatoes, peppers, cauliflower, corn, squash, zucchini, carrots, small watermelons in it.
- It is desirable to supplement the vegetable composition with lettuce, dill, yellow, white daisies, field plants, cones.
- A basket of vegetables decorated with ears of wheat, oats or barley will be especially original.
Photo ideas for autumn crafts from vegetables and fruits in kindergarten
Among the most popular children's vegetable crafts, it is worth highlighting animals (hedgehogs, bunnies, squirrels, bears), cartoon characters and cars. If you plan to create accessories for Halloween, then for this you definitely need to take a pumpkin, zucchini or watermelon and make unusual shapes out of them. The easiest way to do an excellent job is to analyze the finished vegetable crafts in the photographs and the methods for making them. We suggest considering the best options:

Everything is just the most interesting! How to make eclairs, lemons from bottles, sew vegetables and berries, make them from papier-mâché.
Food is a pleasant topic for many. Products run out pretty quickly, and already from delicious cakes, fruits, only memories remain. But you can make it so that they will always be in front of your eyes, and even decorate the interior. Don't believe? Then find out how to achieve it.
How to make eclairs from plastic bottles?
Look how delicious the cakes look. But do not forget to warn home and visiting guests that these eclairs cannot be eaten, they can only be admired.

To make such a sweet that will always be in the house, take:
- 3 plastic bottles of 0.5 l;
- foil;
- salt;
- PVA glue;
- acrylic paints;
- scotch;
- thin white foam;
- Styrofoam;
- white fom;
- glue gun;
- brushes.
Expand the foil, put this blank on it, and next to it is another, but a whole bottle without a cap. Wrap them in foil, put them in the oven for two minutes. Homemade eclair also needs to be baked, but these blanks are placed in a hot place to make them more pliable. When you take them out of the oven, press down on the foil to make the bottles oval.
Cut the whole container in half, you only need a part of it, which is with a bottom. She will play the role of half a cake. A blank of two bottles at the junction must be glued with adhesive tape.
Pour PVA glue into a convenient container. Sprinkle salt on the board. Lubricate the plastic bottle blank with glue with a brush, then roll it over salt, which will adhere well to this base.
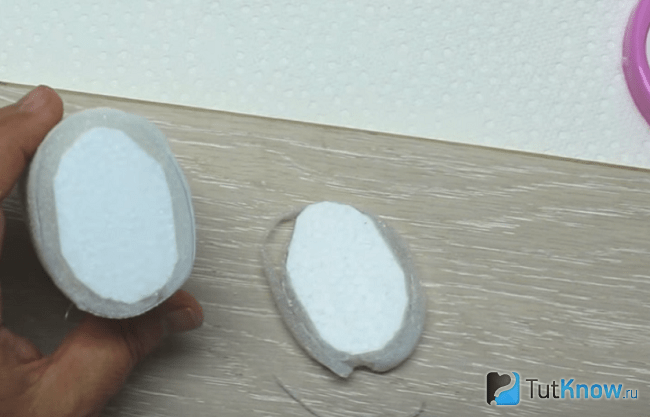
Set these future eclairs aside to dry. After that, you need to brush off excess salt with your hands or a brush. Cut out a small cone shape from the styrofoam. Lubricating it with silicone from a glue gun, glue a sheet of thin white foam rubber here. You will need to wrap the foam blank a couple of times.
At the same time, the foam rubber strip will imitate the dough, and the foam plastic will be the inner white cream.
Now shove this blank with the cone-shaped part inside into the bottle. This part should fit firmly and well into it. Lay the bottle on the board on its side, cut off the excess with a sharp knife to get a nice even cut.
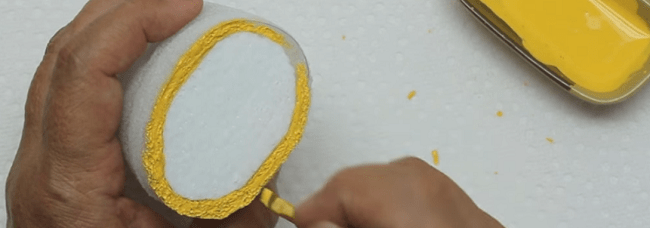
Now with yellow acrylic paint cover the surface of the cakes. To highlight the dough of the eclair halves with this color, apply it with a thin brush along the contour of the cut, painting over the white foam rubber here.
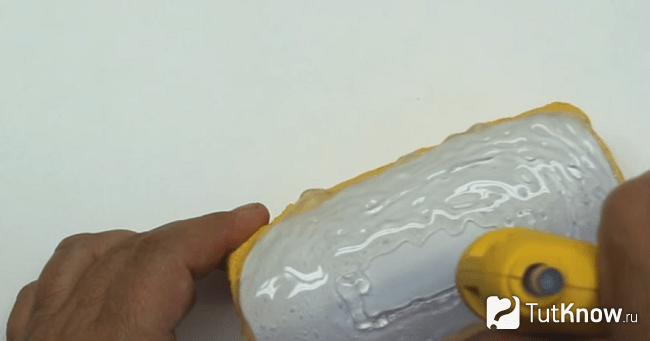
From a white foamirant, cut a rectangular blank, round the edges. Its shape almost repeats the view of the cake from above.

Glue this part with a glue gun, cut off the excess.
Now generously pour silicone from the glue gun here. To do this, prepare the silicone rods in advance so that they do not run out in the midst of the process.
Wait for this glue to dry, after which it needs to be painted over with brown acrylic paint to make a delicious glaze. The photo clearly shows how to make such an eclair.
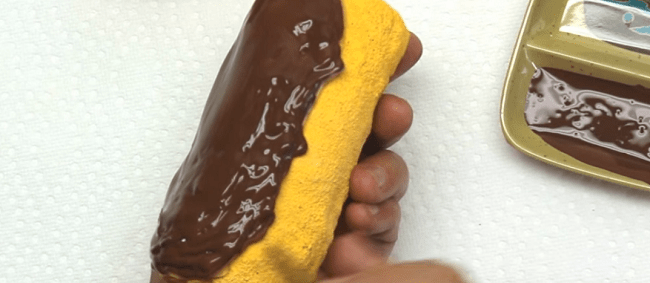
In the same way, make the icing for the second cake, after which you can put them on decorative dishes, but it’s better to put them not on the table, but behind the glass in the cabinet. After all, these cakes are so similar to real ones, they look very appetizing, you need to make sure that someone does not want to try them “by the tooth”.
If you need to bring crafts to a kindergarten competition, this will be an excellent way out. But also the teacher should not lose vigilance so that the children cannot take such an artificial sweetness.
The next craft also looks like a real one. Therefore, it is also necessary to warn everyone who will look at her that she is not edible.
How to make lemon at home?
For this craft, take:
- small bottles;
- sharp knife;
- PVA glue;
- salt;
- acrylic paints;
- scotch;
- thin brush.

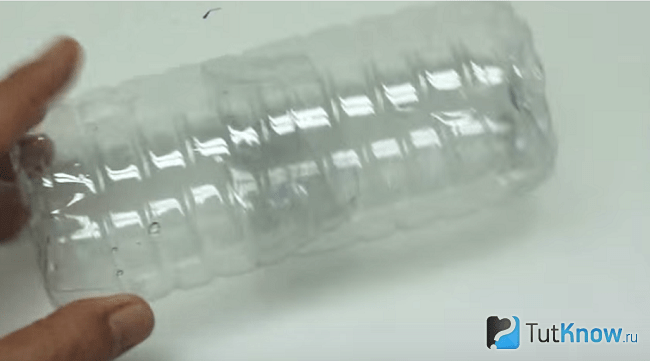
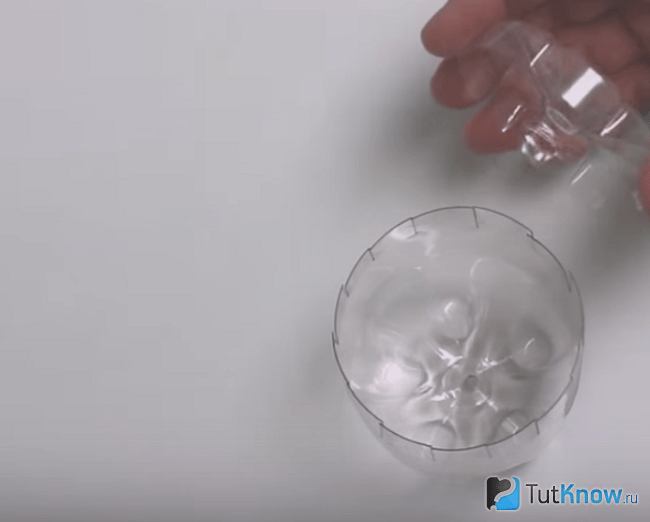
From the bottom of the bottle, cut off a piece about 7 cm high, you can vary this value at your discretion to make a lemon of the desired size. From above, cut its strips, the distance between which is 1 cm, their length is the same.

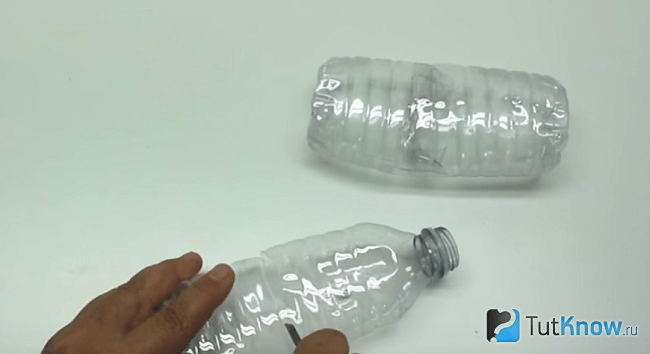
As in the first case, such a fringe will help to better put the second part of the bottle on this one. But downloaded from the second bottle, you need to cut off the bottom, the height of which is quite small, about 1.2 cm.
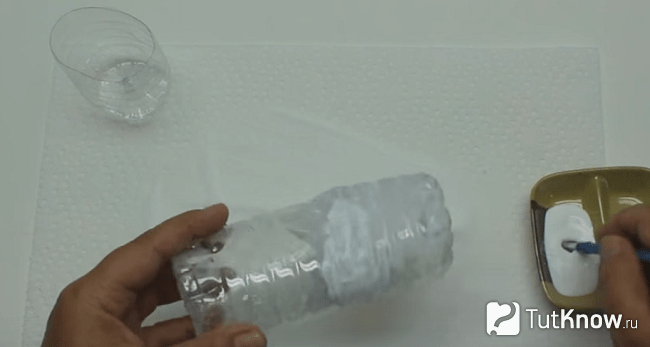
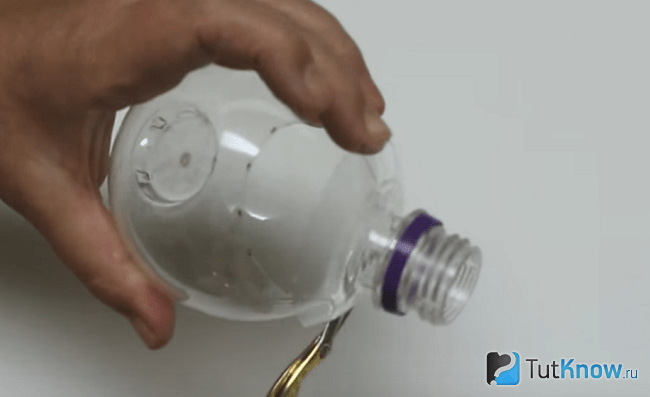
Match these two blanks, seal the junction with tape. Lubricate the surface of one and the second bottle with glue, sprinkle with salt.

In this case, the bottom, which is inserted into this container, does not need to be lubricated. To make lemon wedges, cut the bottoms of plastic bottles so they are about 1cm or less high. With PVA glue, you need to lubricate only their sidewalls, also sprinkle them with salt. While the glue dries, you can go about your business.

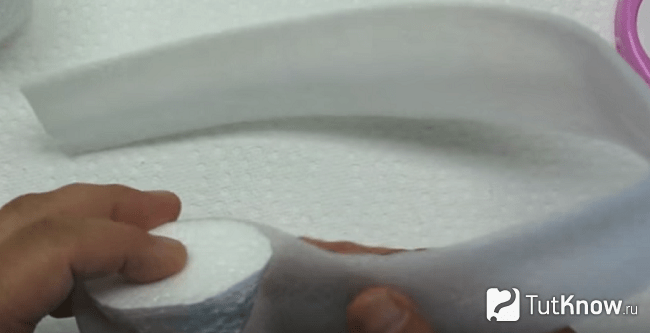
Then you need to remove excess salt with your hands. If this is not done, then along with these grains the paint will fly around when you cover the surface of the fruit with it.
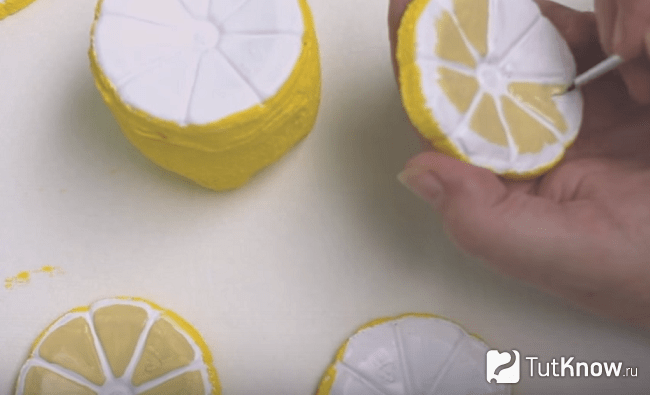
To make the color of the final work the most vivid, it is better to first cover the surface with white acrylic paint, when it dries, use the one you need.
This is how elegant blanks painted with white acrylic look.

Now the skin of lemons and its slices need to be painted with bright juicy yellow paint. To make the flesh have a realistic color, mix white, beige paint, add a little yellow. This composition should be applied with a thin brush on slices of lemons, but leave white streaks and light edging.
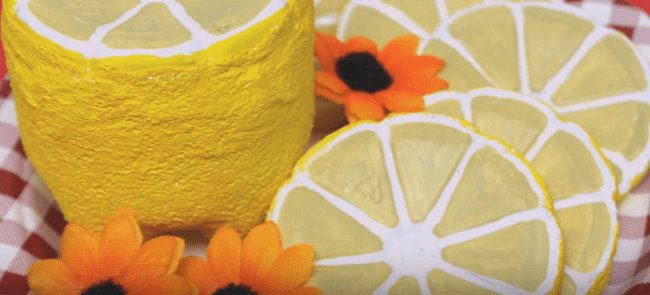
When the paint dries, lay the juicy lemon and its slices on a dish. Let everyone who sees such beauty praise your golden hands and be surprised that such a bright realistic lemon can be made from a plastic bottle.
How to make a candle in the form of a watermelon with your own hands?

The main component will also be a plastic bottle, but small and round. Here is what you need to transform it:
- a piece of foam;
- sharp knife;
- small round candle;
- expanded clay;
- acrylic paints.
To round the edges of this container, to make them less sharp, attach this cut to a heated iron for a few seconds.

Put the foam in front of you. Turn the blank from the bottle over, place it with a cut on this material, draw a circle along these contours with a pencil. Cut it out, inside draw another circle, its diameter is equal to the diameter of the candle. Make this inner notch.
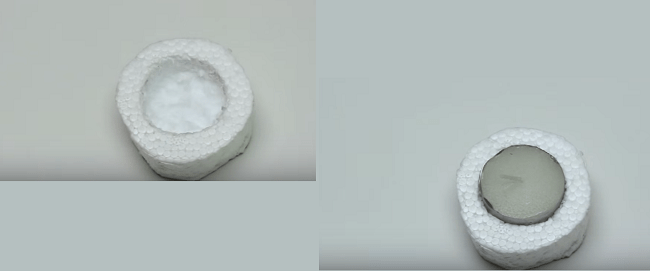
Pour expanded clay or other decorative stones into a plastic bottle, put a foam blank for a candle on top.

Outside, paint the blank from the plastic bottle, as well as from the foam, with white acrylic paint. On top of it, apply green, of course, when the previous layer is dry.
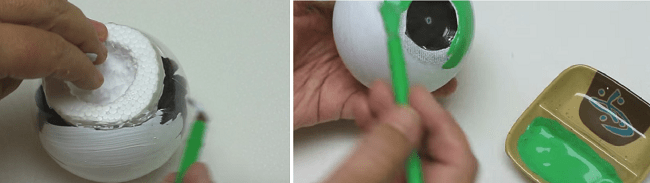
From above, cover the whiteness with red paint to make the pulp of the fruit.
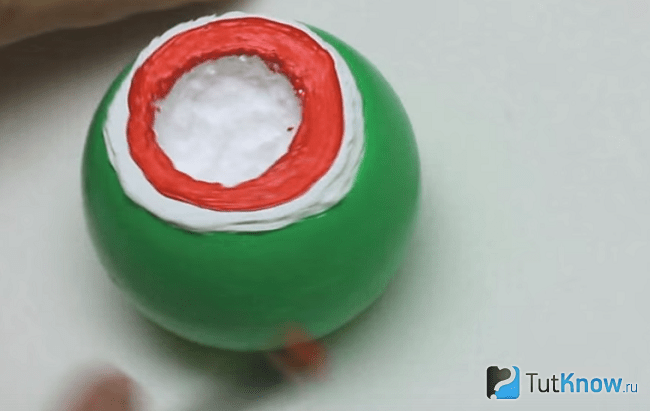
Now, on top of the dried green paint, you need to draw black stripes of a watermelon, they may not necessarily be straight, make them openwork.
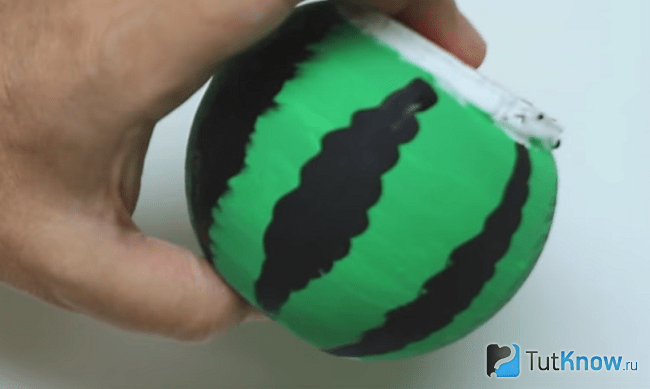
It remains to put a candle inside, light the wick and you can indulge in romantic dreams by the fire.
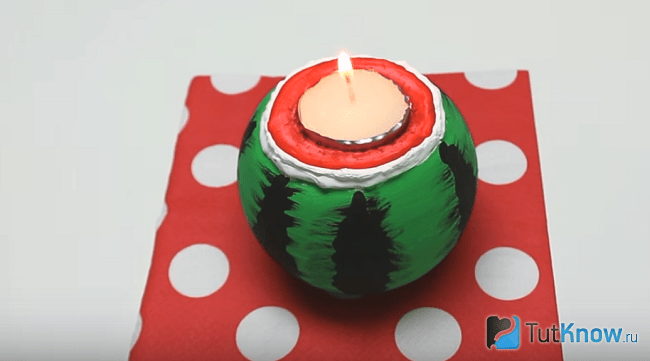
Here's how to make a candle at home out of almost nothing.
How to make vegetables and fruits: a master class
We will make them from papier-mâché. To do this, take:
- newspapers;
- paste or PVA glue;
- foil;
- scotch;
- colored paper or corrugated, or tissue paper.
The next batch of newspaper sheets must also be kneaded well, then lowered into PVA or into glue prepared by oneself. To do this, you can mix flour or starch with water, put on fire, with frequent stirring, bring to a boil.
When such glue has cooled, you need to lower the newspapers into it, distribute them over the surface of the foil fruit. Lay the blanks on a tray, put them in a warm place, for example, under the battery, so that they dry completely. Only then proceed to the design.
To do this, you need to generously lubricate colored, corrugated or tissue paper with a paste or PVA, glue future fruits and vegetables with these blanks.
See what wonderful crafts you get. Put them in a bowl. Place on a table or nightstand to decorate.

There is another way that will tell you how to make fruits and vegetables with your own hands from papier-mâché.
- This will require real products. If you want to use them later for food, then take only a natural flour or starch paste for work.
- Pour it into a bowl, dip a paper napkin torn into pieces there, take out the mass with a spoon with holes, which is called a slotted spoon. Then the excess glue will drain.
- The paper composition must be applied to the selected object, for example, a banana, orange or apple. The layer must be sufficient. Then also put the crafts in a warm place.
- When they have reached the condition, having dried, then carefully cut the paper layer of each fruit in the middle to remove the two halves of the frozen papier-mâché mass. To give them integrity, connect again by gluing the cut.
- Further, such blanks are drawn up at your discretion. You can glue them with colored paper or cover them with paints.

If you want to make halves of an apple, then you do not need to glue its 2 paper parts, on the contrary, you need to fill them with a mass of newspaper or napkins mixed with glue. When the blanks are dry, prime them with putty. After drying this mass, it must be sanded, then covered with acrylic paints.
For this job you need:
- paper napkins;
- fruits and vegetables;
- paste;
- Bowl;
- sandpaper;
- acrylic paints;
- tassel.
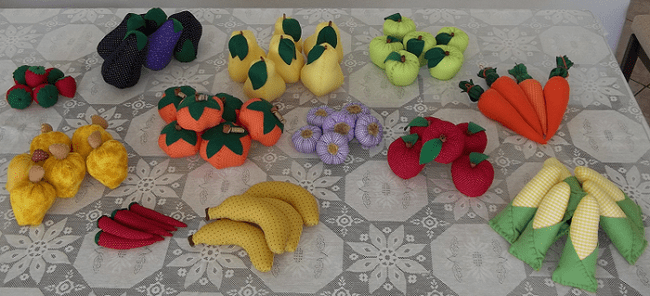
How to make artificial fruits and vegetables from fabric?
They can be voluminous and flat. Let's take a look at the first option. If you were asked to bring toy fruits and vegetables to kindergarten, then you can sew them from the remnants of the fabric.
Take:
- patches of fabric;
- synthetic winterizer;
- presented patterns;
- scissors;
- chalk or dry remnant.
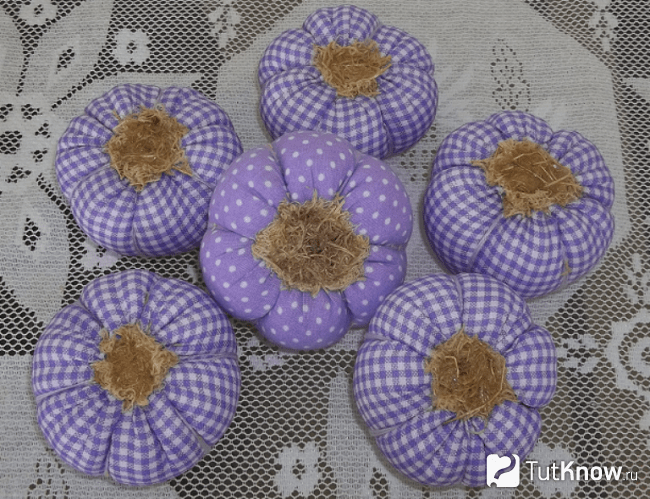
It consists of several slices, the following photo will tell you their pattern.
Based on this diagram, cut out 6 blanks, they need to be sewn into a single canvas. Sew the second side of the last piece and the first side of the first. Fill the resulting bag with padding polyester, sew it on top, tighten the thread. Sew this hole, glue or attach tow with a thread and a needle on top.
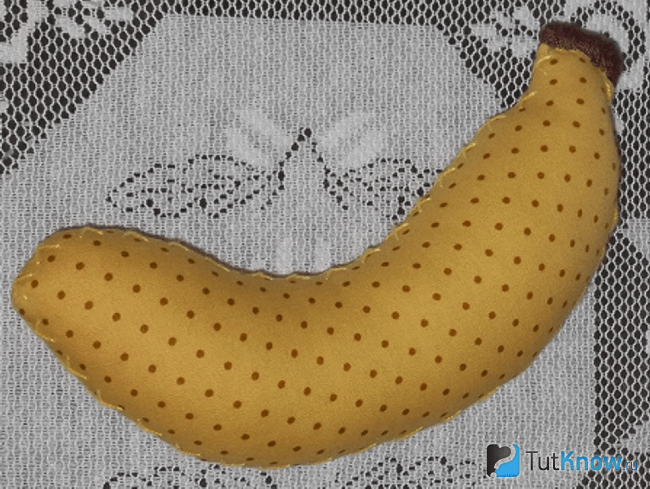
You can also sew a banana out of fabric.
For this you need to take:
- fabric of a suitable color;
- bulk filler;
- thread with a needle.

- Redraw the outlines of this fruit, attach this template to the yellow fabric, cut out two blanks.
- If you have a sewing machine and work skills, then sew both halves on it, leaving a small edge free on top.
- Through it, you will fill the banana with padding polyester. Cut a small rectangle out of brown fabric, fold it in half in the form of a ribbon, sew it here, at the same time closing this hole.
- If a sewing machine is not available, then you need to sweep both halves using a seam over the edge. Even without this tool at hand, you can still make a banana.

Looking at such bright-colored carrots, summer is immediately remembered and the mood rises. Find fabric in the right color. As you can see, you can use not only plain orange, but also small white polka dots.

- Translate this template onto the canvas of your choice. Connect the sides of this figure to make a cone. They can also be swept away on a typewriter or by hand.
- Stuff this cone with padding polyester, sew greens on top. To make it, cut a circle from a dense fabric of this color. Cut with scissors its edges almost to the middle. Raise them up, sew this part to the carrot.
- In order for the greenery to acquire the shape we need, tie it with a thread.

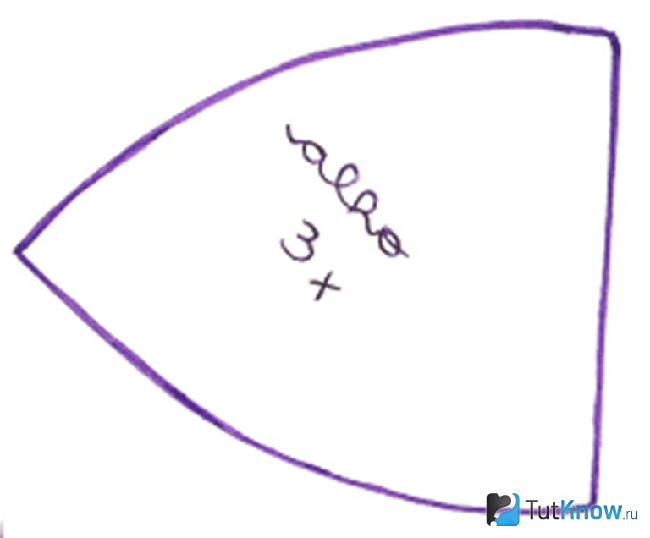
A pattern will also help you make this vegetable.

As you can see, the big part is the eggplant itself, you will need to cut 5 identical ones. A small petal-shaped form is the greens of a vegetable. Cut it out of fabric of this color. 5 identical wedges need to be sewn together to make a blank similar to a cone. Through the upper hole, you will fill it with padding polyester, sew greens here.
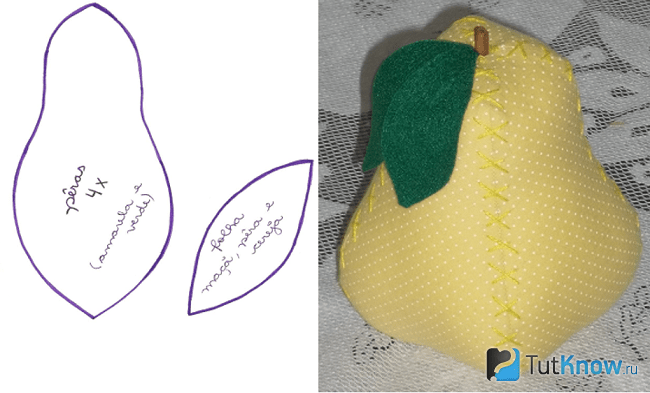
A pattern will also help you make a quince.

The main part of this fruit is a large blank, they will need 3 pieces that need to be swept away on the sides. You will make a quince tail from brown fabric by sewing 2 parts for this. Stuff the body of the fruit with synthetic winterizer, sew a tail on top, covering the junction of these two elements with it.
Here's how to make an apple out of fabric. To do this, cut out three identical parts, stitch them on the sides. Collect the resulting workpiece on top of the thread, tighten.
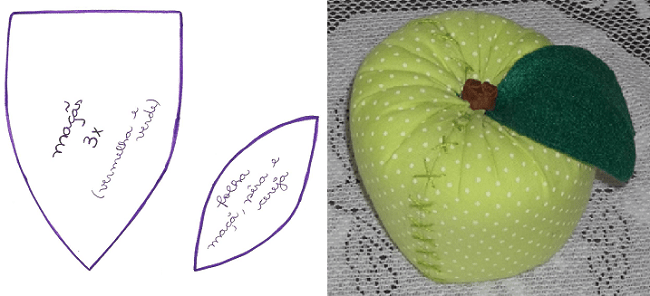
Cut a leaf from a green drape or felt, a fruit tail from a brown one, attach these details in place using a thread with a needle.
A pear consists of 4 blanks that need to be swept away. If you are doing this on your hands, use a cross stitch. To do this, first make parallel seams at an angle of 45 °, then with an inclination to the other side - seams perpendicular to them.
If you do not know how to make strawberries to add this berry to fruits and vegetables from fabric, then pay attention to the pattern.

Three parts of an almost triangular shape, sewn into a single canvas, will become a berry, if you then stuff this semi-finished product with a padding polyester, gather it upstairs, sew the greens of the berry here.
- Grapes are created in a very interesting way. From fabric of a suitable color, cut out a triangle similar to the one you made for the carrot, but larger.
- Sew this blank on the side to make a wide cone. Stuff it with synthetic winterizer. Starting from the bottom, separate small pieces of fabric together with a padding polyester, tie them with a thread to make balls.
- Make such grapes all over the surface of the cone. Sew a green drape hat and ponytail on top.

In the finale, you can add spice if you make another vegetable. A pattern is also provided for it.
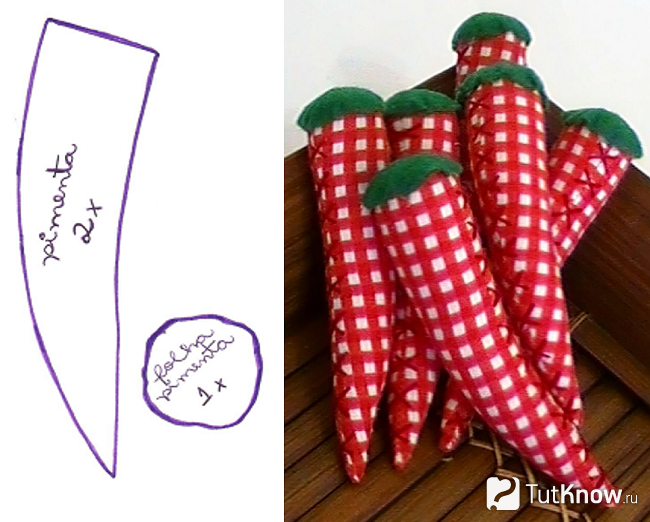
You can make hot peppers using a plain red cloth or with fasteners. Cut out two identical acute-angled parts, connect them on the sides with a seam. Fill with filler, close the place with a green cap of fabric.
Here's how to make your own vegetables using leftover fabrics, empty plastic bottles, old newspapers, or paper towels.
We hope that you will be interested to see the process of making vegetables in the presented story.
How to make a sweet, beloved by many - lollipops, is described in the second video. You will create them from plastic bottles using interesting needlework methods.