Wet felting from wool. Master Class
Master class “Felting wool jewelry”
Author: Vasyukova Svetlana Alekseevna, teacher of additional education, MBOU DOD "House of Children's Creativity"The master class is designed for students aged 10-12 years
The wonderful holiday of March 8 is approaching, and what else could please a mother more than a gift made by the hands of a child. Jewelry that we make ourselves from wool will be a wonderful gift for mom.
Purpose of the master class:
developing independence and increasing the creative abilities of children through arts and crafts - wool felting.
Tasks:
get acquainted with the technology of wet felting from wool and the history of felt making;
promote the development of imaginative thinking, creative independence, memory, imagination, attention, fine motor skills, evoke a desire to fantasize, develop a sense of composition in children;
cultivate aesthetic taste, accuracy, perseverance, patience, attentiveness, diligence.
Nomads were the first people to appreciate the unique properties of felt. They made houses, clothes (insoles, burkas and men's hats), interior items (carpets, runners, pillows), livestock equipment (saddle parts, saddle blankets and horse blankets, large felt bags for transporting goods, etc.) from wool. utensils (bags for storing tea, small dishes and other small items), bedding for newborn calves.
Felt appeared in Rus' during the era of the Mongol-Tatar yoke. Much later, about two hundred years ago, in Russia they learned to felt felt boots from wool. But in addition to felt boots, cloth was also made in Rus', which was quite popular, felt for household needs and felted hats.
So let's start making a set of wool jewelry. During our work, we will make beads and a brooch, which you can give to your beloved mother.


The first step will be making beads.
On the Eighth of March
To my beloved mom
I'll give you the sun
Golden-maned ray!
Let the ray touch
Mom's head
Kiss on the cheek
Tender and awkward!
Straight through the clouds
My playful ray
Warms mom
golden mane,
It will tickle your eyes,
Having fun playing
And mom will wake up
Smiling at the sun!
We will need:
Organza ribbon about 1m long;
combed wool for felting – about 10 g
20 plastic beads – 5 mm in diameter
bowl with soapy water
soap
towel
gypsy needle with wide eye
scissors

Step 1. Layout of wool for beads.
We take a skein of combed wool in our hand, and with the fingers of our other hand we grab the very tip of the wool fibers. Tear off a thin strand of wool.
From such strands we form a wool bead. We place the first strand on the table, the second at a right angle to the first, and so we fold several strands, perpendicular to the previous strand.
So make a soft, loose pile of wool.

Step 2. After laying out the wool for the bead, fold it into a ball.
We wrap the left edge of the strand, then at a right angle we wrap the right edge, etc.

We wrap the wool in this way until a ball is formed.

It is still quite loose and falls apart easily, and in order to proceed to the next process - felting, you will need soapy water.
Step 3. Prepare a soap solution for felting: for half a liter of water, 1 tablespoon of liquid dishwashing detergent, preferably not brightly colored, otherwise the wool will be stained.
Soak the wool ball in soapy water, squeeze out excess water and begin rolling the ball.

The first movements should be light and soft. It's like you're just rolling a ball in your palms. You can use a dishwashing sponge. On the abrasive side of the sponge, the top layer of the bead very quickly begins to fall off and harden. After the top layer of the ball has hardened, you can apply some effort and roll it until it becomes a “pebble.” The finished bead should be firm to the touch, of the correct shape, without creases.
Creases form if you begin to felt a ball that has not yet hardened, applying force. The ball gives a fold and later this fold develops into such a “scar”, i.e. crease.
Felt several beads this way.
Step 4. Let's start assembling the beads.
At the beginning of the work, we lay out the beads according to size. We place the largest bead in the center and arrange it in a mirror pattern on the sides in descending order.
We distribute plastic beads between the wool beads.

Using a gypsy needle, we make a through hole in the center of the wool ball and thread it onto the needle.

On a note. To make piercing easier, it is better to turn the bead with the needle to the right and left. This way you will avoid deformation of the ball.
Take the next wool ball and, just like in the previous step, pierce it with a gypsy needle exactly in the center. We thread the ribbon through the needle and push the needle through the ball.
On a note. The balls for the beads should be quite dense, and therefore it will not be so easy to thread the needle and ribbon with your fingers. Use pliers to make the process easier. Grasp the sharp end of the needle with pliers with one hand, and hold the ball between the fingers of the other hand.
We move the bead further away, cut the tip of the ribbon at a very sharp angle, so that it freely passes through the small hole of the plastic bead.
And in the reverse order we thread the plastic beads, alternating them with woolen ones.
Align the beads on the ribbon. Cut off the excess piece of tape. The ends of the ribbon on the cuts can be burned with matches.
The beads are ready! Well done!
Let's start making a peony flower using the wet felting technique.
Felting a flower from wool is a fairly simple process; even a person who is encountering this type of needlework for the first time as a craftsman will be able to create an amazing and bright product. The choice of flower for this master class was not accidental; peony is one of the most spectacular flowers, and a brooch in the shape of a bright flower will be an impeccable decoration for almost any outfit.
So, in order to felt a flower from wool using the wet method, you will need:
natural wool (colors: white and red);
soap solution;
bubble film;
nylon mesh;
scissors.

Step 1. Felt the petals
As with making beads, pull thin strands of wool from the combed ribbon and shape each into a triangular shape with loose fibers on one side and a fine tip on the other. Place the pieces in a circle. The first layer is laid out from the center of the circle (hand in the center).

Proceed to laying out the second layer. This time, lay out the wool along the outer contour of the circle.
To get an even felt when felting wool, try to lay out the wool evenly without gaps or excessive compaction. Remember that the wool will shrink by a third during the felting process.

Step 2. Wet the wool evenly with the soap solution. It’s good to use a bottle with a pinned cap, so the wool will be moistened evenly, but don’t overdo it, a puddle of excess moisture will only hinder our work. Cover the product with a net. After this, gently rub the fur with your palms over the mesh. The movements must be careful; the flower must be smoothed towards the center, so the edges of the flower will lie smoother. When the wool begins to acquire a denser texture, increase the pressure. You also need to periodically turn the flower over to ensure even felling.

Step 3.

Step 4. When the wool falls a little, fold the edges of the wool for a more even edge of the product. We continue to felt the flower with a folded edge
Step 5. Using the same method, we proceed to the layout of the second tier of the petal. To get vibrant shades of peony, place white wool in the middle of the red circle with white veins. Felt in the same way as the first tier.
In this step-by-step master class you will see how to make beautiful beads from wool with your own hands using the wet felting technique.
This handicraft is simple and fun; once you learn how to fiddle with simple things, you can create beautiful designer items and souvenirs. Felted wool beads ideally complement knitted clothing - they are soft and cozy, lightweight and do not leave any puffs. This decoration can be worn with an open collar or with turtlenecks. If you like voluminous jewelry, increase the diameter of the beads.
Preparing materials for felting
To felt beads from wool, buy materials and tools at a craft store:
- wool in two colors (in the master class, black and white are used as a basis, but you can choose your favorites);
- floss threads to match the wool;
- black satin narrow ribbon;
- black braid;
- gypsy needle;
- beads (white mother-of-pearl, black);
- glass beads (white, black).

How to make beads from wool
When making beads with your own hands, start by felting beads from wool. To do this, pour warm water into a bowl and press the liquid soap dispenser several times to obtain a soap solution.
Lay out a towel and start preparing the wool. Divide the wool into nine parts, because there will be nine balls. Make four white pieces, two black pieces, and three mixed colors.

To felt a bead, roll a strand of wool into a ball and submerge it completely in soapy water. Next, start rolling it on your hand, gently making circular movements, without pressing. As soon as you feel that the ball is taking shape and rising, you can roll it more intensively until the desired density is obtained.

Then rinse the workpiece under clean cold water, squeeze it lightly in your hand and place it on the radiator to dry. Make all the bead pieces in a similar manner. Mixed color blanks are also easy to make. Felt a white ball and add a black transparent strand on top. Roll out in your hands and dry.

Bead decoration and assembly
After all the parts for the beads are completely dry, start decorating with embroidery, beads and braid. In total you need to decorate four beads.
Bead No. 1
Take the white ball. Apply a pattern on both sides of it as in the photo - a cross.

Place a large bead or seed bead in the center; you can insert a song underneath for beauty.

Secure with thread and place black and white strips of beads on four sides of the cross.

Then use black floss thread to embroider the outline of the cross using a chain stitch.

After leaving a little space, use regular embroidery stitches to border the cross. Sew white beads in the empty spaces between the legs of the cross.


Bead No. 2
Embroider flowers with white thread on a dark wool bead made by yourself. Tie a French knot in the center of the flower. To do this, wind the thread four times around the needle itself and stick it next to where the thread exits the ball.

Gently pull the thread through, the structure will be secured and a French knot will be formed.

Place the petals around the knot. Form a curl from the thread and pick it up with another stitch from above.


In this way, embroider six petals. In this master class on felting beads, three flowers were created.
Bead No. 3
You will need a white bead. Using a simple pencil, draw exactly two horizontal lines on the ball. Use black thread to embroider these lines.

Fill in the inside between the lines with crosses.

In the center of the crosses, embroider another small cross with white thread. Sew beads (white mother of pearl) between the crosses. Tie French knots at the top and bottom of the embroidery.

Bead No. 4
Decorate this white ball with decorative braid. Sew it on top.

On top, create arcs of black thread, and fasten them in the center so that they do not fall apart.

Decorate the braid with white beads.

Assembling the decoration
Gather the felted beads onto a thin satin ribbon. Measure the required length of the ribbon, try it on so that the decoration can easily pass through your head, since there will be no clasp.
Thread a satin ribbon into a gypsy needle and string wool beads, alternating them by color. Insert glass elements between them and be sure to make knots on the tape for fixation.

Once you have finished stringing, tie or glue the ends of the ribbon. Original felted wool beads are ready to decorate a fashionable outfit!


We also have stylish and many other decorations in. Wear it with pleasure and feel free to tell everyone that you are the author of designer jewelry.
A master class on felting wool beads for needlewomen on the “Women’s Hobbies” website was prepared by Natalya Napolova, photo by the author. Join us on social networks to stay updated on new lessons.
Another product made from natural material - felted beads with your own hands from wool. You can felt beads for beads of one color or with the addition of another color, as in the picture.
Choose colors that suit you best with the clothes you are going to wear them with. Beads made from felted wool balls will turn out bright, but if they do not match the color of your wardrobe, then they will spend most of their time in a drawer.
Materials for felted wool beads
- Wool for felting
- About 175 - 180 cm of cable for jewelry work
- Clasp
- Bead clips (quantity depending on the number of beads, two on each side of the bead)
- Needle for felting
- Felting brush (I didn't use it)
- Soap solution (for wet felting or felting)
- An awl for punching holes in felted balls

First, you need to roll the balls with your hands and start felting them with a felting needle; I do this on a regular dishwashing sponge, on its foam side.
You can read more about how to felt wool balls using dry and then wet felting in another article:

Felting such wool balls is very simple; every beginner, even a child, can do it. First, use the dry felting method—poking a ball of wool with a felting needle, and then you can continue felting the balls in the washing machine.
To do this, I place them one at a time through a knot into the legs of old tights and, in this form, put them, along with other things intended for washing, into the drum of the washing machine. Anyone interested in all the small details of making balls for beads or other jewelry (for example, earrings) is welcome to follow the link.
In total, you need to make 9 pieces of felted beads of each size - 2.5 cm, 2 cm, 1.5 cm.
Assembling felted wool beads
When the felted wool beads are ready, you must first divide the jewelry cable into three parts, one will be slightly larger than the others - about 65-67 centimeters, the other (middle) - 58-60 centimeters, the third, the shortest - 52-54 centimeters.
Try it on yourself - you may want to make the beads shorter or, conversely, longer. If you make long beads and the head will fit freely, then you can save on the clasp.
Felted beads made from unspun wool are very dense, it is impossible to even pierce them with a needle, so we will use an awl to string them onto the cable at intervals of several centimeters.
Leave the very beginning of the cable (on both sides of the clasp) free, the distance for large beads is less - about 9 centimeters, for medium ones - 20 centimeters, and for the smallest ones - 23 centimeters.
But these are approximate sizes, and you can make your own felted beads from unspun multi-colored wool, original and completely different from these. It all depends on your imagination. You can make wool beads not round, but oval. I personally prefer the completely round ones.
Between the felted ones you can add plastic or metal beads, crocheted balls, glass beads, and beaded balls. Felted beads can be very beautifully embroidered with simple embroidery - stars, snowflakes, appliques can be made on them from fabrics with small printed patterns, and embroidered with beads.
All that remains is to collect all the beads into three parts of the cable, secure them (so that they do not move) using clamps and attach a clasp to the ends. Clips are small metal beads; they must fit freely into the jewelry cable, and to secure felted beads, they must be clamped in the right place, for example, with pliers.
That's all, your DIY colored wool beads are ready!
You may be interested in:
This is a classic necklace made of multi-colored mucaite and amber with the addition of bugles in some places between the large flat beads.
The beads are quite massive, but look very impressive, especially when paired with massive amber earrings.
I also have a matching mukaite wrist bracelet. The bright autumn colors of this stone attract attention.
To complement the felted beads, you can make earrings from the same felted balls, from one or several balls each. Or like in the photo - felted balls each in a sphere made of metal wire. They turn out to be quite large, but weightless, because felted wool weighs very little.

By felting unspun wool, you can make not only felted beads or earrings, but also brooches. Try making small round toy beads in the shape of funny animals, like the ones in the picture. They serve as the basis for our decoration on the clasp pin.


I offer a little
lie down! :)
I don't pretend
neither for the title of a large Master class, nor
on proprietary technologies, just
statement of how I do it, in
at this particular moment, at this particular moment
place (I was at the sea...)
I think it will be
interesting for complete beginners
felters just getting acquainted with wool
and felting beads is just the best
a way to understand (which I did not at one time
done - we are not looking for easy ways :)), that
this is wool, how it lives under your hands
etc...
So, let's begin...
we will wet felting beads...
We have to
will:
wool
unspun - for these purposes, in my opinion
look, absolutely any will do, better,
for your own development, do
different beads from different ones to
feel the wool, the degree of shrinkage,
the result and your attitude towards it.
Silk or
plant fibers (optional)
Sponge (for
washing dishes, foam rubber, etc.)
or a special mat or brush for
felting
Needle for
felting with notches
soap (for me
liquid is more convenient)
film with
pimples
anything
sharp, like a gypsy needle or knitting needle.
Let's take ours
wool, pulled out from the tape (wool
happens in a combed strip, in which
long fibers in strands or carded,
similar to cotton wool) small strands - I
in felting, a supporter of thin strands,
that’s why I made the beads small,
2 for each...
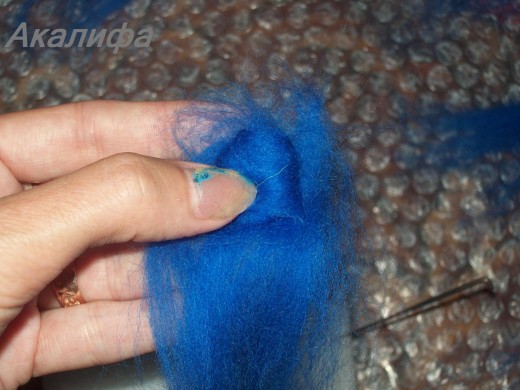
This lock
roll into a bun, starting from
edges, gradually twisting towards the other
edge like a snowball.

Then we take
second strand

and do it
the same thing, winding over ours
kolobok
Can this be a little
simplify if you initially take one
strand, but thicker, more (and even in
depending on the size of the beads
we want to receive), how, for whom it is more convenient..
It turns out that
we are such a soft, loose little bun

We repeat these
operations as many times as beads you
want to do.
Now let's go
there's a bladed weapon coming :)) Take a sponge and
a needle and a little “bait” our
future bead: slowly give injections
needle into the ball, scrolling evenly
from all sides


Next stage
- decoration of our little bun -
here you can give free rein to your imagination and
decorate as you wish, or with fibers
wool is the same, but of a different color, or
silk fibers (as I did), or
fibers of any origin
(viscose, banana, soy, bamboo, etc.,
just not acrylic - it is only for dry
felting), threads of roving or other
yarn in which at least part of the composition
natural wool. Is it possible at all?
do not decorate with anything, at least on
at this stage.
I decorated mine
beads made of black viscose fibers,
blue and yellow silk. Few of them
baited it with a needle.


All these manipulations
we spent with a needle in order to
our bead accepted more or less
fixed spherical shape and
did not fall apart into components :) with
our subsequent actions on her. But
you can do without it, if you have one
not available, just necessary later
will be more neat and smooth on
influence the bead...
Let's continue:
Let's go to the wet
business... we make some soapy water (you can
rub soap into water, you can simply
wash the piece in water or liquid soap
or shampoo, or as a last resort,
dishwashing liquid, dilute in
water, the main thing is that your hands are adequate
reacted to this soap work)
- preferably hot or warm, but
if there is no possibility, for beads it is not
so scary - and they fall down in the cold
(this is not a scarf, and not slippers :))
Lay down the film
with pimples, put ours on it
miracle buns, water them with water...

And we start very
smoothly, slowly, so as not to
deform our even pellets,
roll them on the surface, you can
alone, you can do everything at once, if possible...

Gradually,
As it compacts, we increase the pressure,
but for now we don’t torment our little kolobok (he
I’m not ready for this yet :)) Also convenient
roll it between your palms, but gently,
so that it does not turn into an ellipse (this
It’s also beautiful, but now our goal is balls)

For comparison
the photo shows the degree of collapse of our
handsome guys:

By the way, here
in the photo you can see how I have one bead
a little warped (topmost),
but it's not that scary at this stage
(under-rolling), just as it rolls away
slightly increase the pressure on those places
where there is more convexity.
Thus
we continue to roll our little buns and
make them look like beads

if you
you need beads of the same size, you need
at the very first stage (preparation
strand) tear off the strands absolutely
the same size and thickness. This is for me
there was no need, so my beads
a little different...

When our
the beads have acquired a charming
even roundness, became plump
and from their surface, when pinched, not
fibers are separated (hairs can),
let's go bathe them in clean water, in order to
to, firstly, wash them from soap,
secondly, make a contrast scent
from hot and cold water, for good measure
seals
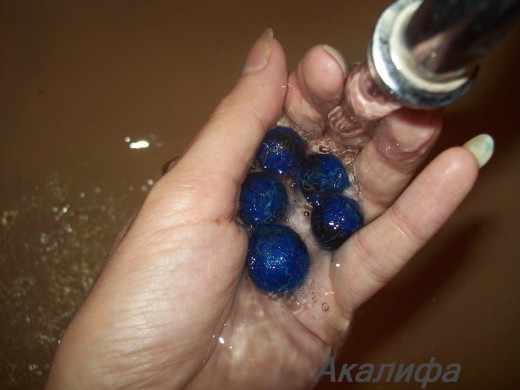
These are ours
clean, washed felted handsome men
turned out

Since I was lying around
them from Semyonovskaya wool, then they
turned out a little fluffy, with
sticking hairs, you can, of course,
leave it like that, but I like smooth ones,
usually, or I cut these hairs
I shave it with scissors or a razor (here
you have to be very careful not to shave it off
layer of our kolobok).

In this moment,
I forgot to do this, I did it a little
later, but it doesn’t matter when.
Now to
our little beads turned into beads,
it would be necessary to make holes in them - this
It’s better to do it right away, because... they are wet
are easier to pierce.
Because I was at sea
I don't have such a large assortment with me
tools, but in general you can do
it is whatever is more convenient for you: gypsy
needle, knitting needle (it’s more convenient to dry on it
immediately, the main thing is that it does not rust), etc.
I had a needle
for carpet equipment:

But since she
there was one, but several beads, I had to
suffer a little - pierce it, and
then place on toothpicks to
drying

and here I am
I remembered the model haircut for
koloboks :)
And the penultimate one
stage: put them to dry, you can
the sun, you can use it on the battery (through paper
or cloth - so as not to fry), or you can
and just like that (it will just be a little longer
dry). Then we remove from our
"drying apparatus" and admire
beads


If you did
beads without patterns or decorations,
Now you can decorate them by pinning the
use the needle itself to draw a pattern, embroider it
beads, sequins, etc.
And last
stage, completely yours: what are you with them
you will do it, your soul and imagination will tell you,
thought, etc.
It can be
and beads made entirely from such beads, beads
in combination with other beads, pendant
with 1(2,3...) such beads, pendant on
phone or keys, etc. etc., that
your imagination will tell you.
I used these beads for these beads.

I will be very glad
if my MK will help someone master
felting beads, someone does this after all
will try it and post it in the comments
Photos of your results!
Good luck to everyone in
this wonderful handicraft!!!
A humble request - If you copy my master class, please do me a favor and put a link to the original with my name!
Small beads of different shapes are the easiest way to start getting acquainted with the wet felting technique. For some reason they think that wet felting from wool is a fairly easy process, I don’t think so... Or rather: the process itself is simple, but requires a lot of physical effort...
I suggest you try to master wet felting from wool yourself - felting beads :)
For work we will need:
it is sold in handicraft stores and is not cheap...
- soap solution - take any dishwashing detergent, but preferably a simple one without any additives for your hands, in short, the cheapest one and make an aqueous solution in a ratio of 1:10 (1 - detergent, 10 - water)
- bubble wrap
- nylon mesh
Wet felting from wool - The process of making beads of different shapes
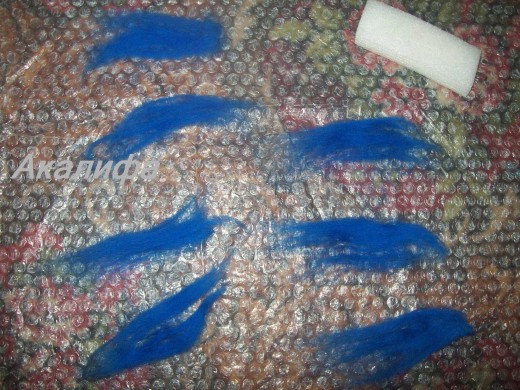
Balloons
Pinch off a small strand of wool from the skein and twist it into a tight ball, roll it a little first with dry hands, then moisten it with soapy water and roll it in your palms, first gently, then with force... as if you were rolling a plasticine ball))) The wool will become dense and will decrease in size 
Rolls and boats
Combine several shades of wool, select the desired thickness, and roll the wool into a “roll.” (in my concept “sausage”)))
Moisten with soapy water and roll the wool on the bubble wrap to the desired density (I refused to roll the sausage into pieces, so I rolled it with my hands, like plasticine))))
Rinse...Dry...Then cut the sausage...

in the first case you get a bead - a roll 
in the second, beads - boats 
Cubes
Place a layer of wool (3 cm thick) measuring 15*15 on bubble wrap and cover with a net. Moisten with soapy water and rub until the wool falls into a layer 1-2 cm thick. Rinse, dry, cut into 1-2 cm cubes... (I didn’t even try)))
Important!
After felting, all workpieces must be rinsed to remove soap!
Something like this))) Go for it, fellow handicraftsmen!)))
Materials from Diana Creative magazine No. 7*2012 were used to write this article. My photos…
P.S. After complete drying, my beads turned out to be stone... Therefore, they should be pierced for further connection at the moment of cutting...
And don't forget to leave your comment. Your opinion is important to me!
If you liked the article, then share this information with your friends by clicking the social network buttons! Just a huge request! - do not copy the entire material, please use social buttons! Do not be shy! I will help as much as I can :) An idea has arisen - Share! If you find any errors, write to us and we will fix them! I have a desire to help the blog in some way - I will be only too glad! Hosting costs money, and materials are not cheap these days... So, if possible, then help financially)))