Today in children's stores you can find a huge number of different educational toys. However, not all parents are satisfied with either their price or quality. Yes, and I want such a toy to serve longer, not bother the baby.
There is an alternative to purchased toys - things made by oneself.
First option
Such toys have many advantages that are not available in their purchased counterparts. Firstly, such a thing can be modified as many times as you like. Your toy will grow with your child. Secondly, it will be cheaper than constantly buying new things for the baby. And yet, in such an object you can put a piece of your soul, your love for the baby. While playing, he will be surrounded by your care for him.
What educational toy can be offered for a child so that it is interesting, useful, and even changes as the baby grows? Sew him a developing active book. If you make it of a special design, where you can take out the leaves and put new ones in, then your idea will last a very long time and will teach the young researcher a lot.
What do you need to prepare for your homemade?
We will need fabrics of various textures and colors, thermal applications, synthetic winterizer, interlining, rustling materials (cellophane bags), Velcro, buttons, cardboard and colored paper, laces, elastic bands, in general, everything that will help us in a creative idea is useful.
Look in your closets and stash - the fastest thing is that you will not have to buy something else in order to sew a book.
First, think over a sketch of your book, draw your plan on paper, and then start working with the fabric. Also decide on its size.
In order for the book to be disassembled and new pages added, sew loops on each leaf, or make holes in them. Now the whole structure can be assembled on a ribbon, or curtain rings.
You will need to put a layer of padding polyester into the pages to make them soft, and cardboard can be placed in the cover and one will be dense. Glue small details with interlining and stitch to the background with a zigzag. Large patterns simply cut out of the fabric and sew with the same seam. If you want the individual elements to be convex, then leave a small hole and fill them with padding polyester.
In order to build "movable" elements, you need a cutout glued with interlining, stitched to a piece of fabric, filled with padding polyester, cut along the contour, and attached with Velcro. Thus, you can make a page with elements that can be moved (starry sky, sun with clouds, numbers, letters ...).
You can make an active page by attaching the clippings to the page with a string and sewing on a string for which you can pull and release the pictures. Using this technology, you can make an aquarium page with “floating” fish, or a flower field where butterflies will “flutter”.
For the development of fine motor skills, make a lacing page. To do this, attach a picture of shoes with holes through which you can thread the lace.

Make a page with a pocket or button purse - let the baby learn to fasten and unfasten it. You can put a key on a string in the pocket.
On some pages, sew on rustling elements, or you can put cellophane into the sheets themselves. You can make any picture three-dimensional and fill it with cellophane. Using this technique, you can make a cutting-grass that rises, and a bug sits behind it. Such a game will attract the attention of the child, help in the development of fine motor skills.
You can make a page-house in which everything will open and close, and the figures behind the windows and doors can visit each other (elements with Velcro). You can also attach a cut of the top of a plastic bottle with a neck that you can screw the cap onto.
Make a page with geometric figures of different colors (circle, square, triangle).
The page on which the lightning is sewn will teach the kid to use it.

To make figures that can be moved, moved, it is better to use non-friable fabrics such as fleece, felt.
Sewn on various buttons will help the baby to get acquainted with the sizes and colors.
Elements from fabrics with different textures will develop fine motor skills of hands, attentiveness.

It should be borne in mind that children really like various hidden figures, for example, you pick up a leaf, and under it there is a bug, you open a window, and a bunny sits behind it.
So we got a book-assortment. However, you can come up with a toy with a specific plot: seasons, clothes, going to visit, wildlife, numbers and letters. Although such a craft requires time, patience and strength from you, it will be a great gift for your child.
Such a book will develop the baby, and will also be very useful on a walk or, for example, in a clinic, when, while waiting for an appointment, you need to keep the child busy with something.
Second option
This is such a big book. 10 cm foam rubber inside the pages.
A rustling tree with fruit buttons and berries hidden in grass pockets; 2 - a rustling apple, the leaves also rustle and are attached to the buttons ...
The sun is soft with rustling rays and a three-dimensional ribbon rainbow sewn on one side (Every Hunter Wants to Know Where the Pheasant Sits - to study the colors of the rainbow); a house made of soft fabrics, the door opens with Velcro and Cheburashka peeps out there.
Butterfly with voluminous wings with Velcro along the edges and with different squares; ladybug - a pocket with a zipper, you can hide something in it.
Flower with petals from ribbons of different colors; soft shiny voluminous star, with buttons around.
A ship with smooth rustling sails, you deflect them, there is a duck-captain; denim train - buckwheat inside, for fingers
The fish rustles with voluminous fins and Velcro tail, the tape is thin like algae, the buttons are like pebbles; whale - dense fabric, soft cotton fin and tail, fountain from the bag.
The back cover of the book is a side feeder. You can not sew the book, but limit the loops and tie them with a ribbon, so the book will turn out to be a transformer, and you can add or change pages.
Third option
It is easy to sew a book that develops a soft toy by yourself: sheets of a page - a double material with a layer of padding polyester - are sewn together, forming the most ordinary book, it is unusual only in that everything in it is made of fabric, and therefore it is easily erased, does not tear, and you can play with it from the moment the child began to grab something with his small hands.

The subject of applications can be absolutely any - animals, berries and fruits, cars. I made my book out of what was found at home, but there was a piece of coarse calico from a sheet. It had a funny score on it. Number and drawing. Three kittens, five hedgehogs and so on. This is what I took as a basis.
She sewed on cut-out appliqués in a zigzag pattern, somewhere she sewed on beautiful children's buttons, somewhere she added Velcro and bows.
If there is no beautiful material with different pictures at home, then you can buy thermal applications, their only drawback is the price.
 do-it-yourself toys photo. Soft book with your own hands. How to sew a soft educational book for a child." />
The main goal is to make the book bright, interesting for the child, with clear pictures, use different materials for the development of fine motor skills, it would be nice to insert a squeaker or a fishing bell somewhere, if possible, of course.
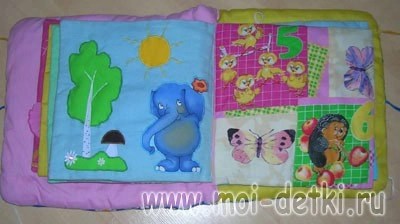
1 page - an elephant, the sun can be pulled by the rays, the flowers are put on a button with a ladybug.
2 page - a bear with a pocket, you can hide small toys, cookies and sweets for the bear in the pocket.
3 page - example 2-1 = 1 made in the form of flowers, one flower on Velcro, the second on a button. It is clearly seen that there were 2 flowers, one was removed. How much is left? Simple and understandable learning to count
 do-it-yourself toys photo. Soft book with your own hands. How to sew a soft educational book for a child." />
4 page - a pocket with two bunnies, and in the pocket there are 2 carrots. Carrots are soft, sewn on an elastic band. The tail of the carrot is “grass” threads, the carrot itself is made of orange knitwear. It is very useful for small children's fingers to feel fabrics of different textures, so be sure that all your efforts will not be in vain! You can pull the carrots, the rubber band stretches and, if you let go, the carrots scatter.
Page 5 - example 5-2=3 is made on the basis of bows. Of the five bows, two are untied, the rest are simply sewn on.
 do-it-yourself toys photo. Soft book with your own hands. How to sew a soft educational book for a child." />
6 page - three kittens and three cherries. Cherries are bright, develop color perception in a child. Cute kittens generally cause a lot of positive emotions in children. Well, besides, again, we repeat the count and how the pussies meow.
7 page - 4 ducklings and 4 pears. We count ducklings and pears, we touch small pears-buttons with our fingers. And at the same time we teach that pears grow on a tree, and ducklings quack "Quack-quack."
 do-it-yourself toys photo. Soft book with your own hands. How to sew a soft educational book for a child." />
8 page - application: an elephant (cut out of fabric (coarse calico) and sewn in a zigzag along the contour to a flannel base), fine motor skills, touch develop again. A birch tree and a mushroom are simply cut out of fabrics of different textures. Black dots on a birch trunk embroidered with black thread.
Page 9 - just 5 chickens and 6 apples.
 do-it-yourself toys photo. Soft book with your own hands. How to sew a soft educational book for a child." />
10 page - a pocket with a bone for a dog. White jersey bone, stuffed with padding polyester. The bone is sewn on an elastic band so that it does not get lost. In general, I made a conclusion for myself - as for the book, it is better to sew on all small and potentially lost objects (carrots, seeds, butterflies, flowers). Everything that is not sewn then has to be collected throughout the apartment. When I was sewing this book, such an idea did not occur to me, and therefore when my daughter started playing with the book (chewing it, sitting on it, hiding in every possible way, tearing it, etc., etc. - well, everything that a child can do in six months or a year), I had to urgently finalize the book, finish it. So there were carrots on an elastic band and a butterfly on a string.
11 page - a boat and 4 fish of different colors (children's buttons)
 do-it-yourself toys photo. Soft book with your own hands. How to sew a soft educational book for a child." />
Page 12 - 8 butterflies, one of which is Velcro, it can be torn off and pulled. As I wrote above, initially the butterfly was not sewn on a string. This is a revised version, so to speak, corrected by the circumstances. Yes, yes, after each reading of the book, try to play hide-and-seek with carrots and butterflies throughout the apartment. This is an exciting game for "bored" mom and dad.
13 page - a pocket with carrots for a bunny. Inside one of the carrots there is a fishing bell, the carrot rattles loudly, pleases the baby and develops sound perception.
 do-it-yourself toys photo. Soft book with your own hands. How to sew a soft educational book for a child." />
Page 14 - bright fruits and berries cut from fabrics that are different to the touch.
I made the cover for the book out of delicate chintz with daisies, pasted a cute Dalmatian dog on the cover and quilted it with padding polyester.
The book turned out to be voluminous and soft, you can cuddle with it, and sleep, and play. And you can also play an interesting game. For example, hide a candy or a small toy in one of the pockets of a book and ask the child to find it.
Fourth option
At the age of 0.5-1.5 years. The book is sewn from fabrics of different textures and colors, with buttons and beads, plastic napkins are laid between the pages so that they do not bend and keep their shape. Everything can be crushed, chewed, washed.
First spread:

The cat, dog ear and tongue are knitted, the mouse is fluffy, all eyes / noses / claws are beads / beads, the mustache, ear, mouse tail can be pulled, sewn on only one side. The bone is made from a tube of Blend-a-honey :)
Second spread:
The petals of the flower are also not sewn to the end, in addition, beads are sewn into them, so that you can knock on them, and they will rattle a little. The stalk and leaf are also beads of different texture. At the sun you can pull the rays. Clouds - terry towel.
Third spread:

Knitted caterpillar, velvet cherries, cuttings - beads. Butterflies, however, I confess - purchased applications, but beautiful and bright.
Fifth option. Educational book - Numbers

The number of flowers on each page corresponds to the number. Each page has rustling cellophane. Thanks to this book, a child at 2 years old learned all the numbers!

Sixth option
The book consists of 12 pages and a cover.
The total size of the book is about 25x25 centimeters. The edges of each page are finished with a colored satin bias ribbon. The cover of the book fastens with a buttonhole. inside pages and covers - sintepon.
Cover (front side) - the bunny is made in the form of an appliqué (cut out a pattern from printed cotton), the inside of the cover is an appliqué with a teddy bear.
Page 1 A girl in the form of an appliqué made of colored pieces of fabric, embroidered parts of the face, a voluminous nose, filled with padding polyester, beads-earrings are sewn on the ears. The hair is made of yellow braid, sewn on so that you can weave braids, you can learn to weave a ribbon. A button in the form of a shiny handbag or purse is sewn on the palm, a thermal application - a kitten - is glued next to it.
Page 2 Lilac page with counting elements - beads, a buckle, a ribbon and a clip on a cord for training the muscles of the fingers.
Page 3 The slipper is made in the form of an applique, you can learn how to lace up.
Page 4 The blue flower is made in the form of an appliqué, leaves on the fly from a satin ribbon. You can count, study colors.
Page 5 Tulip with a bee. On this page, the tulip is sewn so that it is empty inside and you can hide a bumblebee there. The bumblebee is sewn to the braid. The sun is made of yellow fleece, the clouds are made of white fleece with Velcro, they can be detached. A small butterfly, white flowers and strawberries are embroidered decals.
Page 6 Page with a penguin. All page details are applications. Penguin - embroidered thermal application.
Page 7 Sea. The ship is made in the form of a pocket - you can "transport" your favorite toys, it moves left and right along a satin ribbon on the "sea horizon". The sea is made in the form of a pocket in which fish lie - separately sewn parts, 2 shells, in the middle of one pearl - a large mother-of-pearl bead. Shell on the button.
A seahorse button is sewn in the foreground.
Page 8 Tree. A synthetic winterizer is inserted into the crown of the tree for volume. Buttons are sewn on the tree - apples. (from can be counted), on the grass - flower buttons. Butterfly - a separately sewn piece with Velcro.
Page 9 Christmas tree with synthetic winterizer inside for volume. A star button is sewn on the top of the Christmas tree. Toys - colored plastic sequins. Next to the Christmas tree, a bunny is a separate detail on a button and an application-gift.
Page 10 Snowman. All parts of the snowman are made of white fleece with Velcro. You can collect a snowman. Month - yellow fleece. snowballs - thermal application.
Page 11 Present. Gift applique with zipper, satin yellow ribbon can be tied into a bow. Put something inside the pocket.
Page 12 Semi-flower. Petals from multi-colored pieces of fabric. on Velcro. You can learn colors, or you can play a game: make a wish and tear off a petal.
The inside of the cover has a pocket with a button. The back side of the cover is an application with an apple.
Seventh option


Eighth option
Pages 30X20, batting inside.
1. COVER. The words BOOK and FOR are lace, the name is embroidered with beads. And a little embroidered with ribbons, for the first time I decided to try.

2. SNAIL- inside the shell are beads, you need to roll them with your fingers.
3. FLOWER- a bee hides, a butterfly and a spider under the leaves. The leaves rustle.


4. BUTTERFLY- turns into an impudent caterpillar or vice versa. Wings rustle, inside the package.


6. 7. GIRL and BOY we study the fasteners, braid the girl's braids.


8. LADYBUG AND BUTTERFLY. Butterfly flies from flower to flower, ladybug also tries to fly away.
9. HEDGEHOG. Carries stocks - on Velcro.


10. RUKOVICHKA. We stick the handles, hide the little differences. Raccoon - application.
11.BOOT there should be lacing, the workshop does not work on weekends did not install eyelets.

12 POCKET. The last page for differences, sweets. Learning to deal with lightning.

Ninth option

I made this soft educational book as a gift for my friend's son. The book is made of separate pages with eyelets, you can play with each page separately. All pages are soft - inside is a synthetic winterizer.
On the first page there is a pocket with a zipper. The basis is chintz, the pocket is coarse calico.

The next page is the house. Smoke from the chimney - soft fluffy threads for knitting. Windows and doors are closed with Velcro. Materials - coarse calico and chintz.

A bear is hiding behind the window, a monkey is hiding behind the door.

The next page is a flower. Petals - different fillers - buckwheat, rustling bag, beans, holofiber. Material - coarse calico, flower - satin of different colors.

The next page is a butterfly. The butterfly has a soft body (inside the holofiber), sewn to the page only with the back, the head is not sewn, the horns are ropes, the wings are sewn only on the back, they are bent, buttons of 3 colors are symmetrically sewn on the wings - learn colors, look for the same. Material: butterfly body - satin, wings - chintz, reverse side of the wings - teak. The base is blue calico with flowers and butterflies. On this page you can count butterflies, count buttons on wings, look for identical buttons, get acquainted with the concepts of big-small, symmetrically (buttons on wings)

Velcro flower next to the butterfly.

The next page is the Christmas tree. The basis is chintz, the Christmas tree is coarse calico, a bag with gifts is knitwear, applications are flannel.
Multi-colored buttons are sewn on the Christmas tree, on the top - a button with an asterisk, a rope with buttons and beads - you can sort it out with your fingers, on the branches - rings (small for curtains, sold in the household), learn to lace. Another fluffy "sparkler". Drawstring gift bag. Velcro applications cat, mouse and dog dance under the Christmas tree. On this page, you can search for the same buttons by color, shape, learn to lace up.

The last page is a snail. The base is coarse calico, the body of the snail is leatherette, the eyes are buttons, the mouth is embroidered, the shell is material for curtains, smooth, inside the shell are beads of different sizes (two circles), in the middle is a button. Beads can be driven around with your fingers.

Cover - calico with a picture from the cartoon "38 Parrots".
The book closes with Velcro.

When studying with a book, you need to pay the child's attention to the color of the parts, their position (top, bottom, right, left, inside, outside, etc.), material properties (smooth, rough, soft, etc.).
Playing with the book, the child will get ideas about color, develop fine motor skills, tactile perception (toy parts are made of fabrics of different textures), attention, speech, imagination, and all this, of course, with the help of a loving mother.
Developing book for kids with their own hands.
Author: Rak Anna Vasilievna, primary school teacher, Gymnasium No. 1, Millerovo, Rostov RegionMaterial Description: I bring to your attention a description of a soft developing book that you can sew with your own hands. This material can be useful for mothers of babies, grandmothers and caregivers working with babies (mothers can be involved in the work).
Target: all-round development of the child.
Tasks:
develop fine motor skills,
develop the thinking, speech of the child,
cultivate love for mother, grandmother.
Since childhood, we have all heard the phrase more than once: “The best gift is the one that is made with your own hands.” You can disagree with this, but a bright and joyful period is coming - you have become a mother or grandmother. Among all the pleasant troubles, the question arises of where to get good, harmless, useful and educational toys?
I answer: sew with your own hands!
Pros:
environmentally friendly materials (after all, we take natural fabrics for work),
safety (all fragments are soft),
positive energy (so much love is invested!),
developmental purpose (each fragment with some kind of task).
Minuses:
I didn't find them.
When my grandson was born, I decided to sew him a soft educational book. Before starting work, I drew future pages, thought it over, prepared the necessary materials - and this is what I got:
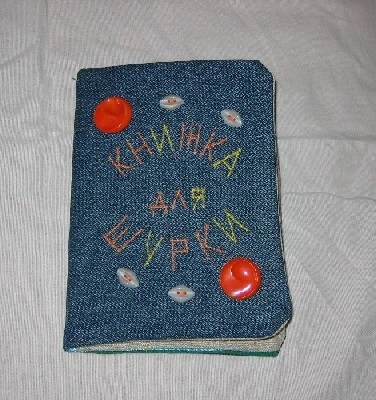
1. This is the cover of a book. Artyom really likes that the book bears his name. The thermal sticker is attached with an iron, the letters are sewn on a sewing machine.
2. We unzip the “zipper” on the boot - a mouse lives inside (it lies freely, not sewn). The toe of the boot is on the Velcro fastener.

3. The shoe will help the child learn how to thread the lace into the holes. The boot mouse loves to get into the boot.

4. The pyramid can be disassembled and then assembled (all fragments are Velcro). The top element on the big button.

5. The wheels of the truck are double-sided, fastened with buttons. The driver and passenger periodically change places.

6. Butterfly, apples and fungus are fastened with Velcro, the hedgehog's prey can be swapped.

7. A worm lives in an apple under a leaf - you can get it by turning the leaf away. The butterfly was once a caterpillar - this is the body of a butterfly, it can be separated by pulling it up.

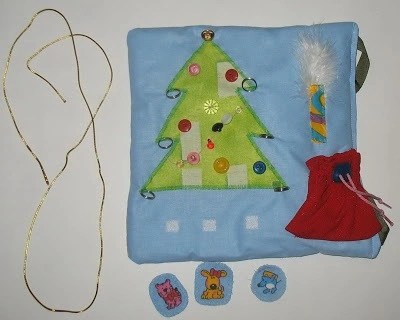
8. Merry Christmas tree, Santa Claus, Snow Maiden and a bag with gifts. Each element of the Christmas tree is Velcro, you can put a small souvenir, sweetness in the bag.

9. "Make" a snowman. Each lump is separated, they are on the buttons. The broom can be picked up by pulling it up.

10. The pocket on the last page (on the cover) is not without reason: so that the details that the child separated are not lost, we put it in it.

Now my grandson is 4 years and 3 months old. He loves his book very much and periodically “rereads” it. Fine motor skills develop, attention develops, speech develops, and we, looking at him, rejoice.
A fabric educational book is an interesting and useful gift for a baby. It is not at all necessary to buy it for a lot of money, you can do it yourself. To do this, you do not need to be a professional seamstress or an enthusiastic needlewoman, sewing such a thing on your own is very simple.

About the benefits of developing fabric books for children
Such a book is able to captivate the baby for quite a long time, which the mother can devote to herself or homework.
Such books, unlike cardboard or paper ones, can be crumpled, twisted, tried to gnaw, wet - absolutely nothing will happen to them. If necessary, they can be washed and ironed, and the book will serve for a long time.


For sewing books, various fabrics are used, such as fur, felt, or various fillers, for example, cereals, rustling candy wrappers, bells. This contributes to the development of tactile sensations of the baby.
Thanks to many details, such as laces, lindens, zippers, buttons, buttons and others, fabric book promotes the development of fine motor skills and teaches the child to independence. In the future, the baby can easily button up a jacket, shirt, tie a knot, etc.


With this wonderful educational toy, you can learn colors, counting, letters, seasons, day-night, big-small concepts, geometric shapes and much more with your little one. Here everything will depend only on your imagination.
You can take such a sensory book with you anywhere, and the child will be busy with useful work when it is necessary to behave calmly.


At what age should it be used?
Fabric books must be made according to the age of your child:
- Children under 1 year old can only be offered options in which there are no small fastened parts.
- Starting from the age of 1, you can already place large parts on the pages that can be removed and attached back, for example, on lindens.
- At the age of three, the content of the pages can expand. There are already a lot more various fasteners and fasteners here, simple games that can be played together, role-playing games in the form of a fairy tale, may appear in the plot of the book.
- Children of older preschool age will like a more complex option that develops logical thinking. Here you can place a finger theater based on a specific fairy tale or cartoon, complicated games and tasks.


materials
For sewing a children's book from fabric, natural materials are used - felt, fur, leather, woolen threads, chintz, silk, linen, etc.
It is better to choose bright colors (red, blue, green, purple, white, black, etc.), they are more attractive to children, especially young children.
Make sure that the color of the plot matches reality. For example, a dog cannot be blue, and the sea cannot be yellow.
Choose the right pattern for the fabric. If balloons can be "flowered" or "peas", then for spruce you need a plain green fabric, the pattern in this case will be inappropriate.


You may also need:
- cardboard;
- synthetic winterizer;
- cotton wool;
- threads of various thicknesses;
- ribbons of different colors and widths;
- different types of fasteners - lindens, magnetic buttons, zippers, buttons, etc.
- fabric applications;
- beads;
- laces of different colors;
- rustling candy wrappers;
- cereals;
- small stones;
- bells.
Your imagination, shown when creating the layout of each page, will tell you what else you need to purchase.
For information on what materials can be used to sew educational books, see the following video.
How to get started?
Before you start sewing a book for your baby, you need to:
- Consider the number of pages.
- Show your imagination and work out in detail the plot of each page;
- Think about what each spread of the book will teach the baby, and what elements are needed for this.
- Choose the shape and size of the future book. The easiest shapes to sew are square or rectangle. For those who have sewing skills and are confident in their abilities, you can choose more difficult shapes - this is a circle, oval, boat, flower, sun - it depends on your imagination, sewing skills, the thematic content of the book.
- Decide how the pages will be attached to each other - you can mount on ribbons, strips of felt, using rings or laces. The most comfortable size is approximately 20 cm wide and 25 cm long.
On small pages, you will not be able to place all the material that you would like, and looking at large pages, the child will get lost, get tired quickly, and attention will be scattered.


- Select or draw patterns yourself that you will need. There is no need to look for any specific patterns for your book, you can even use children's coloring books.
- Calculate approximately how much material and various decorative elements you will need for tailoring. Get everything you need.
- Take your free time to create a unique book for your beloved child.


Walkthrough and Basic Principles
The principles of sewing books from fabric are the same, only the content of the pages changes:
- In order to sew the pages, you will need to cut them out of the fabric and sew them on three sides (in case you chose a square or rectangular shape).
- Next, we fill the resulting pocket with material for sealing - it can be thick cardboard, foam rubber or synthetic winterizer - and sew the pocket.
- The design of pages and covers is more convenient to do until you have sewn a pocket, that is, on the felt cut out for the page. On it you sew applications and various details in accordance with your idea.


- At the stage of decoration, fasten various accessories, ribbons. Then two sheets of felt are sewn together so that the wrong side is hidden.
- The algorithm for sewing a book cover is approximately the same. The difference is that you need to leave a supply of felt for the spine, the size of which depends on the thickness and how many pages you will make. Do not forget that the cover should be denser than the pages. To do this, if you are sewing a book out of felt, you can fold it in half.


Master Class
We offer you a master class on sewing a simple book.
You will need:
- 11 sheets of felt 20*20 cm in size for sewing pages and 20 sheets 15*15 cm in size for details;
- needles and threads, the color of which should be matched to the page and details, pins;
- magnetic buttons - 5 pcs;
- buttons for decor (butterflies, birds) - 10 pcs. It is better to choose buttons made from natural materials, such as wood.
- 6 beads in black and white;
- 2 white flat buttons and 6 black buttons;
- hat gum will need 1 m of black and 1 m of purple;
- 50 cm black and 50 cm white Velcro tape;
- simple buttons - 4 pcs;
- 20 g of holofiber as a filler or you can use a synthetic winterizer;
- 15 cm of ordinary rep tape;
- 1 m each of blue, white and blue zigzag rep tape;
- zipper: 15 cm and 20 cm.

Here are approximate calculations for sewing a sample book. It is better if you have the necessary materials with a small margin (felt, ribbons, Velcro, holofiber). Depending on the desire or the availability of the necessary materials in stores, you can easily change them.
For sewing pages, use the above algorithm. In this case, it does not change. Seams can be done by hand or with a sewing machine.
The elements attached to the pages are sewn separately.
If you sew with your hands, then choose a “needle forward” seam for removable elements, “behind the needle” for elements that will be sewn on, and a “loop” seam for processing pages.

When sewing elements on linden, it is better to sew the part on which there are hooks onto removable parts, and the soft part of the linden to the page itself. It will be much more convenient to use the book, because if the book closes without removable parts, its pages will remain safe and sound.

If you want to make the pages more rigid, you can use thick cardboard or tarpaulin, rather than padding polyester. We will fasten the pages to each other with the help of felt, cutting it into strips. Patterns in this version are very simple, we draw them by hand.
The first cover of the book will look like this. On it we have an inscription and a cute lamb, as well as a button for fastening the book.

On the first page we have a flower and ladybugs that are attached to it with magnetic buttons. With the help of this page you will learn colors with your baby. It is also well suited for consolidating counting skills from 1 to 5.

A big ladybug settled on the second page. Its wings are connected by a zipper, and under them there is a pocket where you can put the ladybugs from the previous page.

A beautiful apple tree grows on the third page. With the help of a linden, flowers or apples are attached to it. This apple tree will help you learn with your child the stages of tree development and the seasons (spring, summer). You can complicate this page if you first make a large pocket where you will put removable elements, and sew only the trunk and bare branches on top of it, the foliage will also be attached with a linden.
In this case, you will need two options for the crown of the tree - spring and autumn.
So you will expand the developing possibilities of this page. In spring, green foliage and flowers will appear on the apple tree, in summer apples will grow instead of flowers, in autumn the foliage will change its color to yellow, and by winter it will fall off.

On the next page, we will house a cheerful hedgehog harvesting. With the help of Velcro, you can attach mushrooms or apples from an apple tree to its needles.

On the second, a jellyfish will swim in the sea. Instead of tentacles, we sew multi-colored ribbons and beads on the hat elastic. We sew the sea in the form of a pocket and we can release tenants into it, with whom it is worth introducing the child before that.

On the cover we make a pocket with a zipper for removable elements and embroider the contours of the pyramid on top. We sew the details of the pyramid separately and attach them to the contours with the help of a linden.

An interesting book for your baby is ready! She will surely become one of his favorite toys, because she was made by his beloved mom!
Toys for children should be not only beautiful, but educational and safe. These toys include fabric books. They help children acquire useful skills, since there are many separate developmental elements on the pages of such a book.
To make a book you will need:
- Cardboard;
- Scissors;
- Needle;
- Threads;
- Buttons;
- beads;
- Colored fabric.

As a basis, you can use cardboard folded with an accordion. So you can not be afraid that the pages will come off and fall out. We will give as an example a master class on creating a cover for a fabric book with your own hands.
First you will need to cut out two thick cardboard rectangles for the outer covers of your book. They need to be covered with a suitable fabric or felt, decorated according to your taste and idea.
For the pages, you will also need to pick up thick cardboard, but it should be thinner than the cardboard for the cover. The height of the pages should be the same as for the cover, and the width can be calculated by multiplying the width of the cover by the number of pages you need, plus two more pages to glue them to the cover. Cardboard pages can also be pasted over with felt or covered with fabric, as you wish. After the cover is ready, you can start decorating the pages of the felt book with your hands.
Developing book for children with their own hands. How to make.
What colors to choose for the design of a book made of fabric

Educational fabric books are created in order to teach the child important and necessary skills, so choose clean and simple colors for decoration. Let it be red, blue, green, yellow, pink, orange, purple. Based on these colors, you will teach the child to recognize them, so it is better to make sure that the baby does not get confused.
One page in the book can be sewn on or glued on Velcro multi-colored geometric shapes, then you can teach your baby to recognize shapes and learn colors with him at the same time.
What ideas to use for decorating a fabric book

We will give a master class on creating pages for a felt book. Of course, it will be interesting for kids if you use buttons, buttons, snakes, ribbons and other things that develop fine motor skills of hands.
On one of the pages, you can sew or attach snakes, buttons, buttons, carabiners, Velcro, laces. Let your child practice fastening and unfastening these useful devices. You can use the pocket tutorial to make the pockets fasten with buttons, snaps, and Velcro.
To fasten circles on buttons, not one, but several, the kids will really like this opportunity. On the page, you can sew an impromptu sketchy sneaker and try to teach children how to lace up.
On another page, you can use a master class on creating balls and pyramids of felt puzzles with your own hands. For example, to make a puzzle ball, you will first need to start with a pattern. Cut out a circle from paper that fits you in diameter and cut it into 4. Take colored felt and cut out each piece from it. Sew Velcro to the place where the circle is attached to the page, also sew the counterpart of the Velcro to each part, and now your puzzle is ready.
A master class on creating a pyramid will be very similar to a master class on creating a circle puzzle. It will be necessary to cut out the details of the pyramid, let them be 3-5. Each detail will need to be made in the form of a rectangle, you can sew felt pads and fill them with cotton wool. Then you will get a beautiful interactive toy, you will need to sew Velcro on each detail. On the page of the book, you also need to sew the mating part of the Velcro.
A good option for an idea would be to use ribbons to decorate a fabric book with your own hands. To be useful, educational cloth books must teach something. So you can sew three ribbons on the page of the book. You can show your baby how to braid a pigtail and he will be able to repeat this workout with his hands.

On the felt page, you can make a sign in which the child will learn to count. The simplest master class is to cut out numbers from felt and sew them to the page. Pull a ribbon near each number and put on each ribbon the number of beads corresponding to the number. It will be very convenient to use such a developing book, made by yourself, when teaching your baby to count.
On one page, you can make a small garden with fruits and vegetables. You can sew vegetables and fruits from felt with your own hands, or you can stick photos of these fruits and vegetables on Velcro. For children, such a page will be very useful, so they can easily remember the names of vegetables and fruits.
Instead of a garden, you can make roads with cars or a sea with boats. the master class for creating such pages will be the same as the others - you will only need felt and Velcro, as well as a little of your own imagination.
The pattern of a boat or a bus is very simple. You can find a photo of the object you need and simply print it, cutting it into important component parts. If this is a boat, then it will be sails, anchor and sides.
You can make an educational game of hide and seek with a baby on some page. For example, you may find this tutorial helpful. Cut out a cap or hat from felt. Sew it on so that the hat can be lifted up. Under the hat you can hide the eyes, smiling mouth and hair. You can use a photo of the eyes and other ideas. If you use this master class, you will delight the children and they will be delighted.
Educational book made of fabric and felt. Handmade
Little children are very fond of soft educational books, on the pages of which great discoveries await them. They get acquainted with animals, plants, develop color perception, imagination, fine motor skills, solve fun puzzles for attention and quick wits. This is the perfect study guide - it can not be wrinkled or torn and you will not want to part with it.
A developing soft book can be devoted to any one topic, or it can be a collection of various game stories. The more books your child has, the better. If you know how to sew at least a little, you can easily create several of these books with your own hands.
If you have no idea where to start and how to sew a developing book, a master class will help you. To do this, you will have to put a lot of time, work and effort, but how much joy the baby will get when he picks up your wonderful creation! And how much fun you yourself will get from creating stories, games and interesting ideas!
Materials and tools
You will need a lot of materials for a developing book with your own hands. You can find something in your stocks, and you will have to buy something in the store. Approximate list of tools and materials:
- Sewing machine, sewing threads, wool and floss, sewing needles.
- Pieces of fabric of different sizes, colors and types.
- Sintepon for stuffing soft parts.
- Braid, ribbons, cords, beads, beads, buttons, bells, clasps and other trimmings.

Operating procedure
The principle of sewing soft books with your own hands is always the same. Only the creation of plots and design differ. The general algorithm is:
We cut out double or single pages from the fabric, sew them on three sides, put in a padding polyester and sew up the fourth side.
On the pages, depending on the theme, we sew plot applications in the form of animals, flowers, vegetables, berries or fruits. It can also be trees, numbers, cars, houses and everything that you have planned to display in your book.
We complement the plots with bells, butterflies, small soft toys and other decorations that help in various game situations.
We sew the finished double pages in the middle of the product, and we fasten the single pages together with the help of eyelets, ribbons or laces.
Helpful Hints
There are a few secrets that will help you sew a book with your own hands:
- Try to choose only natural fabrics for your baby.
Fill the small details of the book with rustling material. Children are very fond of rustling toys. - Characters, flowers, fruits that you want to place on the pages can be cut out of fabric with a cartoon plot, or you can buy ready-made applications in the store.
- To make it interesting for a child to play with your book, try to make educational elements interesting. Let them unfasten, take out or untie.
- We bring to your attention interesting workshops on sewing developing books with your own hands. We prepare all the necessary materials and start creating!
A soft bunny with a cute bow settled on the first page. There is rustling material in one ear, and a small bead in the other.

On the second page - a bunny garden with a basket. The kid can harvest in a basket, and when he grows up a little, he will learn to count carrots.
On the third page, a flower grows, in which a bee lives with buckwheat inside and a caterpillar. When the baby pulls the bee, the caterpillar connected to it crawls into the flower.
A butterfly lives on the fourth page. Her body is tucked under an elastic band. This is a chrysalis that, when put in place under an elastic band, turns into a butterfly.
The fifth page is devoted to toys. The pyramid consists of sticks of different lengths with Velcro. The child will develop motor skills by disassembling and assembling the pyramid. On the sixth page, a bear sleeps. It can be laid to sleep, covering with a blanket.

On the covers, on the one hand, a pleasant to the touch sun shines, and on the other, a velvety moon with an inserted cord and stars hanging on it. They can be pulled in one direction or another.
We will need: cotton fabric, synthetic winterizer, threads, ribbon, braid, lace, buttons, beads, small toys and accessories.
Operating procedure
Step one: for a two-page spread, we cut out two rectangles measuring 15 cm by 30 cm from the fabric. We fold the rectangles with the right side to each other and sew on three sides. We turn out and insert the rectangle of synthetic winterizer. We sew the fourth side with a hidden seam. We sew the part around the perimeter on a typewriter or manually. In total, we make two such reversals.

Making a fleece bunny. Cut out a circle (head) and sew with a blind seam. For the ears, we cut out four parts, which we sew together in two, turn inside out, fill with rustling material, lay a bead and sew to the head. We embroider eyes, a mouth, we sew a bow and buttons.
We make a sleeping bear in the same way as a bunny. We sew him a nightgown. From velvet fabric, sew a blanket to the bottom edge of the page. We attach Velcro to the top of the blanket.

Step two: make the cover. Sew on the loops of the braid, as shown in the figure. We twist the crocheted lace into a spiral and sew the eyelets on top with a hidden seam. It got sunshine. On the back cover, we cut out a month from the fleece, cut through it and overcast two loops. With a hidden seam, we sew the month to the cover and thread the lace with stars through the loops.
Then we make a page with a carrot. We cut the orange fabric with cones and sew five carrots, filling them with padding polyester. We sew the top of the carrots together with green fleece tops. We sew an elastic band and a basket of brown fabric onto the page. For the pyramid on the page in the center we place a sticky tape. We sew sticks, to which we attach Velcro from the bottom side.

Step three: make a flower meadow. We cut out a flower, a twig and a leaf from the fleece and sew it with a hidden seam. We do not sew up the top of the flower, a bee will live there. At the bottom of the flower we leave a small hole for the lace with the caterpillar. At the bottom of the page we sew grass from the braid. We cut out the butterfly and sew it on, as shown in the diagram.
We sew a bee from yellow velor, decorate it with black braid, sew a lace with a caterpillar to it and place it in a flower, stretching the caterpillar out through the lower part of the flower. We sew a butterfly chrysalis from white fleece, embroider eyes on it and attach it to the page with an elastic band. We decorate the clearing with buttons in the form of flowers and a ribbon bow.
Development book page - master class

We will need: red fabric, colored threads, buttons, buttons.
Operating procedure:

- Cut out a page of fabric measuring 20 cm by 20 cm.
- We draw a sketch on paper, then transfer it to tracing paper and cut out templates from it for transfer to fabric.
- According to the templates, we cut out a vase, an apple, a tomato and a strawberry from the fabric. We make loops on an apple and a tomato. Crochet cherries and sew buttons to them. We also attach a button to the strawberry.
- We sew a vase, buttons and buttons onto the page. Then we connect the finished page with the back half of the page, sew them on three sides, turn them inside out and fill them with padding polyester.
- We sew the fourth side with a hidden seam. On the side we punch two rivets for lacing the pages.

DIY educational book for girls - master class
We will need: colored fabric, multi-colored threads, buttons, beads, a lock, wax crayons.

We sew page spreads, as shown in the first lesson. We make a cat applique on the cover and cut out the letters of your child's name. We sew all this, as shown on the cover. On the first page we place the application of a ladybug. In its middle we make a pocket with a lock, in which her children will live.

On the second turn, we sew on the application of a girl with a long braid, which the baby, playing, will braid. On the second half of the turn we sew a handbag with a pocket. On the next turn, we have an application of a laundry basin with a pocket and a clothesline stretched between the trees.

We make clothes with Velcro so that the child can take off and hang up clothes. On the next spreads, we sew the rest of the applications, as shown in the figures.
DIY educational book for a boy - master class
We will need: colored fabric, small sponges, buttons, felt-tip pens.
Operating procedure:


- We sew the pages of the book in the same way as in the first lesson. The size of the book will be A3.
- We cut out cars from sponges, glue button wheels to them and color them.
- On each turn, we alternately sew the highway with pedestrian crossings in the form of numbers 1, 2, 3, 4 and 5, as shown in the diagram. For cars with Velcro we designate a parking space.
- On the back cover, glue three rows of Velcro tape. This will be the garage.
- We design the book as you wish.
A few ideas for interesting and informative pages of a developing book
On this page, the kid will be interested to learn how animals are treated.

The little boy will love to play fireman.

A very good idea for a developing book is a home farm.

Having mastered your first master class and gained experience, you can easily sew such a soft book with a pen, as in the photo above.
A few more great options for developing pages.

Sewing a developing book with your own hands is a huge field for your imagination and creativity. We hope that after passing our master class and being inspired by our ideas, you will be able to create bright, funny and instructive books for your baby.