Before new year holidays many parents, as well as kindergarten teachers and school teachers, ask topical issue: how to make an outfit for the main New Year's hero with your own hands. You can buy ready carnival costume in a store or order a tailoring of a New Year's dress in an atelier. But this is not always financially beneficial, and there is no desire to buy a cheap and low-quality Morozko or Santa Claus outfit, which is sold in every supermarket. Children are unlikely to believe in such a magician, and Christmas story will be corrupted.
Components of an outfit
First, let's figure out what parts the decoration consists of: a fur coat, a hat, mittens, a bag with gifts, a magic staff and a white beard with a mustache. Of course, the main and rather complicated part of the outfit is a fur coat, which must be sewn exclusively according to patterns. By the way, if you are smart, you can use the pattern of a bathrobe with long sleeves or an old coat of the simplest style.
New Year's decoration pattern
Before sewing a fur coat and hat for Santa Claus choose a short pile fabric first. It could be, for example:

To finish the fur coat and hat you will need:
- white fur;
- batting;
- synthetic winterizer, which can be replaced with a beautiful white fabric.
Fur coat for the main character
 Usually this role is entrusted to men, but women often have to dress up as a grandfather. The fur coat is worn over clothes, so the size will be approximately 50, 52, 54. Yes, and the grandfather of size 46 will seem ridiculous, but he must be omnipotent. So, you will need a lot of fabric. First you need to take measurements with a centimeter tape from the one for whom you need to sew a Santa Claus costume. Then you need to carefully study the selected pattern and make sure that it fits in size.
- a piece of chalk or a remnant of dry soap;
- rulers and centimeter tape;
- finished, cut pattern.
Then you should cut the fabric, leaving allowances for the seams of about two centimeters.
The fur coat is sewn from five parts: two front shelves (right and left), back, collar and belt.
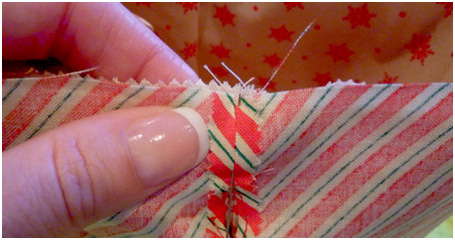
 After the parts are cut and cut, you can begin to connect the parts. First you need to sew on the shoulders two front shelves with a back, then sew the side seams on the wrong side. All seams must be processed on a typewriter with a zigzag, overlock or special scissors, so that subsequently the edges of the material do not crumble and do not diverge.
Separately, you need to sew the sleeves and process the seams. Then the sleeves need to be sewn into the armholes of the fur coat. The main thing is to do it right so that the sleeves fit correctly.
When the main part of the coat is ready, it remains to sew the collar, tailored from white fur or any other fabric. You can also cut and sew a collar from the same fabric as a fur coat, and then sew fur on it.
The last detail of the dress is a belt (sash), it should be wide and long so that it can be circled around the waist twice and tied in front. To cut out such a belt, a special pattern is not needed, you can cut out a part in size, twenty centimeters wide, taking into account allowances for seams and three meters long. If you only have short pieces of fabric and no length is left, make a sash piece from several pieces and sew them together.
Then the resulting sash blank must be folded in length exactly in half, carefully bend the edges inward and stitch the entire detail on sewing machine. Your belt is ready, its ends from two edges can be decorated with white faux fur, fringe or fabric.
Christmas hat for Santa Claus
 After the coat is ready, you can do sewing a hat to dress Santa Claus.
For this you need a pattern. Use a measuring tape to take measurements from the person to whom the item is intended. If you are sewing for a child, all measurements must be taken from the baby, for an adult outfit - from an adult.
When the size of the selected pattern is ideal, then it can be transferred to matter. It is necessary to transfer to the fabric with the desired dimensions.
The hat consists of three parts:
- top part;
- band.
 After finished pattern transferred to the fabric from the wrong side, you need to cut out all the details, not forgetting about the allowances for the seams. Then you need to sew the top of the cap with the bottom. In order for the hat to keep its shape, a band of starched cotton fabric or cardboard, thick paper should be sewn on. At the end of the work, the hat, like the collar of a fur coat, must be decorated with white fur or fabric.
If you are preparing Morozko's magic decoration for a class or kindergarten, an indispensable attribute of this should be a magic stick-staff. You also need a gift bag. Let's see how to sew it.
Frost bag
Sew a bag for Frost gifts quite simply. To do this, you will need a cut of the matter you like, a sewing machine, a tailor's measuring tape and fifteen minutes of free time. Ideally, Santa Claus's gift bag should be sewn from the same fabric as the entire costume. But if there is no similar material left, the bag can be sewn from any, the main thing is that it matches the color or has universal colors:
- Red and blue;
- silver and gold;
- white and oil.
 So, it is necessary to cut out two identical rectangular parts 1 meter long and 80 centimeters wide. Sew both parts on a sewing machine from three sides from the wrong side, process the edges of the seams with a zigzag or overlock.
Turn the top of the bag inward by five centimeters and sew on a typewriter. In the resulting lapel, you need to insert a braid or ribbon with which the bag will be pulled together. Instead, you can cut out a strip of fabric, seventy centimeters long and ten centimeters wide, tuck and stitch the edges. Then sew it in the center to one side seam on the front side, so that the bag can be tied with this ribbon.
To make all the details of Santa Claus's New Year's decoration look magical and truly fabulous, you need to add to the decoration additional decor. The easiest way is to decorate the outfit with shiny tinsel that can be sewn on:
- along the edges of the fur coat;
- on cuffs;
- on the collar;
- as the edge of a hat.
You can embroider snowflakes by hand or on a sewing machine with silver, gold or white thread; sew shimmering sequins, rhinestones, beads and other decorative elements onto the costume. You can knit openwork snowflakes and sew them on a fur coat and hat of Santa Claus.
staff making
 The image of Morozko will be incomplete if there is no magic in the hands, fairy staff. It is quite easy to make it. It is necessary to take a long club, wooden or plastic, wrap and glue it with foil. And you can also paint with white, silver or gold spray paint.
The top of the magic staff is crowned with a large star. Cut out a large five-pointed star from thick cardboard and cover it with foil or paint it with paint. The edges of the stars and the staff can be decorated with shiny tinsel, glue large beads, rhinestones, snowflakes and any christmas decor handmade or store bought.
You can complement the magic star with a couple of small bells that will produce an original, fabulous effect from the appearance of Santa Claus at the holiday.
Mittens for Santa Claus
Hands are exactly the element by which the children recognize their daddy, teacher or physical education teacher in Santa Claus, therefore gloves should be a must carnival costume.
 For sewing mittens, you need to choose the fabric, the same as for sewing a fur coat, hat or bag. If you are sewing mittens for a baby, then the pattern must be reduced.
It is necessary to transfer the pattern pattern to the fabric. Each glove is made up of three parts: one back and two internal (top and bottom). To cut a mitten for the second hand, transfer the pattern to the material in a mirror image.
Then you need to cut the material, taking into account the seam allowance(one centimeter) and sew. First the inner parts of the mitten, then connect them back side. All seams are sewn from the wrong side and must be processed with a zigzag or overlock.
Mittens, like other parts of the costume, can be decorated with tinsel, snowflakes, beads, rhinestones or other New Year's decor.
How to make a beard
An important detail in Frost's costume is it's a beard, white, fluffy, magical. If you didn’t manage to get a ready-made beard, you can make it yourself. Can be made from the following materials:
- from synthetic winterizer;
- synthetic wool;
- artificial fur;
- white yarn;
- paper or fabric.
 Let's look at an example of creating from an old, forgotten, white or beige machine-knitted wool sweater.
Need to take old sweater, PVA glue, scissors, a small piece of white.
First, on a white cotton fabric, make a sketch of the beard of the desired size and cut it out with scissors along the contour. Don't forget to make a hole for the mouth and ties to hold the beard on the head.
Then you need to carefully dissolve the sweater into separate threads, starting from the lower edge of the beard, thread by thread, in small bunches. It is necessary to glue the beard on the fabric base in even rows of threads, filling all the free territory and creating a real beard for Santa Claus. Thanks to machine knitting, the threads will turn out to be strongly twisted, curly. According to this principle, you can make a beard from strips of white ribbon used by florists, pre-curl them with a scissor blade or from strips of plain white paper.
Faux fur beard It's fast paced and looks great too. It can be made round or triangular shape. It is attached, like a beard from a sweater, with elastic bands or ribbons.
A beard for a child and a man can be made from household scrap materials. Take a clothesline and cut it into equal lengths. Using a gun and hot glue, gradually, row by row, glue the pieces of rope onto the fabric base for the beard.
If you have leftover wool for felting, you can make a mustache and beard for a fairy-tale hero from it. Prepare the base from the fabric, glue the strands of wool, starting from the bottom.
 To make the image of the main character of the New Year complete, be sure to make grandfather specific make-up with make-up or women's cosmetics. Paint a frosty red nose and rosy cheeks, draw eyebrows with white shadows so that they match the white beard.
If you know how to knit or crochet, then the outfit can not only be sewn, but also knitted.
Now you can easily make a costume and a unique image of your favorite New Year's character.
Attention, only TODAY!
Now the turn has come to the main accessory of the New Year's wizard. But what part of the outfit quickly becomes unusable? That's right - a gift bag. In this article we will tell you how to sew a Santa Claus bag.
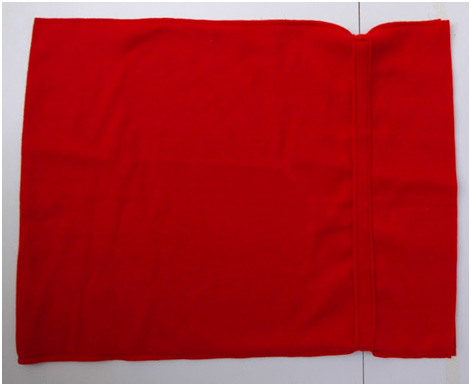
Moreover, the bag of Santa Claus is very easy to sew with your own hands. The easiest option is to take a thick fabric, fold it in half and sew along the edges. In order for your New Year's bag to look more voluminous with your own hands, fold the corners that appear at the bottom up and stitch them to the main seam. As you can see from the picture, the Santa Claus bag pattern is very simple and does not require special sewing skills.
The fabric for the bag is better to take dense, but elastic, so that you can put large gifts. For these purposes, velvet, satin or fleece is best suited. We cut out two identical rectangular pieces from the fabric, 55 cm high. 38 cm wide. We fold the two parts with the right side to each other and sew the side seams. After that, the seams are smoothed with a hot iron.
At a distance of 10 cm from the top edge, as indicated in the next photo, we attach a rectangular strip of fabric 5 cm on both sides. This will be the pocket for the drawstring that tightens the bag.
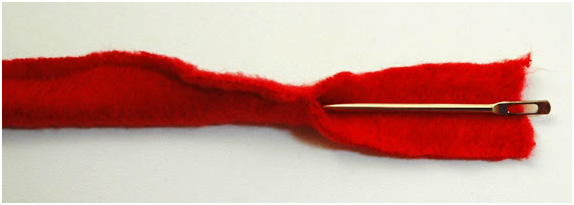
If you have fabric left, make a drawstring for the bag, if the fabric was cut short or you didn’t have time, take a regular white shoelace and use a pin to insert it into a sewn pocket for a drawstring.
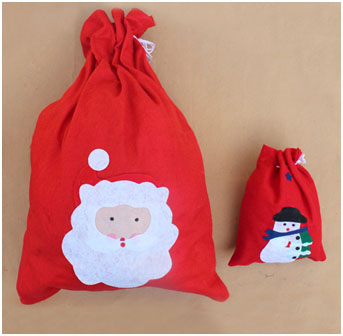
Now it remains to decorate our bags of Santa Claus with our own hands, so that they become truly festive. And here it all depends on your imagination! Using fabric paints, you can paint your bag with magical winter patterns. Using the applique technique, decorate the accessory with funny figures.
But remember, you always have the opportunity to choose a well-tailored bag for New Year's gifts, using the catalog of the online store site.
Master class with a step-by-step photo "The Birth of Santa Claus" (making Santa Claus under the Christmas tree)
Repeshko Lyudmila Petrovna, primary school teacher, MOU "Olenovskaya school No. 1 of the Volnovakha district", ptg. Olenivka, Donetsk region.
Material Description: master class for teachers and parents.
Purpose: this souvenir as a gift for the New Year.
Target: make a souvenir for the New Year.
Tasks: create festive mood; interest in participating in the manufacture of a souvenir; develop ingenuity, creativity, fine motor skills hands; cultivate aesthetic qualities, love for beauty.
Materials:
- wooden beam 60 cm high,
- wooden stand in the shape of a square 18x18 cm,
- screw, hammer, nails No. 25;
- waste material (rags of knitted, synthetic items)
- braid, laces, threads;
- cotton wool;
- starch, water;
- gouache;
- scissors;
- PVA glue;
- New Year's "rain";
- brushes
- glazing bead;
Master class progress:
preliminary work: conversation "Holiday is coming soon New Year and everyone needs Santa Claus. Santa Claus with a bag, and a surprise in the bagAfter the participants are familiar with the information, they proceed to the manufacture New Year's souvenir Santa Claus. Choose a workplace and prepare the necessary material and tools.
1. We connect the stand and the beam with a screw, placing the beam in the center of the stand. We put the head on the beam, nail it.


2. We wind waste material on the timber and fasten it with braid, cord or knitting threads.


3. We apply cotton tapes in front and behind to get a bathrobe .. We fix it at the head with sewing threads. From the bottom, according to the growth of Santa Claus, we cut off the excess cotton wool. On the front of the dressing gown from the neck to the bottom we attach another wadded strip, but already. And at the bottom of the dressing gown on the hem, glory to the right, we put a cotton strip.


4. We make a belt from cotton wool. We take a cotton tape 4 cm wide and twist the edges in opposite directions.

5. We prepare the head for a hat. Apply a cotton strip from ear to ear (depending on the size of the head). We glue the eyebrows. We prepare a cotton strip for the beard, try it on, fix it with a little glue. Glue on the mustache.

6. We put a small layer of cotton wool on the top of the head and cover it with a cotton strip from the forehead to the neck. From left to right, wrap the head with a cotton strip to get a hat. At the back, we cut off the excess length and fix it a little with PVA glue. (At the end of our work, everything will be fixed with starch)


8. We make hands: 2 hands, 2 fingers from a thin cotton strip and 2 sleeves from cotton strips are wider than on the brush. We wrap a wide strip of cotton wool (i.e., a sleeve) around the finished brush, cut off the excess cotton along the length of the arm and make cuffs on the sleeve.


9. We raise the beard and fix the cotton strip - the collar. We cut off the excess.

10. We insert a stick into the hand of Santa Claus - a staff (a glazing bead of the desired length), we fix it with PVA glue, and at the bottom we nail the staff with a nail to the stand.

11. Liquid starch is ready (like rare jelly). Per glass cold water- 1 tablespoon of starch without a slide, mix well. Boil 1 more glass of water in a separate bowl. Pour into boiling water gradually, stirring with a spoon, the prepared mixture of starch.
12. We prepare devices (a long brush, a glazing bead) for coating the product with liquid starch. We wind it on a brush (glazing bead), wind the cotton wool, dip it in liquid starch and apply it with twisting movements to all parts of the product. Grind the rain and sprinkle immediately on the product that has just been treated with the mixture.


13. In a warm place, we leave our Santa Claus to dry.
14. Prepare yellow gouache (for staff) and red gouache (for hats, mittens, belts). Add a little PVA glue to the paint, mix and paint.


Santa Claus is born! We pack, tie and the gift is ready!
Lesson 12
Cut bag details:
Main fabric (velor)
Bag 1 child.
Crepe satin
Bag lining (bottom part) 1 part
Drapery patterned
Bag lining (top part) 1 part
Manufacturing technology of a bag for Santa Claus gifts
1. Run the application.
Baste the details of the white fleece appliqué on the bag detail according to the sketch. Sew on the edge of the details with a decorative braid (see lesson 1 p. 3). Embroider appliqué details with sequins.
2. Stitch the top piece of the patterned drapery lining to the bottom piece of the crepe satin lining.
Place the top piece of patterned fabric lining with the bottom piece of crepe satin, right sides together and baste. Sew the top piece of the bag lining to the bottom piece of the bag lining. Press the seam allowance down. The seam connecting the upper part with the lower part of the lining is 4-5 cm below the drawstring. Patterned lining at the top of the bag provides a beautiful appearance bag at the lapel. If desired, the lining of the bag can be made in one piece from a homogeneous fabric.
3. Stitch the bag part from the main fabric with the bag lining part along the upper cut.
Fold the details of the lining of the bag and the details of the velor bag along the upper cut with the right sides inward, sweep. Stitch the bag part from the main fabric with the bag lining part along the upper cut with a seam of 0.5-0.7 cm.
4. Stitch the middle seam (located at the back in the middle of the part) of the bag.
Fold the bag in half lengthwise with the right side inward (into the pipe), sweep. Stitch the middle seam of the bag with a seam of 1 cm, while sewing the middle seam of the lining. On the section of the bag from the main fabric at the level of the drawstring, leave a hole for a cord 2-3 cm long unstitched. Iron the seam allowance in different directions.
5. Stitch the bottom seam of the bag from the main fabric.
Fold together the lower sections of the bag from the main fabric (we fold it so that the middle seam (p. 4) is in the middle of the back half of the bag) with the right side inward, sweep. to grind bottom cut bag from the main fabric with a seam of 1 cm. Iron the seam allowance in different directions. Fold the corners across the seams, topstitch the corners.
6. Lay the finishing line along the top edge of the bag.
Turn the bag right side out, putting the lining inside the bag. Sweep the piping along the upper edge of the bag from the lining side. Lay the finishing line along the top edge of the bag.
7. Sew two parallel stitches for the drawstring.
Lay temporary stitches on both sides of the drawstring lines, fastening upper layer lined bag. Sew two parallel stitches along the guide lines of the drawstring.
8. Stitch the bottom seam of the lining fabric bag.
Turn the lining of the bag inside out through the open bottom section of the lining. Stitch the bottom seam of the lining of the bag from the corners to the middle, leaving a hole in the middle for turning inside out. Stitch the corners of the bag lining.
9. Stitch the turning hole.
Turn the lining right side out through the opening you left. Fold the opening of the lining and stitch 1-2 mm from the edges of the lining parts folded inward.
10. Insert the cord into the drawstring.
Insert a decorative cord into the drawstring through the hole in the middle seam. Burn the ends of the decorative cord to prevent shedding, tie knots at the ends of the cord.