Preparing for the New Year includes many interesting things. This includes decorating your home, setting up a Christmas tree, and making gifts for friends and relatives. Decoupage Christmas balls can be a wonderful souvenir. Or decoration for your apartment. How to make these cute little things with your own hands, you will learn by reading this article.
Decoupage Christmas balls. Master Class
Inside every person lives an artist who is ready to create masterpieces from the simplest things. However, some people are embarrassed to express themselves and prefer to buy ready-made jewelry in a store. We invite you to change the situation and become a real creator for a while. Decoupage of Christmas balls is a simple and exciting technique that even a child can handle. Read the instructions carefully and feel free to get to work.
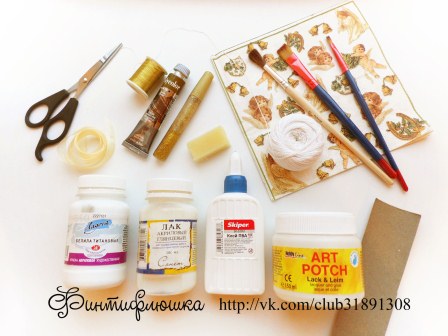
materials
To make one original Christmas tree toy, you will need:
- Large plastic ball.
- PVA glue and brush.
- Liquid for degreasing of a surface.
- Acrylic white paint.
- Sponge for washing dishes.
- Colored napkin with a pattern in the Christmas style.
- Manka.
If you are afraid to ruin a new toy, take an old unwanted ball that has already lost its presentable appearance and is not suitable for decoration. Remember that decoupage of Christmas balls with your own hands is a very exciting activity. So bring your children and spouse to it. The fruits of collective creativity will remind you of a wonderful pastime and make you closer to each other.

Surface preparation
Before starting work, carefully inspect the toy. If it is covered with cracked paint, then sand the surface. Thanks to this action, the coating will become even, and the paint will lay down better. After that, treat the ball with a special degreaser. If this is not at hand, use vodka or nail polish remover.
Stages of work:
- First we need to apply white paint to the ball. For this purpose, you can use a brush. But toning with a sponge will help you achieve the best result. To do this, fold it in half and secure the edges with a clothespin. Take a makeshift pen, dip the sponge into the paint and apply the first coat. You can paint the entire ball or cover only a small area. Go over the paint over the surface again and hang the decoration to dry.
- Get your colored napkin ready. To do this, carefully separate the top layer and carefully tear off the picture. It is very important that the edges of the pattern are uneven - then it will look better on your ball.
- Attach the picture to the toy and start gluing it from the center to the edges. Christmas decoration is almost ready. If the selected pattern is large enough, make a few tears along its edges.
As you can see, decoupage of Christmas balls is very simple, and even a beginner can handle it.

Finishing touches
There are a few little tricks that will hide the roughness and small flaws in your work and give the decoration an extra charm. Use the following tips:

Decoupage Christmas balls can be done in many ways. Use the suggested ideas or rework them as you wish:
- Take a small ball and a colored square napkin. Coat the paper with glue and wrap the decoration in it. Tie the top of the bag with a beautiful braid or ribbon.
- Cut out strips from colored napkins and wrap them around the ball. The upper part, where the ends will converge, mask with a beautiful bow.
- Cut out even circles from colored napkins and overlap them over the entire surface of the ball. The resulting "bump" will look great on your Christmas tree.
We hope you enjoyed the ideas we shared with you in this article. Don't be afraid to experiment with materials at hand. And soon you will learn how to create original things with your own hands that others will not tire of admiring.
New Year's decoupage - thematic decor of your favorite jewelry and items for the long-awaited holiday. We have prepared ideas for you, on the basis of which you can decorate your interior and New Year's table with original items.
For decoration, you can choose an endless variety of materials: braiding or making a kanzashi ball.


This master class offers you a simple decor option with which you can easily repeat the decoupage of Christmas balls with your own hands.
 For work, you need to prepare the following items:
- Plastic balls (plain or transparent);
- PVA glue diluted with water in a ratio of one to one;
- Napkins with matching motifs;
- scissors;
- Acrylic based paints;
- Craquelure varnish;
- Sponge
- Semolina (you can use special artificial snow).
New Year's decoupage of the ball begins with the coating of the workpiece with gold-colored paint. Apply it with dabbing motions. After the paint layer dries, a layer of varnish intended for craquelure is applied over the surface of the ball. With its help, cracks will form. So you get a ball with an aging effect. Leave the workpiece to dry.


After the ball dries, you need to apply the base color paint on the surface of the ball. For these purposes, a sponge is best suited. Next, dry the item again. You can use a hair dryer to speed up drying. Subsequently, you will see how cracks begin to form on the ball.
 Further, the decoupage of Christmas balls itself begins directly. From the selected thematic napkin, you will need to cut out the motif with your own hands and separate the layer with the color image. Now, using a brush and diluted PVA glue, fix the pictures on the ball. Glue during decoupage is applied from the middle to the borders of the picture. The borders of the pasted image are shaded with a sponge and paint of the main shade. In addition, pictures can be completed with acrylic-based paints.
The master class and decoupage of Christmas balls is coming to an end and at the last stage, certain areas of the ball are dipped in semolina or special artificial snow.
Here is such a wonderful New Year's decoupage that will help you decorate boring Christmas balls with your own hands. See how attractive they look in the photo.

Cold decoupage technique for candles
The second master class will show you how cold decoupage of candles is made using a napkin. To do this, prepare:
- a candle;
- Napkin;
- scissors;
- A glass rod or other device that has a smooth surface.
This method is best suited for candles that have thin walls. This makes it easier for the wipes to adhere to surfaces.
The master class begins with measuring the required length of the napkin. To completely cover the candle using the decoupage technique, you must try to make an even seam. You need to cut the motif with small gaps relative to the length and width (approximately a centimeter).


When you smooth the paper, gently press the stick, allowing the napkin to stick to the plane of the candle. After finishing smoothing, pay attention to the seam. At the beginning, you need to press one side of the picture, and then work on the second. If its length extends beyond the first side, cut it off. Do not overlap, so the decoupage of the candle will have an unpresentable appearance.
It remains to work out the upper and lower boundaries of the candle. At the top, use scissors to carefully cut off the unnecessary parts along the bottom. Leave a couple of millimeters, this will help make the decoupage of candles more accurate.
At the final stage, you can stick shiny elements that will give the candle an even more festive look.
Decorate a bottle of champagne for the New Year
Continuing the theme of New Year's decoupage, let's look at the decor of a champagne bottle with our own hands, because not a single New Year's feast can do without this traditional drink.
Necessary materials and accessories for champagne:
- The bottle itself (before decoupage, it must be soaked with water. This will make it easy to remove paper labels glued to it);
- Fan brush;
- Themed napkins with New Year's motifs;
- scissors;
- Acrylic based paints and contours;
- Special varnish for decoupage works;
- Construction tape.
The top of the bottle is sealed with construction tape. This will help keep the golden part of the label clean.
Next, take a foam sponge and use it to cover the bottle of champagne with white acrylic-based paint with your own hands. To obtain a uniform plane, apply several coats of paint with intermediate drying of each of them. After allowing such a primer to dry, an acrylic-based varnish is applied to the bottle.
At the next stage, the master class proceeds to the decoupage technique. For this, three-layer napkins are taken and the very first layer is separated from them, on which color pictures are applied. After that, you need to tear out the images with your own hands, with which further work will be carried out.
Having prepared all the details, proceed to fix them on a bottle of champagne. With gentle movements, walk along the surface of the napkin with a brush dipped in water, moving from the center to the borders of the picture. Try to carefully smooth out any wrinkles that have formed. By connecting the napkin to the plane of the bottle, the product is covered with a layer of PVA glue.
After drying, the master class moves on to tinting the top of the champagne bottle using acrylic paints. Having chosen suitable colors, they are applied with a sponge along the plane of the object, slightly stepping on the decoupage pattern. This will help you hide the navigation areas. Leave the bottle to dry. After that, re-coat it with varnish in several layers.
As an additional decoration, use a golden outline and draw interesting patterns on champagne with your own hands or thematic greetings, as in the photo. Lacquer is applied over the decor.


Original New Year's toy with your own hands
And one more final master class will show you an example of how you can decoupage Christmas tree decorations from old light bulbs.
Before decoupage, the light bulb is wiped with alcohol. Further, its surface is covered with an acrylic primer, which is applied with a small layer of foam sponge. In order to make it more convenient for you to apply the primer, hold the object by the base or do it on a supply from improvised materials, as in the photo.


After letting the primer dry, apply white acrylic based paint over the light bulb. Let the acrylic dry for half an hour.
 Take the prepared napkin and tear out the thematic inscription from it. If the napkin has three layers, separate its top layer with pictures. The resulting element must be fixed along the protruding contour of the product. Decoupage glue is applied over the fragment from the center to the borders. Next, let the item dry. After that, you can start background painting. Pick a paint to match the selected pattern. In this case, these are delicate blue shades. To get it, mix light acrylic with a couple of drops of blue tone paint. Now, using a sponge, apply the resulting color over the entire bulb, slightly stepping on the glued pictures.
The New Year is approaching, and now is the time to think about the festive decoration of the interior and the Christmas tree. Of course, today, without any problems, you can buy any Christmas tree decoration in the store. But after all, Christmas decorations made by hand look much more interesting and original.
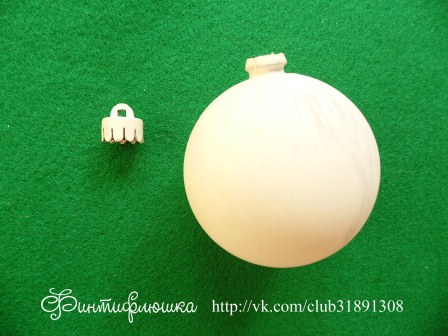
One of my latest handicraft hobbies is decoupage. It is in this technique that I want to decorate the Christmas tree ball. Let's see what I get as a result. As a basis for creating my original and unique Christmas tree decoration, I decided to use the most ordinary and cheapest plastic Christmas ball purchased at the nearest supermarket:
And I absolutely do not care what color it is - anyway, I'm going to transform it beyond recognition.
In addition to the Christmas ball, I prepared for work:
- a beautiful decorative napkin with a New Year's pattern,
- primer,
- acrylic paints (white and gold),
- brushes,
- small piece of foam
- fine-grained sandpaper,
- scissors,
- decoupage glue,
- a thick cotton thread of white color (I have a cotton “Lilac”, but you can also take No. 10),
- PVA glue,
- gold glitter,
- glossy acrylic lacquer
- golden organza ribbon
- golden lurex thread
Master class: how to make decoupage of a New Year's ball with your own hands
To begin with, I disassemble the Christmas ball into parts, which I then cover with a layer of white primer.
When the primer is dry, I apply white acrylic paint to the surface of the ball with a foam rubber sponge in three layers. Let each layer dry well.

After making sure that the paint is completely dry, I process the surface of the ball with fine-grained sandpaper. I really want the surface of the Christmas ball to be as smooth as possible.

Of course, it was not possible to achieve a perfectly flat surface. Lack of patience and fear of overdoing it and rubbing a hole in the paint layer interfered.
After removing the dust from the surface of the ball with a dry napkin, I proceed to decorate it using the decoupage technique.
While several layers of acrylic paint were drying, I did not waste time - I cut out two drawings from a decorative napkin and, having layered the napkin, left only the top paint layer for work.

Now I glue the prepared napkin motifs to the surface of the ball on one side and the other, using decoupage glue and a wide flat synthetic brush.
For the first time in my decoupage practice, I manage to paste both motifs without a single crease. And this despite the fact that the surface of the product is not flat, but spherical! Perhaps the dusty and uninteresting work of preparing a smooth surface for decoupage was not in vain?

The pasted motifs must also be allowed to dry. While the glue dries, I paint the loop for attaching the New Year's ball with gold acrylic paint, again using a piece of foam rubber for this purpose.

Since the drawings I have chosen do not cover the entire surface of the ball, I decided to decorate the empty spaces in an interesting and completely simple way.
I cut a few pieces of white cotton thread 12 cm long. You can use longer pieces, but my ball is quite small, so I don’t need long pieces of thread.
I alternately moisten each piece of thread with water, and then cover with PVA glue. Glue can be applied with anything: brush, sponge. But I prefer to do it with my fingers.

Wet threads are laid in the form of a pattern on the surface of the ball. My imagination was only enough for curls and loops, but in general, of course, the pattern can be absolutely anything.
In those places where the thread lay unevenly, I correct it with a thin flat brush dipped in water.

Thread patterns dry very quickly. Therefore, as soon as the last thread is laid, I begin to cover the curls with gold sparkles, drawing each element of the pattern with glue glitter.

Finishing the work on decorating the New Year's ball, I cover the ball itself and the loop for fastening with glossy acrylic varnish. I apply the varnish in two layers with intermediate drying.

Having meticulously examined the finished ball, I decide to complement it with a bow of a translucent golden ribbon. I tie the ribbon to a loop and thread a golden lurex thread there so that the ball can be hung on a Christmas tree.
I admire a completely transformed cheap Chinese plastic ball and think that even a non-certified magician can create a small New Year's miracle with his own hands.


Toys are a very exciting activity that even those who have not been fond of anything like this before can cope with. Create some crafts for the Christmas tree yourself. They will delight you every time you prepare for the New Year holidays.
List of required tools and materials
- The most important thing is napkins with a suitable pattern or simple pictures.
- Next, you will need decoupage glue. It can be replaced with simple PVA glue, which must be slightly diluted with water.
- Tassels. It is better to take synthetic ones, since the pile practically does not crumble from them.
- Varnish. You can take a special one for decoupage, craquelure to create cracks, or one that is available.
- A piece of sponge. You can cut off a little from a kitchen washcloth for washing dishes.
- Acrylic paints. Quantity and color depends on your wishes.
- Ribbons so that the toy can be hung on the Christmas tree.
The rest of the list depends on the design of the crafts. So, for example, to make New Year's toys with a three-dimensional texture, you will need to take a structural gel. It is applied in strokes, hardens and takes shape. Then it is painted in the desired color.
Various sequins, beads, rhinestones and other small decor may also come in handy. To stick these materials, it is better to use a cool gun.
What crafts can be made from

Decoupage of New Year's toys cannot be done if you do not have a base. In its capacity, you can use the following materials:
- old ;
- special round shapes made of foam (there are any diameter);
- wooden bases of any shape (for example, a ball, Christmas trees, stars, and so on);
- transparent glass or plastic balls;
- old light bulbs;
- thick cardboard, from which various figures are cut out, and much more.
Decoupage of New Year's toys - a master class for all design options
Instructions on how to make crafts using decoupage technique:

- Take your base and, if necessary, clean it of dirt (such as peeling paint, paper labels, etc.).
- Cover the base with a layer of acrylic paint. If you want to completely decorate the craft with a napkin, then take white paint as a substrate. If you will be gluing small elements, then draw the background of the desired color.
- Cut out the part of the picture that you will glue. It is best to soak the brush in water and run it over the napkin. Tear off excess paper easily.
- Coat the area on the base with glue and lean the picture.
- Go over the picture with a thin layer of glue.
- Let the craft dry completely.
- Then pour some of the paint you used for the background onto the paper or palette, lightly dip a sponge into it and go over the edges of the pasted drawing. Movement should be light.
- Cover the craft with a layer of varnish.
- Attach a ribbon to hang on the Christmas tree
Decoupage completed. At your discretion, you can sprinkle glitter on top, paint individual elements of the picture with paint or make a shadow, glue rhinestones or beads, and so on.
Possible options for decorating Christmas tree toys

- Take the finished base (for example, an asterisk or a ball), cover with a layer of paint, and then glue the entire napkin. Turn the base over and go around the edges with a brush dipped in water. Tear off excess paper. Do the same with the reverse side. Coat the edges with paint.
- You can make Christmas toys. The master class consists in the fact that, after the glued pattern has dried, a structural gel is applied to the base. With it, you can depict snow or some elements. It is better to mix the gel with paint in a separate container or cover with acrylic at the end.
- Take a ball and cover it with a layer of paint. Then tear the patterned paper into several pieces. Glue each piece separately. It will turn out a very beautiful New Year's toy.
- Prepare the base. Cut out the circle and glue it on. Cover the craft with varnish. Using a glue gun, place flat-bottomed beads (special droplets) along the outline of the picture. The image will appear to be in a frame.
In preparation for the new year, I began to disassemble the toys for the Christmas tree. Some toys are no longer suitable, others are a little outdated, but I keep them as a rarity, and now I can update and decorate some myself. I found Christmas balls that are absolutely faceless and small in size and decided decorate in different ways.
Went from simple to complex.
First ball decided to do it with the help of technology direct decoupage.
For this I needed:
- Nail polish remover, cloth
- Foam rubber sponge and stationery clip
- brushes
- PVA glue
- white paint
- Two-layer napkin with bullfinches
- Acrylic lacquer
The ball was degreased with a napkin and nail polish remover. I took the liquid without acetone, since the ball is plastic (Photo 1).

For convenience, when staining, I put the ball on a thin stick. I primed it with white paint and waited for it to dry (Photo 2).

I pasted a small torn fragment on one side of the ball. I applied glue from the center to the edge, if necessary, made tears on the sides so that the napkin fit the ball (Photo 3).

Then on the other side I pasted the same small fragment. I chose such a picture so that it fits on the ball and does not deform much when pasted on a round surface (Photo 4).

After the whole ball was glued and dried, it was varnished (Photo 5).

The first ball is ready (Photo 6).

Second ball decided to do it using .
- Red acrylic paint
- Craquelure varnish
- bituminous varnish
- Three-layer napkin
I degreased the ball in the same way (Photo 7).

Primed with red paint all over. Dried (Photo 8).

I applied craquelure varnish and left it to dry for 15-20 minutes (Photo 9).

The varnish was not dried until completely dry, as stickiness should remain. She applied a contrasting white paint, touching only once in one place (Photo 10).

After some time, cracks appeared (Photo 11). I waited for it to dry completely, and started working after a while. Otherwise, the paint would get wet and smear all the cracks.

I pasted fragments of napkins on one side of the ball, then on the other, and pasted snowflakes between the pictures (Photo 12.13). Dried up.


The whole work was varnished several times (Photo 14).

Dry each layer well. To give the ball an “antique” look, I “stained” it with bituminous varnish a little (Photo 15).

The second ball is ready (Photo 16,17).


Decor of the third ball I decided to do it in style mix media.
Here, in addition to the available materials, tools and decor elements were needed:
- glue gun
- Narrow lace
- Buttons
- fabric flowers
On a pre-skimmed ball, I glued the lace with a glue gun (Photo 18).

I toned the ball with a thin layer of paint, painted over the lace more densely (Photo 19).

I glued the flowers onto the lace with a glue gun (Photo 20), then the buttons in a free order (Photo 21).


I painted the entire composition red again (Photo 22).

Dried well. The final touch was painted with white paint, giving the ball a "snowy" appearance.
The third ball is ready.


Christmas balls turned out different, each is good in its own way:
Like the product and want to order the same from the author? Write to us.
More interesting:
See also:
How to crochet a snowflake
Crochet. Snowflakes For the New Year, as a rule, we decorate our house with snowflakes. They can be made...