Do-it-yourself numbers for a child's birthday will be a great surprise for a son or daughter, decorate a children's room or a playroom in a cafe where the holiday will be held. These numbers also look very impressive during photo shoots organized for the child's name day. This is a relatively new trend that is gaining momentum - hurry to stand at the origins of fashion and make such a surprise for your child, especially since it is not so difficult to do it yourself.
Blanks (bases) for numbers
It all starts with a blank - the base on which the decorative material will be attached to decorate the figure. The base can be flat and voluminous - and you will have to choose the option that is more preferable for you in advance:
- the voluminous base looks more spectacular, it is quite stable and can be viewed from all sides (install it in the center of the table, hang it on a chandelier on the ceiling, just put it anywhere in the room); its only disadvantage is the large time costs and, of course, the need for a large amount of decorative material for decoration;
- the flat base is decorated on one side only, it is unstable and is usually used for hanging from the wall (i.e. the back part of it is hidden), it is done quite quickly and does not require many materials for decoration.
The easiest way to make a flat base is from ordinary thick cardboard (corrugated cardboard).
The bulk base can be cut out of a foam sheet; this option is good because you can stick flowers, ribbons and other decorations into the foam with the help of hairpins - a great reason to avoid one way or another dirty work with glue.
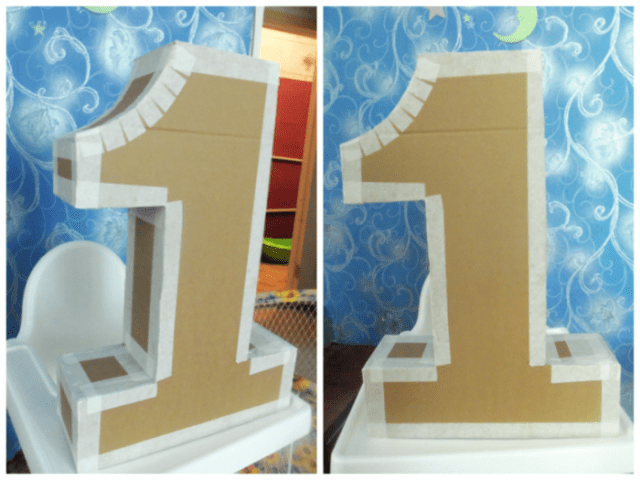
Also, a bulk blank can be made using cardboard and adhesive tape - as shown in the pictures:


A voluminous blank for a birthday number made of cardboard is the most reliable and stable option, however, you will have to puff with its creation the most.
DIY birthday number ideas
Numbers from napkins and corrugated paper
Corrugated paper and its more economical option - napkins - a very convenient and easy-to-use material for creating decor. All kinds of florists and buboes are born from this material at the moment of an eye, no matter how crooked handles the one who took for their creation possesses.

The general principle of creating a flower figure from a napkin is simple: you need to fold the paper with an accordion in several layers (the more layers, the more magnificent the final bubo), rewind it with thread or wire in the middle, cut off the ends, rounding them or making them sharp, and start straightening each layer of paper, forming petals from it. As a result of such simple manipulations, such a bubo (flower) will turn out.

Here are the numbers from napkins you can do with your own hands:


Figures with cartoon characters
The simplest option for creating numbers for a name day for those who don’t really want to mess around with embellishments. Paste the blank with plain paper or paint it and stick it on the number of printed cartoon characters - of course, the one that your child likes to watch the most. Alternatively, these can be stickers with heroes or small toy figures depicting them.


Ribbon and fabric numbers
Numbers for a girl's birthday, wrapped in ribbons or cloth, look elegant and gentle. They can be decorated with flowers and other floral ornaments. From chiffon, you can make buboes similar to flowers from napkins - such a figure will look more sophisticated, this is a gift for a real princess.


Photo collage numbers
A simple but effective idea is to collect the most memorable photos with your child from the past year and make a collage of them, arranging it on a digital basis. It is good to hang such a figure on the door or at the head of the children's bed.

For such a figure, sometimes a blank is not even needed, a collage can be glued directly to the wall:


Numbers from flowers for a girl's birthday
Another option for girls, especially relevant for princesses born in spring or summer.


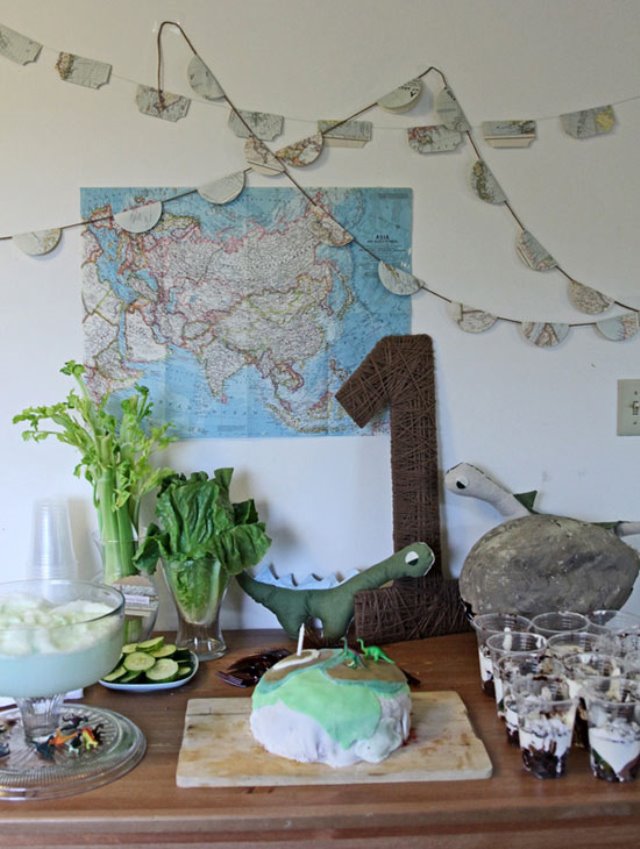
Numbers from threads
Wrap a cardboard blank with thick woolen threads - what could be easier? This is a great option for a birthday number for a boy who definitely does not like flowers, ribbons and butterflies. A theme close to your son can serve as a decor: marine (anchor, boat), cartoon (Pokemon, minions), research (binoculars, magnifying glass), etc.


Piñata numbers
A piñata is a candy blank that is hollow inside, which the birthday person (on his own or together with the guests) must break with sticks in order to get to the desired treat. As a blank for the piñata, a papier-mâché figure is used, which is easily and simply torn. Piñata is usually decorated with strips of finely cut strips of paper or foil.

These are the numbers in the form of a piñata that you can make yourself:


Balloon numbers
Another option from the category of simple and oriented to both sexes of children. It is enough to make a base figure out of thick wire and fix inflated balls of the same or different sizes on it.


Recently, large and small numbers made of cardboard, created especially for kids, have been popular: they are used for birthdays and other themed holidays. We have collected for you the best options for do-it-yourself volumetric numbers from paper: schemes and templates will help you quickly make the desired combination of a number series and use it in your idea.
What are numbers for?
 As a rule, figures are made for. They look unusual and delight all the guests of the house: the grandparents of the baby are especially touched, because the number not only decorates the room, but also eloquently indicates that the baby has become older. The numbers serve great backdrop for thematic photos: the baby can pose with numerous relatives or on his own.
Numerical figures do in any event agency, however, parents will save a lot by making such crafts with their own hands. Their production is extremely easy and does not take much time: good imagination and creative skills will help you create paper numbers that will look no worse than purchased ones. About how to do it and what is needed for this in detail we will tell in the article.
Materials for manufacturing
 If there is a very small baby in the house, and you have not yet got hold of stationery, we advise you to immediately go to the needlework store. Create a note in the phone, so as not to forget the tools that you need to purchase for future crafts:
- Cardboard
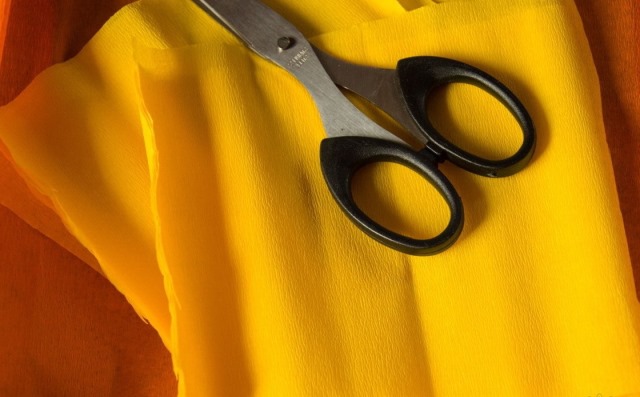
The size depends on the size of the number you are going to make. For a large number of numbers planned to be used as props for a photo shoot, it is better to prefer A4 thick cardboard. if there are huge crafts in the plans, you will have to be creative and find large boxes of large household appliances. The easiest way to do this is to ask at the store: usually sellers are happy to give away unnecessary packaging from goods. - Scissors
Take comfortable scissors: when cutting cardboard, they should not rub the places of contact with the skin.
If you don’t have a clear idea in your head yet of what your number should look like, take the colors that you will like the most in the store. Otherwise, select the material according to the idea.- Twine
Get a couple of skeins of twine if the planned event will be held in a rustic style. - Construction stapler
A stapler is needed when working with thick cardboard. Without it, the creation of three-dimensional figures will become almost impossible. - glue gun
Required for fastening parts - Rulers, pencils, erasers
Materials are needed for the design and marking of numbers on sheets of cardboard. - Additional materials
Purchase additional materials as needed. These include: textiles, beads (beads), napkins and colored paper, knitting threads, tinsel.
We make a frame of volumetric figures
 Big numbers have a big advantage: child can play with them and rearrange to any place in the apartment. At the same time, a well-made figure will last more than one year.
Follow instructions if you want to make a volumetric figure:
- Decide on the sizes. Depending on this, choose the material: ordinary A4 size cardboard or a large refrigerator box.
- On a piece of cardboard draw number by hand or using a template. Templates are given below.
- Cut out the number. Use scissors or a utility knife for this. If you cut out only one shape, then the craft will turn out flat: you can hang it on the wall or make holiday skewers with the age of the child.
- For a three-dimensional figure, prepare two identical numbers. In addition, cut out strips of cardboard that will serve as a layer between the templates. Band width define depending on the size of the number.
- Attach two templates and inner strips with a construction stapler, paper tape or a glue gun.
- Decorate the resulting frame, depending on the idea and materials at your disposal.
Variants of volumetric figures from improvised materials
We have made extensive compilation volumetric figures created by craftswomen especially for their kids. Some options are given with a description, so you there will be no difficulties with the performance of particularly complex figures.
Gorgeous colored paper numbers are made very easy, however, they often take several days of painstaking work to create. If you want to make a neat craft, take the creation of decorative elements into your own hands. baby can render minimal help: submit sheets, choose colors or glue decor elements in the indicated place. detailed instructions for decorating letters with paper flowers is indicated in the photo tutorial.


 Numbers from buttons
Such a figure will come out in a tidy sum if you are not a craftswoman with a collection of buttons. Glue the buttons on cardboard or paper, dropping a little superglue into the middle. If thin cardboard is used and the figure does not exceed the size of an A4 sheet, the buttons can be sewn on with contrasting threads. This will give the craft special charm.

The figure with images of a baby or a family is performed in a three-dimensional and flat version. To fix photographs on paper need glue PVA or small scraps of adhesive tape.
 fluffy number
Looking at such creations it is difficult to hold back a smile: they are soft and fluffy want to touch them. Imagine how nice it is for a baby to cuddle up to a three-dimensional figure?
Making it easy: select the threads for knitting the desired colors. Next with follow instructions:
- Wind the threads around the object of the desired size. It can be a regular mug or planter.
- Carefully remove the winding, fold it in half. Bandage the core.
- Cut the threads along the edges, fluff. The soft pom-pom is ready.

 Thread craft
Another option for crafts using knitting threads. Just wind the frame as it shown on the picture. You can arrange a composition a single color or mix several contrasts. For a rustic party, use twine.

 Corrugated paper numbers
In this performance fantasies there is where to roam. A variety of colors and decoration techniques will help you create a figure to your taste and needs. Here are the simplest frills, and flowers, and the usual pasting: look carefully at the photo and draw ideas from the finished work of young mothers.


 From napkins
Do not think that numbers made from improvised materials will look ugly, because the work of the master is afraid. Examine the photos below: all volumetric figures are made by ordinary women. In the process of work, they used only templates of numbers and napkins that ended up at home. Try it too: the result will exceed expectations!


The simplest option, requiring a minimum of effort and cost. Purchase wrapping paper, appropriate in style to the event, and wrap the frame of the figure. Despite the simplicity, the result is very nice. Examples in the photo. 

 Purchasable Items
If there is no time to cut flowers and think through the details, purchase in store ready decor elements. It can be flowers, beads or wrapping paper for flowers.
 Textile
This option is suitable for lovers of needlework. With the help of modern fabrics, you can create amazing drawings and compositions on numbers from ordinary cardboard and paper.
Making DIY crafts is easy. It just takes a little time, patience and a couple of fresh thoughts. You can get them from the Internet, including from the article “Do-it-yourself volumetric figures from paper: schemes and templates”.
And prepared the attributes to decorate the room. But how to emphasize that this is a celebration of the first anniversary. And not just a celebration dedicated to the child. Here the number 1 will come to the rescue directly. Moreover, it can be used in decor in the most unexpected way. But the large decorative numbers look especially interesting. We will teach you how to make a one for your birthday with your own hands.
Children's birthday 1 year old: how to use numbers
Let everyone around at the celebration just scream that your baby has his first birthday today. And this will help not only thematic decorations, outfits, treats. But also the number 1, which can be used in various ways:
- Be sure to add the words "I am 1 year old" to the holiday garland. Let the guests see from the threshold what the holiday is dedicated to.
- It can be fun to make hanging garlands with numbers. Decorate each unit in accordance with the chosen theme.
- To decorate dishes, sweets, drinks, use toppers with an image or in the form of a single.
- Lay out a unit on the wall with balls, bows, or make such a decoration out of paper.
- In the photo zone, there must be a three-dimensional or flat number, which will later remind you when the photos were taken.
And most importantly, a large decorative figure, which will practically become the central attribute of the name day. It can be miniature or huge, flat or voluminous.
Such decor can be easily ordered or bought ready-made. But it will be much more interesting to look at a figure for a birthday of 1 year, made by yourself. Indeed, in this case, you can take into account the chosen theme, the outfit of the baby, the size of the room.
And most importantly, the preparation of any holiday brings relatives together, gives it special significance.
Number 1 for a birthday with your own hands from balloons
Kids just love balloons. Even very little ones are delighted with the decor of the balls.
And to make the number 1 for a birthday from balloons is quite simple.
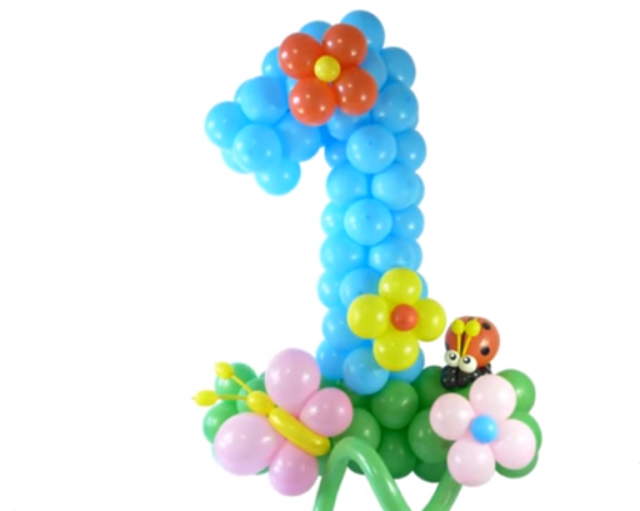
We offer a master class for making the number 1 from multi-colored balls.
We will prepare all the necessary blanks and tools. We will need blue balls up to 10 cm in diameter in the amount of 52 pcs. and 36 greens of the same size. But it's better to buy balls with a margin in case something goes wrong.

To inflate so many balloons, it is better to use the simplest pump. This will greatly speed up the process. We will tie the blanks with the help of a fishing line.
We begin the process of manufacturing a unit with the preparation of basic elements. Each segment will consist of 4 balls.
To do this, fill the balloons with air using a hand pump. At the same time, we control the size of the balls. We tie each ball.
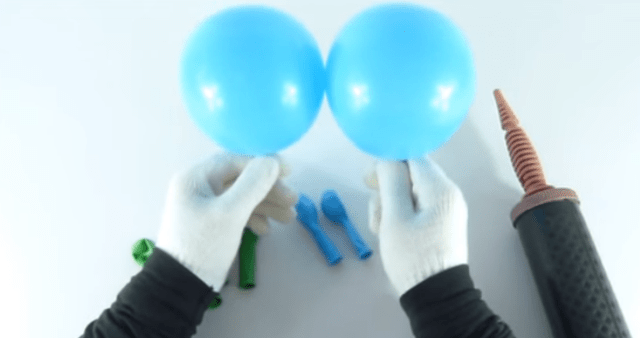
We take 2 balls of the same color and connect them together. Let's do another one like this. We connect two finished blanks together, twisting. We got the basic segment of the craft.

In the same way we make a green segment.

In total, you need to make 9 green segments and 13 blue "fours".

Let's start making the base of the unit from green balls. We fix the fishing line on the first segment, wrapping it several times between the balls. Now we press the next green segment to it and fix it with a fishing line. In this way we connect all the green “fours” together.

We cut the fishing line, and tie the remaining tail several times around the balls and hide it.

We got the base of the number 1.

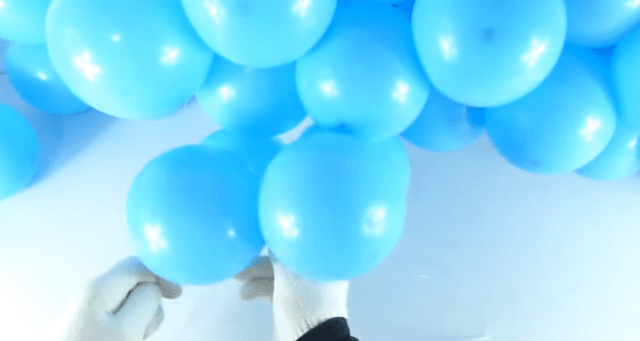
We tie a fishing line to the center of the green meadow, and begin to attach the blue segments. They will go vertical. In total, we will fix 10 blue segments.

From the remaining three "fours" we make a spout of ones. To do this, we will attach the segments to the side of the vertical part. When we connect all the segments, we draw the edge of the spout to the vertical part. We cut the fishing line, tie it and hide the edge between the balls.
Our unit is ready. If desired, it can be decorated with balls of a different color, from which it is easy to make a butterfly, flowers, ladybug.

In the same way, you can make numbers in a different design.
Sizes, patterns, options for decorating a flat number 1 for a birthday
Flat ones look original, which can be placed on the wall, curtains, simply leaning against other decorative elements.

It is enough to decide on the size, height of the workpiece and make a template out of paper.
We transfer the finished template to a cardboard base - we outline the contours with a pencil. Cut out the number along the contour.
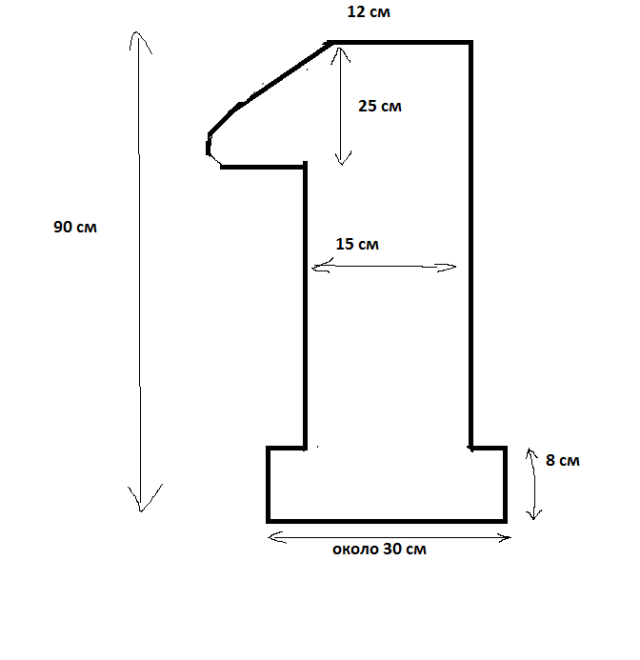
The cardboard blank for the festive unit is ready. You can decorate such a blank with anything you like, choosing the design and material for the general style of decorating the holiday.
The easiest way to decorate a flat figure is to use twine or multi-colored threads, corrugated or colored paper, bright fabric or floral film, flowers or napkins.
Such materials are wrapped or pasted over the base.
To give the decoration extra volume, the base is decorated with voluminous flowers, pompoms, bows.
Volumetric number 1 made of cardboard for birthday
But a volumetric figure will look much more interesting. Her birthday boy will be able to rearrange, play with her. Such a voluminous unit will perfectly fit into the photo zone, and into the design of the room, garden area.
For its manufacture, you can use thick foam. But if such material is not at hand, the blank is easy to make from ordinary cardboard.
Even if you do not have large boxes, you can glue the base of several parts. First, we make two templates for the unit itself.

In size, cut out the side parts and the base of the figure.

We connect the blanks together with adhesive tape.

As a result, you should get such a voluminous figure from cardboard.

Don't be upset that she's not too pretty.
All flaws and irregularities will be securely hidden under the decorative elements. You can decorate such a base with paper umbrellas and flowers, fringe and photographs, felt and threads.
How to decorate a birthday party
We offer several original options for decorating the number 1 with your own hands from improvised materials. Save these master classes for yourself - they will definitely come in handy for decorating volumetric figures for other children's parties.
Number 1 in eco-style from twine, thread
A very simple option for decorating a flat blank. We need ordinary twine and glue.

We gradually apply glue to the cardboard. Wrap the treated area with twine. You can make neat turns, or you can slightly change the angle of inclination. When wrapping the glued area, apply glue above and continue winding the twine.
When you wrap the entire workpiece, leave the figure to dry. Almost one is ready. But if desired, the twine can be painted with acrylic paints or decorative elements can be added.

But you can initially use not twine, but bright threads with which we will wrap the cardboard blank.
Number 1 from napkins for a boy for his birthday
Make the fluffiest birthday number for your little one.
To do this, you will need multi-colored napkins, a lot of napkins and patience. But the result is worth it.
Such decor will be much cheaper than ready-made numbers.
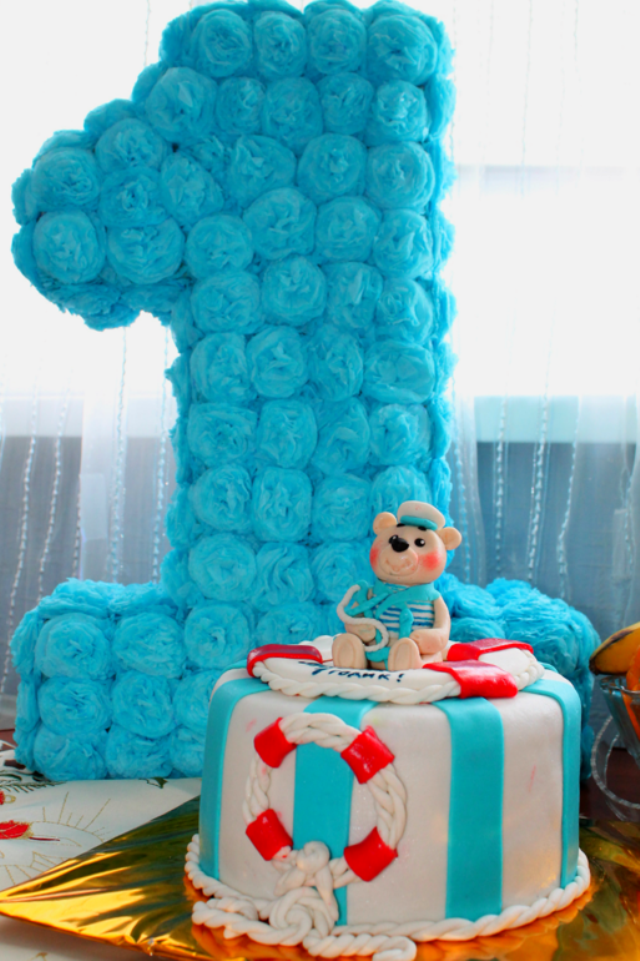
We buy several packs of blue or blue plain napkins.
If you want to dilute the blue background with white flowers, purchase the corresponding color of napkins. Numbers with a smooth color transition look very cool. In this case, you will need napkins in blue, blue, sky and white.
To make napkin flowers, it is better to take single-layer napkins. Fold the napkin twice without unfolding. It is not necessary to cut the squares, in the future all the folds will be cut off. We fasten the workpiece in the middle with a stapler. You can use ordinary wire to fasten the base of the flower.
Now we cut the square to the size of the flower to make an even circle.

We carefully collect the first layer of the napkin up, forming flower petals. We perform this operation with each subsequent layer. When you have lifted all the layers, straighten all the petals.
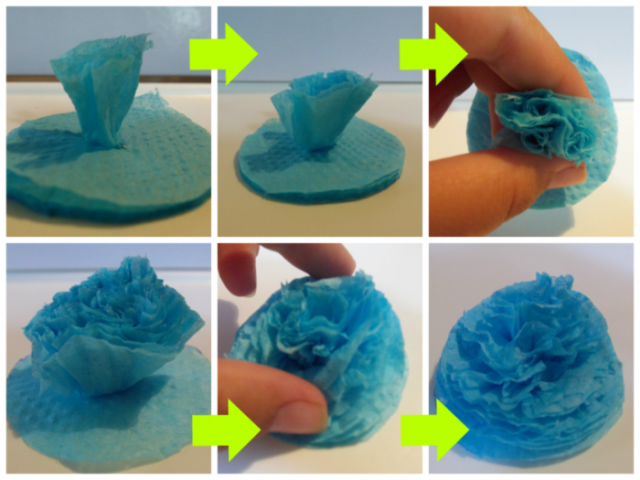
If you want to make a more lush flower, take two napkins. You can also cut a round blank into several petals without cutting to the base.
We decorate the cardboard blank of the unit with ready-made flowers. It is better to do this with a glue gun.

After gluing with napkin flowers, a beautiful lush number 1 is obtained.
Number 1 for a girl's birthday from corrugated paper
Corrugated paper roses look great. A figure decorated with such flowers will become a chic decoration for the anniversary. You can fantasize, experiment with the color and arrangement of multi-colored flowers, or simply make a one-color one.
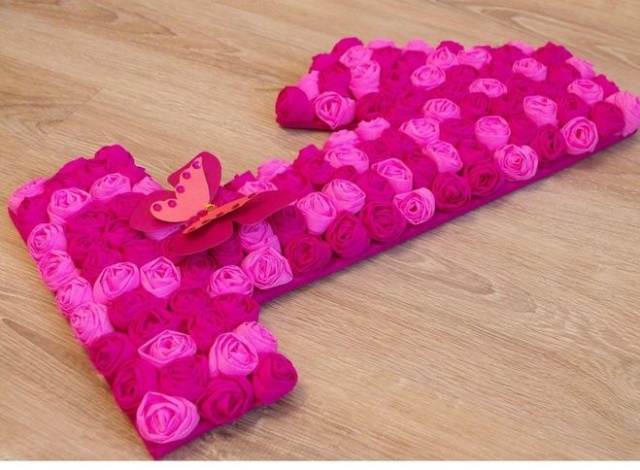
It will take quite a lot of corrugated paper, and more time to make a lot of blank flowers.

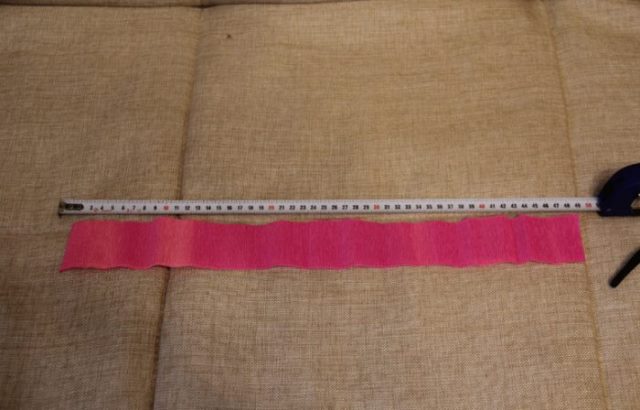
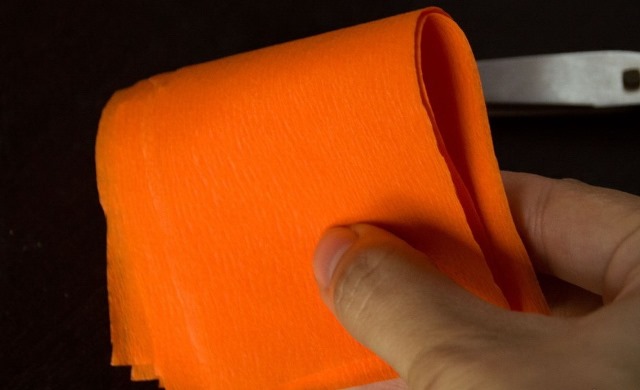
Unfold the paper and cut strips out of it. The folds on the workpiece should be located across. The width of such a blank will be 3.5 cm. But decide on the length yourself. It can be 20 or 50 cm. The longer the strip, the more magnificent the rosette will turn out.
We slightly stretch one of the sides of the strip and bend its edge. Due to the stretching of the folds, beautiful waves should be obtained.

We bend the edge and form a curl.
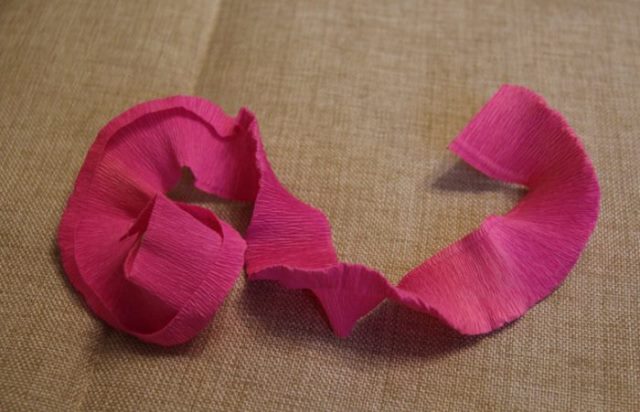
We begin to collect the flower itself, for which, holding the edge, we begin to twist a strip of paper around the base.

When the entire strip is folded, the bottom of the flower must be grabbed with an elastic band or thread.
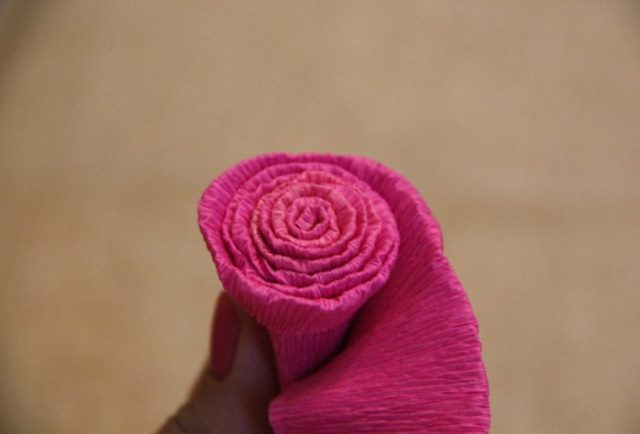
The first rose is ready. But you need to make another 50, 100, 300 flowers.

Paste the cardboard base of the figure with paper.

This will help to hide possible gaps that may occur during pasting.

We glue the finished flowers to the base with PVA glue or a hot glue gun.

The result is a beautiful decorative unit that will invariably please the birthday girl.
Other Uses for Corrugated Paper
No time or desire to mess with corrugated paper roses? Use simpler ways to decorate a unit with her help.

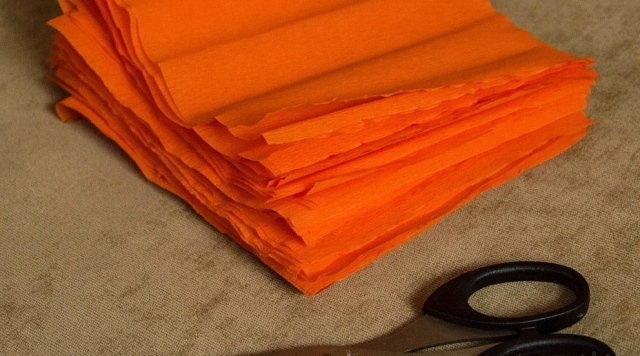
It is enough to cut multi-colored corrugated paper into squares.
To do this, we fold the blank strips several times and cut them along the resulting folds.
We will get a lot of corrugated squares.
Lubricate the cardboard base with glue. We take a pencil and wrap it with corrugated paper so that the core is in the center.
It remains to dip the bottom of the flower in glue and attach to the base, straighten the edges-petals.

Gradually paste over all the walls of the cardboard blank. Try to make the petals cover the entire surface of the number.
But there is a much easier way.

We cut long strips of corrugated paper in different colors. We make cuts along the edge of each strip to make a fringe.
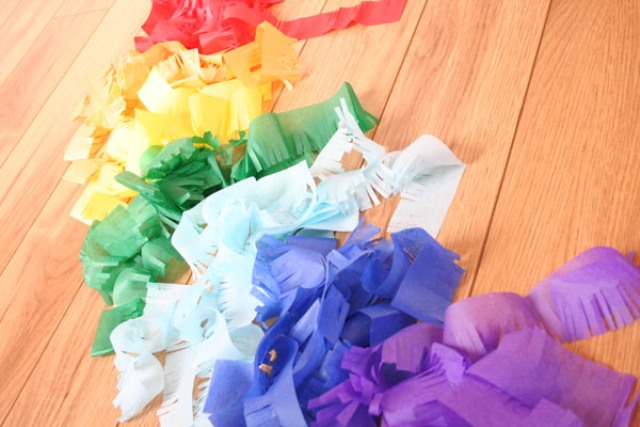
We begin to paste over the cardboard unit from below. We glue the first strip of fringe by applying glue to the whole part of the strip.

Stepping back a little, glue the next strip. Make sure that the next fringe overlaps a solid section of the previous one.

We continue to paste over the entire surface of the unit, changing the color of the stripes.
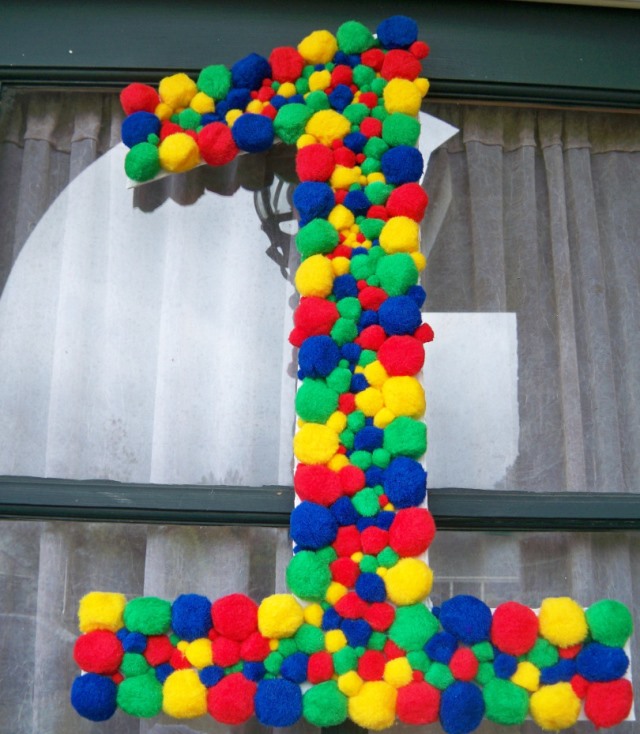
Number 1 for birthday from pom-poms
If there are a lot of multi-colored woolen threads at home, you can use them to decorate the number 1. Only this time we will not wrap a cardboard blank, but make pompoms from threads.
We will need two rings, which should be exactly the same size. They can be cut out of thick cardboard. 
Put these rings together. We gradually wrap the rings with a thread. You can take a single-color thread or threads of different colors.

When the entire ring is covered with threads, cut the threads along the outer edge of the circle. At this stage, you need to be especially careful so that the workpiece does not crumble.
We tie all the threads with an additional thread, slightly pushing the rings apart. We remove the cardboard rings and shake the resulting pompom well.

We make so many pompoms from threads so that they are enough to paste over the entire one. In this way, you can decorate both a flat and a three-dimensional figure.
Video: balloon birthday party
You can get acquainted in detail with all the stages of making the number 1 from balls in the video:
Do you want to make a pleasant surprise for your child or even with him? A figure for a birthday, made with your own hands, will be an excellent decoration for the holiday. You can make it in different ways. Joint creativity will be a great way to have fun and exciting time with your baby.
flat design
A do-it-yourself birthday figure can be made from paper or cardboard. These materials are best suited as a basis for decoration. If you do not need a voluminous product, use the simplest manufacturing method. To do this, just draw an outline of the image on the sheet and cut it out with a knife or scissors.
So that the number can be placed vertically, find a support for the structure or make a “leg” out of cardboard on the back. In addition, it is easy to hang such an ornament by making one or more holes in the workpiece, through which a cord, ribbon or ribbon will be passed.
Bulk product
In order not to think later how to strengthen the decoration on a horizontal plane, a do-it-yourself birthday figure can be made immediately with a side plane, on which it will be placed. To place on a table or on the floor products that have a rounded bottom (3, 5, 6, etc.), it is recommended to provide a horizontal platform. In addition to the functional purpose, the side plane also has decorative properties. Such a three-dimensional design will always look more spectacular, even more modestly designed than a flat one.

In addition, it is easy to add backlight here. This basis is made as follows:
- Draw two blanks of the selected number on cardboard or thick paper.
- Prepare a strip of such a width that will correspond to the thickness of the number.
- Glue the side part with adhesive tape to the base (two blanks of numbers). If the adhesive tape is not at hand, you can provide allowances on the paper strip and use PVA.
Whatever number you need, choose any way to create a design. You can decorate both a flat and a three-dimensional product in different ways. It is the decor that creates the beauty and impression of the decoration made.
What size to make a figure
The choice of dimensions for your decor will depend either on what the object is intended for, or on the amount of material available or the time to work. Large decorations are popular for creating a festive interior atmosphere. They are made both 50 cm high and meter high. This design can be placed on the floor, on the back of the sofa or hung in the space of the room. If you want to put decor on the festive table, you should make a smaller number. A good idea is a garland of numbers or a postcard of this shape. If you have time and desire to create, try different options in several dimensional gradations.
Design Ideas
The easiest way is to use the most affordable and easy-to-handle material - paper, plain or corrugated. The combination of different color shades and material processing methods, even from a simple sheet for an office printer, allows you to make an excellent decor. So, the ways to decorate the base can be as follows:
- Quilling decor.
- Complementing the volumetric form with internal illumination.
- Gluing squares or rectangles of corrugated strips.
- Use of roses twisted from spirals or strips.
- Making flowers from corrugated paper.
The choice of method depends on the amount of time and paper available. Spectacular works are obtained using corrugated multi-colored paper, as well as metallized, mother-of-pearl, embossed.
Often they use fabric, buttons, beads, sequins, beads, colored cones glued to the base. Openwork transparent airy options made of threads with a frame look spectacular. Take ready-made ideas, supplement with your own options, create spectacular decor for the holiday!
Baby options
The number "2" for a birthday with your own hands can be made from ribbons, paper, even from dough or in the form of a candle. For the smallest, it is better not to use small parts that the baby can tear off or chew off.
It is good to use corrugated paper. It is easy to cut many rectangles with cuts in the form of grass from it and glue it in layers to the base. An idea in the form of rainbow colors or a solid color option will do.
gift for little
If you create a figure for a birthday with your own hands from paper for a girl, any ideas with frills, pink flowers will do. If you have plain colored paper, glue the base with roses from it.

To make such simple and beautiful elements, just do the following:
- Cut the circle in a spiral from the edges to the center.
- Twist tightly the resulting workpiece.
- Fasten with glue.
- Glue the blank of the figure with the made flowers.
If you initially take circles of different diameters and also change the width of the spiral, you can get a variety of decor in contrast to the sizes. The middle of the roses is decorated with beads or pins are inserted. They attach roses to the base, and the heads play a decorative role. Such flowers are also made from strips of corrugated paper. It also turns out beautifully.

Another effective and quick-to-make option for a girl is to glue many layers of horizontal strips of corrugated paper. This will create the effect of frills or ruffles on a skirt or dress. If you use a gradation of color shades from light pink to red or lilac, you get a very beautiful decoration.
Do-it-yourself birthday number for a boy
For little gentlemen, of course, you should not use flowers and frills, so choose ways that allow you to get a beautiful, but strict decor. Use the appropriate color scheme (definitely without pink). You can decorate the base with many corrugated squares (this will not take much time). The second option is to make it. To do this, it is enough to connect several sheets in layers, fold them all together with an accordion, bandage them in the middle and unfold the layers. These flowers look like carnations.

Glued to the base in large quantities, they will create the effect of a terry surface. From blue or green paper is quite a suitable option for a boy. From above, you can decorate with images of cars, then the decoration will definitely not look girlish.
What to do for older kids
Children, starting from the age of three, can already be involved in the manufacture of festive paper decor. For example, the number "3" for a birthday with your own hands can be made in the simplest elements a child can twist on their own. If this proves difficult, make them yourself, and let the little helper simply glue the finished parts to the base.

In this way, both decorations of an opaque paper base (flat or voluminous) and openwork figures are made, the design of which is completely assembled from twisted rings, leaves, petals and flowers.

If you use your imagination, it will not be difficult to make stories for boys using this method, for example, to enter a typewriter, motorcycle, boat or any other attribute of a boy's life into a figure.
The number "4" with your own hands for a birthday can be made together using an even more complex technology. Glue the frame for the volumetric part out of cardboard or thick paper. Leave slots in the front side, and mount light bulbs or a regular Christmas tree garland inside. So, you will make a volumetric figure with backlight.
So, a do-it-yourself birthday figure can be made in different ways. For every holiday, you can easily make a new decoration.
Corrugated paper number will be a wonderful and original decoration if you are preparing for a holiday or want to arrange a surprise for a loved one. Volumetric bright numbers will be useful to you not only for your birthday, but for your wedding anniversary and even for the New Year. With your own hands, you can arrange the most memorable party for your friends, and all that is needed for this is multi-colored sheets of corrugated paper, which you can buy at any store with goods for creativity or stationery.
Corrugated paper number for a year
Number 1 from corrugated paper will decorate your holiday, and will also become an excellent background for family photos that will keep the memory of this day for a long time. Pieces of corrugation are suitable to decorate a cardboard blank, and the finished craft can be attached to the wall.
In this case, we will be making a flat craft, so we need thick cardboard, for example, you can take an old box from household appliances, draw a unit outline on the sheet and carefully cut it out.
It is very easy to draw a unit using a pencil and a ruler, but if in doubt, you can use a template that must be printed and glued to cardboard, and then cut out with sharp scissors.
For crafts, you can use a corrugation of one color or several, then the figure will turn out bright. Usually, a color is chosen so that it is combined with the decor of the holiday, and maybe even with the outfit of the birthday man.
In this case, to perform do-it-yourself numbers from corrugated paper we will use the trimming technique, so we need to cut the corrugation into small squares. The size of the square will depend on how "fluffy" you want to make the main decoration of the holiday. For example, we will have a square with a side of 5 cm. To begin with, it is better to cut the sheets into strips, then put them together and cut into squares.

For convenience, PVA glue must be poured into a saucer, and take a pencil to work, we will use the blunt end of the pencil. Previously, the cardboard base itself can also be pasted over with corrugated strips.
Now you can start decorating, in this case we will stick paper squares only on one side, but in the case of a three-dimensional figure, side strips should also be decorated. Facing involves gluing only the middle of each square to the base. The elements are glued close to each other, which is why the fluffy decoration is obtained.
We apply the blunt end of the pencil to the middle of the paper square, and wrap the ends around the pencil, so it will be more convenient to glue the center to the base. After that, dip the center of the leaf in glue and attach it to the base. You need to hold it for a few seconds so that the glue is fixed, after which the pencil can be carefully removed, and in the same way glue the next square, as close to the previous one as possible, so that the tips of the squares stick up.
Gradually, you need to decorate the entire surface of the cardboard template. If you want to hang the finished decoration on the wall, then you need to attach a loop on top. And to put it on the floor, you need to make a stand at the back so that the craft is stable.

Number 1 from corrugated paper
flat corrugated paper year number in the technique, the facing turns out to be fluffy, but there is another way to decorate it. Again, first we need to cut out a cardboard template. You can use several layers of cardboard so that the template is dense enough and does not bend.
In Mexico, at almost all children's holidays there is a piñata, this is a voluminous toy made from cardboard and decorated with paper stripes. Ours will be decorated in the same technique. do-it-yourself number 1 from corrugated paper.
Compared to trimming, decorating with paper stripes is faster. When we cut out the template, it must be pasted over with corrugated stripes. It is advisable to use paper of different colors to make the craft bright.

First, the corrugated sheets must be cut into strips about 5 cm wide, and then each strip should be cut perpendicularly to make a “grass”. When you decorate the template, you need to start from the bottom. Glue should be lubricated only with that part of the paper strip that is not incised with “grass”. Each next strip must be glued so that the fringe hides the glued part of the previous strip.
Thus, the entire surface of the template is pasted over, and when the glue dries, you can arrange a holiday for your baby. And if you are going to your goddaughter's first birthday, then prepare one.

Volumetric figure from corrugated paper
And if you know how to do it, then it will not be a problem for you to decorate with your own hands a unique children's holiday. Volumetric figure from corrugated paper requires preliminary preparation of the template, because we need to make a bulk blank, which, moreover, must be strong enough.
The easiest option is to make a blank using cardboard, in this case a large cardboard box from household appliances will come in handy. If you don’t have such a box at hand, contact the nearest grocery store or supermarket for help, the sellers will certainly not refuse to help you and give you one box from the warehouse. It will need to be disassembled into flat sheets: the side wide sides will go to the number templates, and the side strips can be cut out from the remaining cardboard.

To form the base, you will also need paper tape, because only on paper tape you can then glue corrugated flowers.
You need to cut out two identical blanks-numbers and wide stripes with which we will decorate the side strips of the three-dimensional figure. Paper tape will help you form a voluminous blank, they should carefully glue the seams, and for greater strength, you can glue it around with tape.
In this way, you can make any number, and use fluffy paper pom-poms or to decorate it.
In addition, the blank can be made from foam, especially if you recently bought large household appliances and you still have foam from the packaging. Such a base will turn out to be quite strong. When the base is ready, you can start the creative process, how to make a number out of crepe paper.

Corrugated paper number
Corrugated paper birthday number or napkins will turn out fluffy, bright, voluminous. Such a decoration will become the center of the whole holiday, and the room can also be decorated with voluminous pompoms, balloons. In addition to numbers, you can make decorations in the form of a large ball, which is also decorated with small corrugated flowers. As you can see, such a simple material as corrugation gives a huge scope for creativity, in particular, it will help you decorate your house for the holiday, because your child's birthday should be unforgettable. And if you are going on a holiday to a friend, prepare for her.

Numbers from flowers of corrugated paper sometimes used to decorate holidays for adults, of course, you should not remind the birthday girl of her age, but on your parents' wedding anniversary, you can arrange a real surprise for them. In this case, it will be necessary to make two numbers separately, using delicate shades of paper. You can use it to decorate the table, and individual flowers can be used to decorate gift wrapping gifts.
Small flowers will help you decorate a bulky workpiece. There are several possible options for how to make just such flowers, do not worry, even a beginner can handle this job.

The volumetric base must be densely filled with miniature flowers so that the cardboard blank is not visible through them, therefore there are two rules for decorating. Firstly, the flowers should be fluffy and voluminous, and, secondly, they should be glued close to each other. To be sure that the craft will turn out beautiful, you can first glue the cardboard blank itself with paper to match the flowers.
First of all, we will consider the simplest option, how to make a fluffy flower to decorate a cardboard blank. To do this, we need, of course, the main material - corrugation, as well as additional tools - scissors and a stapler. We will need to cut many circles of the same diameter, so you can make a template on cardboard, for example, circle a glass and cut it out.

Corrugation is easy to cut, even if it is folded in several layers, so first we will cut the sheet into strips. Their width should be 0.5-1 cm larger than the diameter of the template circle. Then each strip should be folded several times, so that as a result we get a multi-layered square. Each such paper square in the middle (the intersection of the diagonals) must be chopped off with a stapler. Next, on this square, we need to circle our workpiece-circle and cut it out along the contour, while the stapler bracket should be located in the middle of the resulting circle. When the circle is ready, it is necessary to lift layer by layer from the very top, and gently crush them towards the center. We will get a fluffy flower that can be glued to the base.

How to make a number out of crepe paper
Volumetric number 1 for a year of corrugated paper can be decorated with fluffy "chrysanthemums". To perform them, the corrugation should also be cut into strips, then folded into several layers and cut with grass, without cutting the strip to the end from one edge. The “grass” should be along the entire length of the strip, but the resulting fringe should be twisted a little with your fingers to make needle petals. It remains only to twist the strip into a tight roll and tie it several times with a thread. You will get a flower, in which one side will be fluffy, and the second - a dense roll that can be smeared with glue and glued to the surface of the workpiece.

Using a corrugated strip, in which the stripes will run perpendicular to the length, you can twist a miniature rosette. To do this, the paper must again be cut into strips, and for each strip, make one edge wavy, stretching it with your fingers. The finished strip must be twisted into a tight roll and fix the edge with threads, tying the roll several times.