This article opens a series of articles on the design and security of the RDP protocol. The first article in this series analyzes the design, usage, and underlying technologies behind this protocol.
This article opens a series of articles on the design and security of the RDP protocol. The first article in this series analyzes the design, usage, and underlying technologies behind this protocol.
The following articles will cover the following topics in detail:
- Operation of the Remote Desktop security subsystem
- Service information exchange format in RDP
- Terminal Server Vulnerabilities and Solutions
- Selection of user accounts using the RDP protocol (developments by Positive Technologies in this area)
History of RDP
The Remote Desktop protocol was created by Microsoft to provide remote access to Windows servers and workstations. RDP protocol is designed to use the resources of a high-performance terminal server for many less productive workstations. For the first time, the terminal server (version 4.0) appeared in 1998 as part of Windows NT 4.0 Terminal Server, at the time of this writing (January 2009) latest version Terminal Server is version 6.1 included with Windows 2008 Server and Windows Vista SP1 distributions. Currently, RDP is the main remote access protocol for systems of the Windows family, and client applications exist both for OC from Microsoft, and for Linux, FreeBSD, MAC OS X, etc.
Speaking about the history of the emergence of RDP, one cannot fail to mention Citrix. Citrix Systems specialized in multi-user systems and remote access technologies in the 1990s. After acquiring a source license for Windows NT 3.51 in 1995, the company released a multi-user version of Windows NT known as WinFrame. In 1997, Citrix Systems and Microsoft entered into an agreement under which the Windows NT 4.0 multi-user environment was based on Citrix technology developments. In turn, Citrix Systems refused to distribute a full-fledged operating system and received the right to develop and implement extensions for Microsoft products. These extensions were originally called MetaFrame. The rights to ICA (Independent Computing Architecture), an application protocol for the interaction of thin clients with the Citrix application server, remained with Citrix Systems, and the Microsoft RDP protocol was built on the basis of ITU T.120.
Currently, the main competition between Citrix and Microsoft has flared up in the field of application servers for small and medium businesses. Traditionally, solutions based on Terminal Services win in systems with a small number of servers of the same type and similar configurations, while Citrix Systems has firmly established itself in the market for complex and high-performance systems. Competition is fueled by the release of lightweight solutions for small systems by Citrix and the constant expansion of Terminal Services functionality by Microsoft.
Let's take a look at the benefits of these solutions.
Strengths of Terminal Services:
- Easy installation of applications for the client side of the application server
- Centralized maintenance of user sessions
- Requirement to have a license for Terminal Services only
Strengths of Citrix solutions:
- Ease of scaling
- Ease of administration and monitoring
- Access control policy
- Support for third-party enterprise products (IBM WebSphere, BEA WebLogic)
Network device using Terminal Services
Microsoft suggests two modes of using the RDP protocol:
- for administration (Remote administration mode)
- to access the application server (Terminal Server mode)
RDP in admin mode
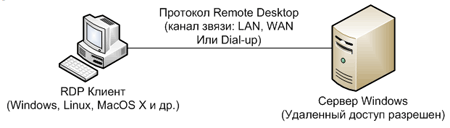
This type of connection is used by all modern Microsoft operating systems. Server versions of Windows support two simultaneous remote connections and one local logon, while client versions support only one logon (local or remote). To allow remote connections, you need to enable remote desktop access in the properties of the workstation.
RDP in terminal server access mode

This mode is only available in server versions of Windows. The number of remote connections in this case is not limited, but you need to configure the license server (License server) and its subsequent activation. The license server can be installed both on a terminal server and on a separate network node. The possibility of remote access to the terminal server is available only after installing the appropriate licenses on the License server.
When using a terminal server cluster and load balancing, installation of a specialized connection server (Session Directory Service) is required. This server indexes user sessions, which allows you to log in, as well as re-login to terminal servers operating in a distributed environment.
How RDP works
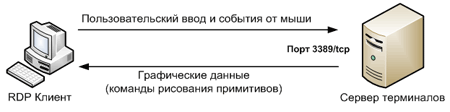
Remote Desktop is an application protocol based on TCP. After the connection is established, an RDP session is initialized at the transport layer, within which various data transfer parameters are negotiated. Upon successful completion of the initialization phase, the terminal server begins to send graphical output to the client and waits for input from the keyboard and mouse. As a graphical output, it can be an exact copy of the graphic screen, transmitted as an image, as well as commands for drawing graphic primitives (rectangle, line, ellipse, text, etc.). Transferring output using primitives is a priority for the RDP protocol, as it significantly saves traffic; and the image is transmitted only if otherwise is impossible for some reason (it was not possible to agree on the parameters for transmitting primitives when establishing an RDP session). The RDP client processes the received commands and displays images using its graphics subsystem. User input is transmitted by default using keyboard scan codes. The key press and release signal is transmitted separately using a special flag.
RDP supports multiple virtual channels within a single connection, which can be used to provide additional functionality:
- using a printer or serial port
- file system redirection
- clipboard support
- using the audio subsystem
The characteristics of virtual circuits are negotiated during the connection setup phase.
Ensuring Security When Using RDP
The RDP protocol specification provides for one of two security approaches:
- Standard RDP Security (embedded security subsystem)
- Enhanced RDP Security (external security subsystem)
Standard RDP Security
With this approach, authentication, encryption, and integrity are implemented by means embedded in the RDP protocol.
Authentication
Server authentication is done as follows:
- At system startup, a pair of RSA keys is generated.
- A Public Key Certificate (Proprietary Certificate) is generated
- The certificate is signed with an RSA key hardwired into the operating system (any RDP client contains the public key of this built-in RSA key).
- The client connects to the terminal server and receives a Proprietary Certificate
- The client verifies the certificate and receives the server's public key (this key is used later to negotiate encryption parameters)
Client authentication is performed by entering a username and password.
Encryption
The RC4 stream cipher was chosen as the encryption algorithm. Depending on the version of the operating system, various key lengths are available from 40 to 168 bits.
Maximum key length for Winodws operating systems:
- Windows 2000 Server - 56 bit
- Windows XP, Windows 2003 Server - 128 bit
- Windows Vista, Windows 2008 Server - 168 bit
When a connection is established, after length negotiation, two different keys are generated: to encrypt data from the client and from the server.
Integrity
Message integrity is achieved by using the MAC (Message Authentication Code) generation algorithm based on the MD5 and SHA1 algorithms.
Starting with Windows 2003 Server, for compliance with FIPS (Federal Information Processing Standard) 140-1, it is possible to use the 3DES algorithm for message encryption and the SHA1-only MAC generation algorithm for integrity.
Enhanced RDP Security
This approach uses external security modules:
- TLS 1.0
- CredSSP
TLS can be used starting with Windows 2003 Server, but only if the RDP client supports it. TLS support has been added since RDP client version 6.0.
When using TLS, the server certificate can be generated using Terminal Services or you can select an existing certificate from the Windows store.
The CredSSP protocol is a combination of TLS, Kerberos and NTLM functionality.
Consider the main advantages of the CredSSP protocol:
- Checking permission to log on to a remote system before establishing a full-fledged RDP connection, which allows you to save terminal server resources when in large numbers connections
- Strong Authentication and TLS Encryption
- Using Single Sign On with Kerberos or NTLM
CredSSP features can only be used in operating systems Windows Vista and Windows 2008 Server. This protocol is enabled by the Use Network Level Authentication flag in the terminal server settings (Windows 2008 Server) or remote access settings (Windows Vista).
Terminal Services Licensing Scheme
When using RDP to access applications in thin client mode, a specialized license server must be configured.
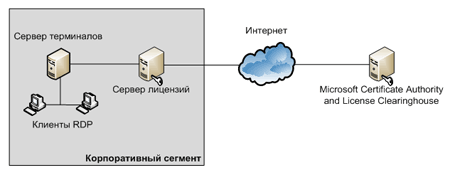
Permanent client licenses can be installed on the server only after going through the activation procedure; before it goes through, it is possible to issue temporary licenses with a limited validity period. After activation, the license server is provided with a digital certificate confirming its ownership and authenticity. Using this certificate, the license server can make subsequent transactions with the Microsoft Clearinghouse database and accept permanent client licenses for the terminal server.
Types of client licenses:
- Temporary Terminal Server CAL
- device license (Device Terminal Server CAL)
- user license (User Terminal Server CAL)
- license for external users (External Terminal Server Connector)
Temporary license
This type of license is issued to the client at the first connection to the terminal server, the license is valid for 90 days. Upon successful login, the client continues to work with a temporary license, and the next time the terminal server tries to replace the temporary license with a permanent one, if it is available in the store.
Per device license
This license is issued for each physical device that connects to the application server. The license validity period is set randomly between 52 and 89 days. 7 days before the expiration date, the terminal server tries to renew the license from the license server each time the client connects.
User license
Per user licensing provides additional flexibility by allowing users to connect from multiple devices. In the current implementation of Terminal Services, there is no means of controlling the use of user licenses, i.e. the number of available licenses on the license server does not decrease when new users connect. Using an insufficient number of licenses for client connections violates the license agreement with Microsoft. To use Device CALs and User CALs on the same terminal server at the same time, the server must be configured to operate in per user licensing mode.
License for external users
This is a special type of license designed to connect external users to a corporate terminal server. This license does not impose restrictions on the number of connections, however, according to the user agreement (EULA), the terminal server for external connections must be dedicated, which does not allow it to be used to service sessions from corporate users. Due to the high price, this type of license is not widely used.
The license server can be installed in one of two roles:
- Domain or Workgroup License server
- Enterprise License Server (Entire Enterprise License Server)
The roles differ in how they locate the license server: when using the Enterprise role, the terminal server searches for the license server in the ActiveDirectory directory, otherwise, the search is performed using a NetBIOS broadcast request. Each found server is checked for correctness using an RPC request.
Promising Technologies Terminal Services
Solutions for application servers are being actively promoted by Microsoft, the functionality is being expanded, and additional modules are being introduced. The most developed technologies that simplify the installation of applications and components responsible for the operation of the terminal server in global networks.
Terminal Services for Windows 2008 Server introduces the following features.
Remote Desktop Protocol RDP(Remote Desktop Protocol) provides remote access via a network to the desktop of computers running the Windows operating system. Used when connecting thin clients to a Windows terminal server running Microsoft Terminal Services. Developed by Microsoft.
Official support RDP included in Windows Server 2008, Windows Server 2003, Windows Home Server, Windows XP Professional, Windows XP Media Center, Tablet PC Editions, Windows Vista Ultimate, Enterprise and Business editions. All versions of Windows XP and Vista include a Remote Desktop Connection (RDC) client application.
Key features of the RDP protocol
- Support for RC-4 encryption with a key length of 128 or 56 bits
- Support for TLS (Transport Layer Security) protocols
- User authentication using smart cards (on the server via Microsoft Terminal Services)
- Local computer audio support for terminal server applications
- File System Redirection - allows you to work with local computer files on a remote terminal server
- Printer Redirection - allows you to print to a local computer printer from applications running on a remote terminal server
- Port Redirection - opens access to the serial and parallel ports of the local computer for applications running on a remote terminal server
- Sharing the clipboard both on the local computer and on a remote terminal server
- Display color depth: 24, 16, 15 or 8 bits
Despite the fact that the RDP protocol packets themselves are transmitted over the network in encrypted form, the terminal session itself can be subjected to a Man In The Middle attack, since neither the server part nor the client part mutually authenticates transmitted and received data packets. Therefore, to build fully secure solutions, you must use the RDP protection at the SSL level introduced in Windows Server 2003 Service Pack 1.
New features introduced in the sixth version of RDP
- remote applications. Direct launch of applications on the server in a dedicated terminal session without opening a terminal session window. Support for local computer file associations - the ability to run applications on the server to open a document on the local computer in accordance with the extension in the file name.
- Seamless windows. Emulation of a local computer window with the application running on a terminal server. Automatic authentication on the server with user account details. Automatic termination of the corresponding terminal session when the application terminates.
- Terminal Server Gateway. Support RDP connections through the IIS gateway server using the https protocol. Provides a secure connection to a terminal server located behind the ISS in the local area network of the enterprise.
- Windows Aero Glass. Support for Windows Aero Glass including ClearType font smoothing.
- Windows Presentation Foundation. Supported on any clients with .NET Framework 3.0 installed.
- Fully customizable terminal services including scripting support through Windows Management Instrumentation.
- Improved bandwidth management for RDP clients.
- Support for multiple monitors. Splitting the screen of a terminal session into multiple monitors. Works only with Windows Vista systems.
- Display color depth: 32, 24, 16, 15 or 8 bits
This protocol, widely used in modern computer networks, is known to any system administrator. Using it, you can connect to a remote machine running a Microsoft operating system. You will have access to the desktop, file system, and so on. Thus, it will be possible to carry out the bulk of the settings and preventive measures, without the need for physical presence behind the screen of a remote PC.
That is why the RDP protocol is one of the main components in the arsenal of technical specialists. Without leaving your workplace, you can manage all available computers on the network and troubleshoot problems that have arisen.
History of appearance
The Remote Desktop Protocol, which is how the abbreviation RDP stands for, appeared back in 1998. This proprietary application layer protocol, at that time included in the Windows NT 4.0 Terminal Server operating system, allowed the idea of remote operation of client-server applications to be realized. As you understand, it is not always possible to provide all jobs with powerful computers, and even in those early years, productivity left much to be desired.
The solution to this problem is the following construction: a powerful server (or a cluster of servers) performs the bulk of computing operations, and low-power client computers / applications connect to it using the RDP protocol and perform their tasks. Thus, on the end user nodes, it became possible to work with complex applications and programs, even with limited resources - after all, the main load fell on the server, and the client PC received only the main result of the operation on the monitor.
Description of the RDP protocol
- By default, TCP port 3389 is used for connection.
- As mentioned above, when connected, it is possible to work with files on a remote machine
- To ensure security, encryption is implemented with both 56 and 128 bit keys
- Also for security features, uses the capabilities of TLS protocols
- Shared clipboard - you can copy data from a remote machine and paste it to your local PC.
- Implemented the ability to connect local resources to a remote PC.
- RDP protocol provides access to local computer ports (serial and parallel)
Principle of operation
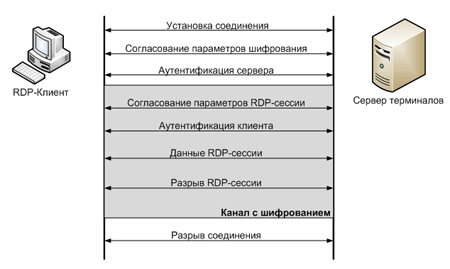
The RDP protocol is based on the features of the TCP protocol stack. First of all, a connection is established between the client and the server at the transport layer. Then the RDP session is initiated - at this stage, the main parameters are agreed upon: encryption, connected devices, graphics settings, etc.
Once everything is set up, the RDP session is ready to go. A graphic image (the result of operations) that occurs as a result of sending commands from the keyboard or mouse comes to the client PC from the server.
Authentication
If RDP security is configured, authentication occurs as follows:
- When the connection is initialized, a pair of RSA keys is generated
- Next, a special public key certificate is created.
- The operating system carries out the process of signing the RSA certificate with a key
- Next, the client connects to the server, receives a certificate from it, and if it passes the test, the remote control session is initialized
How to start
Operating systems such as Windows XP, Vista, Seven have the Remote Desktop Connection client software enabled by default. To launch it, you need to press the keyboard shortcut Win+R, dial mstsc and press Enter.
The RDP protocol is a convenient, efficient and practical tool for remote access both for administrative purposes and for everyday work.
Given that its implementations are almost everywhere (various platforms and operating systems), and there are many of them, you need to have a good understanding of its capabilities.
At the very least, this will be needed for a number of reasons:
- Often, another solution is used instead of RDP (VNC, Citrix ICA) for a simple reason - it is assumed that "the built-in RDP is minimal and does not know anything."
- In many solutions related to cloud technologies that are now fashionable (transferring offices to “thin clients”, and simply organizing terminal servers), there is an opinion that “RDP is bad because it is built-in”.
- There is a standard myth about the fact that “RDP cannot be exposed outside without VPN, they will break” (the myth has a rationale, but has not been relevant for a long time).
- Well, since we are talking about myths, there is an opinion that “Having switched from RDP to Citrix, traffic drops a couple of times”. After all, citrix is expensive, therefore at least 157% cooler.
All these myths are nonsense and a mixture of outdated "practical advice" relevant in the days of NT 4.0, as well as outright fictions that have no reason to exist. Since IT is an exact science, you need to figure it out. A well-tuned RDP protocol of new versions, taking into account all the new functionality, is a fairly good and reliable tool for organizing remote access.
Therefore, we will:
- Brief mention of RDP versions
- Configuring the RDP session security mode
- Configuring encryption for RDP
- Binding to a specific adapter and port
- Change the standard port to the desired one
- Making separate RDP settings for multiple network adapters
- The inclusion of NLA
- NLA and Windows XP
- How to enable CredSSP in XP
- Choosing the right certificate for RDP
- Blocking connections via RDP accounts with an empty password
- RDP speed optimization
- RDP compression optimization
- Setting up general RDP compression
- Setting up RDP audio stream compression
- RDP data stream ratio optimization
- Enabling Require secure RPC communication for RDP
Let's get started.
Versions of the RDP protocol
The protocol has a fairly long history dating back to NT 4.0. We will leave the historical details aside for a simple reason - on this moment it makes sense to talk only about the version of RDP 7.0, which is in Windows Vista SP1 / Windows Server 2008 and is added to Windows XP for free by installing SP3 and the updated RDP client (located at the link to KB 969084). I'm assuming you have at least Windows XP, and that you have/can install the latest Service Pack, and don't waste your time discussing the advantages of RDP in Windows 2000 SP2 over NT 4.0 SP5.
Configuring the RDP session security mode
In principle, this is the easiest part of the task. The point is the following. In different RDP versions two main session protection mechanisms are used - built-in in RDP and “wrapping” the session in TLS. The built-in is not secure enough, and the recommendation “RDP can only go outside in VPN” is about it. So always enable TLS support. This is the minimum you should start with. Restrictions will be unless the server version is not lower than Windows Server 2003 SP1 and the client RDP 5.2 and higher, but, I think, this is quite solvable at the end of 2011.
How to enable RDP over TLS
There are several options, as always. The first is enabling through group policy. To do this, you need to go to the target group policy object (well, or run gpedit.msc locally on your home workstation) and select “Computer Configuration” -> “Administrative Templates” -> “Windows Components” -> “Remote Desktop Session Host” ” -> “Security” and enable the Require use of specific security layer for remote connections parameter there, selecting SSL (TLS 1.0) only in it. You can choose a softer Negotiate, but I would not recommend it, because. at the moment it is trite below the acceptable level of security. As a person who created private clouds with enough high level security, I can say that the point of taking especially valuable data to a data center near London and going there with default RDP is zero and is a search for trouble.
It can be easier - open the Remote Desktop Session Host Configuration snap-in (you can find it in mmc or ready-made in the Administrative Tools -> Remote Desktop Connections menu), select the desired connection from the Connections list (usually it is one and is called RDP-Tcp), and open Properties, after - the General tab and select the desired Security Layer there.
For TLS to work, a digital certificate is required (at least from the server side). Usually it already exists (it is generated automatically), make sure it is available, we'll talk about how to make it good later. While it is necessary that it simply be, otherwise it will not work.
Setting up encryption for RDP
4 encryption options will be available for configuration. Let's consider each of them.
RDP Low Encryption Mode
The most “no” mode. Legacy of terrible times and versions of RDP 5.x. Can negotiate encryption based on 56-bit DES or 40-bit RC2, which is not serious at the moment. Unnecessary and dangerous. For example, if you enable it, then TLS will not be enabled, because TLS will already refuse to negotiate such weak ciphers as this option offers.
RDP Client Compatible Encryption Mode
The second "none" mode. Legacy of terrible times and versions of RDP 5.x. Will try up to 128 bits RC4, but settle for DES/RC2 right away. Unnecessary and dangerous. Also not compatible with TLS.
RDP High Encryption Mode
The minimum allowed mode. Requires at least 128 bit RC4. Works with all servers starting with Windows 2000 Server w/HEP.
FIPS140-1 Encryption RDP Mode
Exactly what is needed. It will support modern symmetric algorithms and will not explicitly support RC2, RC4, single DES, and will also force the SHA-1 algorithm to be used for integrity calculation (Message Authentication Code - MAC), and not MD5. Always enable this option, it is almost impossible to find a server that does not know how to 3DES, AES or SHA-1.
Where is this setting made? Open the Remote Desktop Session Host Configuration snap-in (you can find it in mmc or ready-made in the Administrative Tools -> Remote Desktop Connections menu), select the desired connection from the Connections list (usually it is one and is called RDP-Tcp), and open Properties, then the General tab and there select the desired Encryption Level.
We bind RDP to a specific adapter and port
In order for the server to work safely and predictably (for example, not start accepting connections from a freshly added network adapter), you must explicitly specify on which interfaces the RDP Server service should accept connections. Plus, it's often useful to switch the port on which the server listens for connections. Of course, you can do this by publishing a server with RDP through some kind of gateway, but you can do it without it. Such seemingly basic actions in reality will significantly reduce the percentage of stupid scriptkids who check well-known ports with another “powerful tool”.
How to bind the RDP service to a specific network adapter or do multiple RDP with different settings for different adapters
Open the Remote Desktop Session Host Configuration snap-in (you can find it in mmc or ready-made in the Administrative Tools -> Remote Desktop Connections menu), select the desired connection from the Connections list (usually it is one and is called RDP-Tcp), and open Properties, then the Network Interfaces tab . In it, you can select one specific interface on which to wait for a connection, plus limit the number of concurrent sessions.
If you have many interfaces, and you need, for example, to be able to connect through 2 out of 5 available ones, then you will need to bind the default RDP-Tcp to one adapter, then go to the Action menu and select Create New Connection there. A connection can listen either on all interfaces or on one, and in the case when you want it to listen on N interfaces, you will have to create N connections.
Accordingly, if you have the task “So that RDP listens on one port on one interface, and on another on the other”, it can be solved in the same way - unbind the default RDP-Tcp from all adapters and bind it to a specific one, then create a new RDP- connection and also bind to the desired network interface.
How to bind RDP service to non-default port
The default port is 3389 TCP. By the way, don't forget to allow it in the packet filter. Well, if you want another, you need to go to the registry key
HKEY_LOCAL_MACHINE\System\CurrentControlSet\Control\Terminal Server\WinStations\RDP-Tcp
and correct the PortNumber value in it. Keep in mind that tracking conflicts in terms of port occupancy is on your conscience, he himself, having discovered that the port you assigned is busy, will not be able to “jump” anywhere.
Enable NLA - Network Level Authentication
The NLA feature appeared in NT 6.0, and later added the ability to partially use it in the previous version of the OS by installing SP3 for XP.
The essence of this function is quite simple. In RDP versions before 6.0, when connecting via RDP client, you must show the login window before authentication - i.e. first show, and then he will try to enter the system. This creates a simple vulnerability - the server can be overloaded with a bunch of requests “let me try to start a new session”, and it will be forced to respond to all requests by creating a session and waiting for the user to enter. In fact, this is a DoS opportunity. How can this be dealt with? It is logical that we need to come up with a scheme, the purpose of which will be to prompt the client for credentials as early as possible. Optimal - to have something like kerberos in the domain. This is what was done. NLA solves two problems:
- The client is authenticated prior to initiating a terminal session.
- It becomes possible to transfer data from the local client SSP to the server, i.e. Single Sign-On starts working.
This is implemented through a new security provider - CredSSP. You can read its technical specification, well, to put it simply, you must always turn on this function. Of course, considering that for its work it is necessary that:
- The client OS (the one with which the connection is made) was Windows XP SP3 and higher.
- The server OS (the one to which the connection will be) was Windows Server 2008 and higher.
Note: Even though the Windows Server 2003 kernel is newer than XP (5.2 vs. 5.1), there is an update for Windows XP that adds support for NLA, but not for Windows Server 2003. That is, even if you connect from the most accessible version - Windows Server 2003 R2 SP2 with all patches, you will not be able to connect to a server that requires NLA and be a server that supports NLA. Alas.
How NLA is enabled from the RDP server side
Your best bet is to enable NLA on all servers via Group Policy. To do this, go to the target group policy object and select “Computer Configuration” -> “Administrative Templates” -> “Windows Components” -> “Remote Desktop Session Host” -> “Security” and enable the Require user authentication for option there. remote connections by using Network Layer Authentication.
It can also be enabled locally. This is done by calling the Properties submenu (the standard submenu for Computer) and selecting the Remote tab there, in which there will be a choice of three options - deny RDP connections to this host, allow connections via any RDP, allow only with NLA. Always enable the NLA option, this primarily protects the server.
NLA and Windows XP
If you have Windows XP, you can also use this feature. The common statement “NLA needs at least Vista, that's what Microsoft did to upgrade” is false. Service Pack 3 adds an implementation of CredSSP that allows you to delegate client credentials held by a local SSP to a server. That is, to put it simply, it is specially made so that with Windows XP you can connect to systems with NT 6.0+. It will not be possible to connect to Windows XP SP3 itself with this function, NLA support will be partial (therefore, an RDP server with support for connecting clients using NLA from Windows XP cannot be made using standard methods, Windows XP will only be an NLA-compatible client).
Note: NLA has been around since NT 6.0, and is part of a suite of technologies called RDP 6.0. The 3rd service pack for XP brings not just RDP 6.0, but the ability to RDP settings 7.0, which is quite positive (for example, RDP 7.0, unlike 6.0, has EasyPrint, bidirectional audio and some other things that turn the RDP client on Windows XP with all the cheats into a fairly practical system). This is a word about bad Microsoft, which so terribly forced everyone to upgrade from Windows XP to bad, very bad Vista, that even in the free service pack for the 2001 product, it sewed in a newer RDP subsystem than the one that came with Vista, released in 2006.
You need to enable this functionality explicitly, because despite the fact that Service Pack 3 adds a new cryptographic provider dll, it does not include it.
How to enable CredSSP in XP
Once again, this operation is carried out strictly after installing Service Pack 3 on Windows XP and, in the context of our conversation, is needed in order to be able to connect to other servers via RDP 6.1 using NLA.
The first step is to expand the list of Security Packages.
To do this, we will open the registry key
HKEY_LOCAL_MACHINE\SYSTEM\CurrentControlSet\Control\Lsa
and find the Security Packages value in it. Press the right button and select “Modify” (not Modify Binary Data, but just Modify). There will be a list like “package name on each line”. We need to add tspkg there. The rest must be left. The place of addition is not critical.
The second step is to hook up the library.
The key will be different:
HKEY_LOCAL_MACHINE\SYSTEM\CurrentControlSet\Control\SecurityProviders
You will need to find the SecurityProviders value in it (note, as in the previous case, this is not a subkey, but a value), and modify it by analogy, only adding credssp.dll . The rest of the list, again, does not need to be touched.
The Registry Editor can now be closed. After these operations, the system will need to be rebooted, because. crypto-providers are a thing that will definitely not be picked up on the go, and this is more good than bad.
Choosing the right certificate for RDP
If you have the option of using a non-default certificate for RDP, then it's best to use that one. This will not affect the security of the session per se, but it will affect the security and convenience of the connection. The certificate that is optimally used should have the following points:
- A name (in subject or SAN) that matches character-by-character the name entered by the client connecting to the server.
- A normal CDP extension that points to a working CRL (preferably at least two - OCSP and static).
- The desired key size is 2048 bits. More is possible, but be aware of the limitations of CAPI2 in XP/2003.
- Don't experiment with signing/hashing algorithms if you need connections from the XP/2003 side. In short - select SHA-1, this is enough.
I will dwell a little more on the issue of a special certificate for the RDP server.
Special certificate template for RDP servers
It would be ideal if the certificate for RDP is not based on the usual template (such as Web Server) and has in the Application Policy field (which in the certificate will be more commonly called Enchanced Key Usage - EKU) the standard Client Authentication and Server Authentication values, but add your own template , which will contain the only, special, application value not added by standard methods - Remote Desktop Authentication . This Application Policy value will have to be created manually, its OID will be 1.3.6.1.4.1.311.54.1.2 , and after that, you can already make a new certificate template, on the basis of which you can issue a certificate specifically “sharpened” for RDP Server.
To fully automate this operation, give the new template a predictable name - for example, "RDPServerCert" - and go to the group policy object, and there open Computer Configuration -> Policies -> Administrative Templates -> Windows Components -> Remote Desktop Services -> Remote Desktop Session Host -> Security. Select the Server Authentication Certificate Template option and enable it, and in the value field enter the name - we made RDPServerCert. Now all domain hosts that fall under this policy will, if RDP is enabled on them, go to the Certification Authority themselves, request a certificate based on the specified template if they do not have one, and automatically make it default to protect RDP connections. Simple, convenient, efficient.
Blocking connections via RDP accounts with an empty password
A trifle, but it is not necessary to forget about it.
To block the connection of accounts without passwords to RDP, go to the group policy object setting: Computer Configuration -> Windows Settings -> Security Settings -> Local Policies -> Security Options and set “Accounts: Limit local account use of blank passwords to console logon only ” to Enabled. Feel free to check that this is the case.
Configuring an ACL for RDP Connection
By default, you must have explicit User Access or Guest Access permission to connect to an RDP server.
The local groups Administrators and Remote Desktop Users have this permission. It is best to use the Remote Desktop Users group to control access to the RDP server, adding the necessary domain groups to it, rather than individual users. Modify the contents of the Security tab in the RDP-Tcp Properties settings only as a last resort, best of all by adding the “RDP Blocked hostname” group, which is explicitly denied RDP access to the specified host.
RDP speed optimization
Optimizing RDP speed is a fairly broad topic, so I'll break it down into sections. In this one there will be those methods that will reduce the load on the protocol before compression and before optimizing the network layer.
Chroma (bit depth)
In RDP 7.0 and above, 32, 16 and 8 bit options are available. If we are talking about work, then 16 bits will be enough for it. This will significantly reduce the load on the channel, and sometimes more than 2 times, which is surprising, but true. 8 bit, of course, is also possible, but it will look painfully scary. 16 bits are quite acceptable.
Note: In Windows Server 2008 R2, 8-bit connections are no longer available.
Enable the Limit Maximum Color Depth parameter on the server, or do the same in the RDP client settings.
Disable ClearType
When you have ClearType turned off, the RDP protocol does not transmit a picture, but commands for drawing characters. When enabled, it renders an image from the server side, compresses it, and sends it to the client. This is guaranteed to be many times less efficient, so disabling ClearType will significantly speed up the workflow and reduce response time. You'll be surprised how much.
This can be done both at the client settings level and on the server side (the Do not allow font smoothing option in the Remote Session Environment section in Computer Configuration -> Policies -> Administrative Templates -> Windows Components -> Remote Desktop Services -> Remote Desktop Session host).
Remove wallpaper
The Enforce removal of RD Wallpaper setting under Remote Session Environment in Computer Configuration -> Policies -> Administrative Templates -> Windows Components -> Remote Desktop Services -> Remote Desktop Session Host will drastically improve the terminal session screen redraw situation. Users without cats on the desktop survive normally, verified.
Enable and configure image caching
If the client has enough RAM, then it makes sense to enable and configure bitmap caching. This will allow you to win up to 20-50% of the bandwidth. To install, you will need to enter the key
HKEY_CURRENT_USER\SOFTWARE\Microsoft\Terminal Server Client\
and create the BitmapPersistCacheSize and BitmapCacheSize parameters there, both DWORD 32 types.
The BitmapPersistCacheSize parameter specifies the size, in kilobytes, of the disk cache. The default value is 10. It makes sense to increase this parameter to at least 1000.
The BitmapCacheSize parameter indicates the size in kilobytes of the cache in RAM. The default value is 1500. It makes sense to increase this parameter to at least 5000. This will be only 5 megabytes per client session, with modern RAM scales this is not significant, and even if it leads to a 10% performance gain, it will already pay for itself. By the way, the same parameter can be corrected in the .rdp file as well; if you save your RDP connection, and then open the file with notepad, then among the parameters you can add something like bitmapcachesize:i:5000 , where 5000 is 5MB of cache.
Disable Desktop Composition
Desktop Composition brings all sorts of "pretty things" like Aero and its friends and noticeably eats bandwidth. For work it is not necessary and harmful. The Allow desktop composition for RDP Sessions option in the Remote Session Enviroment section in Computer Configuration -> Policies -> Administrative Templates -> Windows Components -> Remote Desktop Services -> Remote Desktop Session Host must be set to Disabled.
Optimizing Desktop Window Manager Settings
The settings found in the Remote Session Environment section of Computer Configuration -> Policies -> Administrative Templates -> Windows Components -> Desktop Window Manager will control the "beautiful" display of slide-out menus and the like. There are three of them - Do not allow window animations , Do not allow desktop compositions and Do not allow Flip3D invocation . All of them must be switched to the Enabled mode, i.e. Essentially, disable all of these features.
Disable redirect of unused devices
If you do not plan to connect certain classes of devices (for example, COM and LPT ports), or audio, it makes sense to disable the ability to redirect them from the server side. So that clients with default RDP Client settings do not waste connection time negotiating unused functionality. This is done in the same place as the rest of the server settings, in the Properties of RDP-Tcp, the Client Settings tab (in the same place where we made the settings with color depth), the Redirection section.
Setting up the general logic for optimizing RDP visual data
An option called Optimize visual experience for RDP sessions , found under Remote Session Enviroment in Computer Configuration -> Policies -> Administrative Templates -> Windows Components -> Remote Desktop Services -> Remote Desktop Session Host -> Remote Session Enviroment , will control the how RDP will perceive visual data - as multimedia or as text. This, roughly speaking, is a “hint” to the compression algorithm on how to behave more competently. Accordingly, to work, you will need to set this parameter to Text , and if you want a lot of beautiful flash banners, HTML5 and watch video clips - better option Rich Multimedia.
RDP Compression Optimization
Compression in RDP has come a long way. According to RDP 5.2 inclusive, there was a compression subsystem (“compressor”), which has the internal name “Version 1” - the simplest and easiest option in terms of client processor load, but the worst in terms of network traffic load. RDP 6.0 made "Version 2" which was slightly improved in terms of compression efficiency. We are interested in “Version 3”, which only works when connected to Windows Server 2008 and older servers. It compresses best of all, and the cost of processor time, taking into account the power of modern computers, is insignificant.
The gain when turning on V3 can, judging by the tests, reach 60% and, in general, even without tests, it is noticeably noticeable to the eye.
How to enable optimal compression in RDP
This is a client setting. Open Computer Configuration -> Policies -> Administrative Templates -> Windows Components -> Remote Desktop Services -> Remote Desktop Session Host -> Remote Session Enviroment in the required GPO, select the Set compression algorithm for RDP data option there, enable it and select Optimize to use less network bandwidth .
Note: Many people wonder why there is a “disable compression” option in the list. This is necessary when your RDP sessions are compressed by an external device that optimizes WAN connections, something like Cisco WAAS. In other cases, of course, there is no point in disabling compression.
Audio stream compression setting
RDP 7.0 brings a great ability to control the quality of the compression of the incoming audio stream (i.e. the audio that goes from the server to the client). This is quite useful - for example, if you are working on a terminal server, then apart from any service sounds like “message came to ICQ”, others are not particularly planned. It makes no sense to stream uncompressed CD-quality audio from the server if it is not necessary for work. Accordingly, you need to adjust the compression level of the audio stream.
This setting will be called Limit audio playback quality and located in the Device and Resource Redirection section in Computer Configuration -> Policies -> Administrative Templates -> Windows Components -> Remote Desktop Services -> Remote Desktop Session Host . There will be three options:
- High - the sound will go without compression. Generally. That is, it will fall under the general compression of the RDP protocol, but specific audio compression (with loss of quality) will not be performed.
- Medium - compression will adapt to the channel so as not to increase the delay in data transmission.
- Dynamic - compression will dynamically adapt to the channel so that the delay does not exceed 150ms.
Choose the right one. As you know, for office work it is better to choose Dynamic.
Optimizing the ratio of data streams in RDP
RDP session traffic is not something monolithic. On the contrary, it is quite clearly divided into redirected device data streams (for example, copying a file from localhost to a terminal server), an audio stream, a rendering primitive command stream (RDP tries to transmit rendering primitive commands, and transmits bitmaps as a last resort), and device streams. input (mouse and keyboard).
The mutual ratio of these flows and the logic of its (ratio) calculation (a sort of local QoS) can be influenced. To do this, you need to enter the registry key from the server side
HKEY_LOCAL_MACHINE\SYSTEM\CurrentControlSet\Services\TermDD
and create there to start (if they are not there) four keys:
- FlowControlDisable
- FlowControlDisplayBandwidth
- FlowControlChannelBandwidth
- FlowControlChargePostCompression
The type for all is DWORD 32. The functionality of the keys will be as follows.
The FlowControlDisable key will determine if prioritization is used at all. If set to one, then prioritization will be disabled; if zero, it will be enabled. Turn it on.
The FlowControlDisplayBandwidth and FlowControlChannelBandwidth keys will determine the relationship between the two data streams:
- User interaction flow (image+input devices)
- Other data (block devices, clipboard and everything else)
The values of these keys themselves are not critical; what matters is how they compare. That is, if you make FlowControlDisplayBandwidth equal to one and FlowControlChannelBandwidth equal to four, then the ratio will be 1:4, and 20% of the bandwidth will be allocated to the flow of interaction with the user, and 80% to the rest. If you make 15 and 60, the result will be identical, since the ratio is the same.
The FlowControlChargePostCompression key will determine when this ratio is considered - before or after compression. Zero is before compression, one is after.
I recommend using the form “our remote server is far away and everyone connects to it via RDP both in the office and 1C” to set the ratio to 1:1 and read it after compression. From experience, this can really help in the situation of “printing a large document from a terminal server to a local printer”. But this is not a dogma - try it, the main tool - knowledge of how it is considered and works - you already have.
Enable Require secure RPC communication for RDP
This setting works similarly to the settings for Secure RPC, which are in the Security section of Group Policy and affect the entire system, only it is easier to configure. By enabling this option, you will make it mandatory for all client RPC requests to encrypt (depending on the system settings, the “lower bar” of encryption will be different - RC4 / DES or, if FIPS-140 is enabled - 3DES / AES) and use at least NTLMv2 for authentication remote procedure call. Always enable this option. There is a myth about the fact that it does not work in an out-of-domain environment. This is not the case, and strengthening the protection of the RPC does not hurt anyone.
This is a server setting. Open Computer Configuration -> Policies -> Administrative Templates -> Windows Components -> Remote Desktop Services -> Remote Desktop Session Host -> Security in the required GPO, select the Require secure RPC communication option there and enable it.